
1. Ifihan
This manual provides instructions for the installation, operation, and maintenance of your StarTech.com SLIMDVDRW8U2 External Slim USB 2.0 DVD+/-RW Dual Layer Drive. This device allows you to read and write data to DVD and CD media using a standard USB 2.0 connection, offering portability and convenience for laptops and desktop PCs without an internal optical drive.
2. Package Awọn akoonu
Jẹrisi pe package rẹ ni awọn nkan wọnyi ninu:
- 1x StarTech.com SLIMDVDRW8U2 External Slim USB 2.0 DVD+/-RW Drive
- 1x USB 2.0 A to B Cable
- 1x Ilana itọnisọna
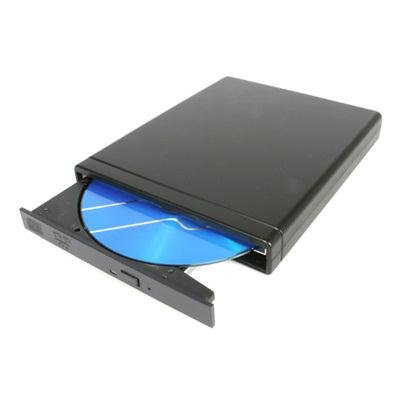
Image: The StarTech.com SLIMDVDRW8U2 external slim DVD+/-RW drive, shown with its sleek black casing and USB port.
3. System Awọn ibeere
Before installing the drive, ensure your system meets the following requirements:
- Available USB 2.0 port (or higher, compatible with USB 2.0)
- Operating System: Windows XP/Vista/7/8/10/11, macOS, or Linux (with USB mass storage device support)
- For DVD/CD burning, compatible burning software may be required (not included).
4. Eto
Follow these steps to connect and prepare your external DVD drive for use:
- So okun USB pọ: Plug the USB Type-B connector of the provided USB cable into the corresponding port on the external DVD drive.
- Sopọ si Kọmputa: Plug the USB Type-A connector of the cable into an available USB 2.0 port on your computer (laptop or desktop PC).
- Fifi sori Awakọ: The drive is plug-and-play. Your operating system should automatically detect and install the necessary drivers. This process may take a few moments.
- Ìmúdájú: Once drivers are installed, the drive will appear as an optical drive in "My Computer" (Windows) or "Finder" (macOS).
5. Awọn ilana Iṣiṣẹ
This section details how to use your external DVD drive for reading and writing optical media.
5.1. Fi sii Disiki kan
- Ensure the drive is connected to your computer and powered on (indicated by an LED, if present).
- Press the eject button on the front of the drive. The disc tray will open.
- Carefully place a CD or DVD onto the tray, ensuring it is centered with the label side facing up.
- Gently push the tray back into the drive until it clicks shut. The drive will begin to read the disc.
5.2. Lílo Díìsìkì
- Software Eject (Recommended): Right-click on the optical drive icon in "My Computer" (Windows) or drag the disc icon to the Trash (macOS) and select "Eject".
- Kọ Hardware: Press the eject button on the front of the drive. If the disc is in use, the tray may not open. Ensure no applications are accessing the disc before using the hardware eject button.
5.3. Reading Data from a Disc
Once a disc is inserted and recognized by your operating system, you can access its contents. Double-click the drive icon to browse files, or use media player software to play audio CDs or video DVDs.
5.4. Writing Data to a Disc (Burning)
To write data to a blank CD-R/RW or DVD-R/RW disc, you will need compatible burning software. Many operating systems include basic burning capabilities, or you can use third-party software. Follow the instructions provided with your chosen burning software.
- Insert a blank, recordable disc (CD-R/RW, DVD-R/RW, DVD+R/RW, DVD+R DL).
- Open your burning software and select the type of project (data disc, audio CD, video DVD, etc.).
- Fi awọn files or media you wish to burn to the disc.
- Initiate the burning process. Do not disconnect the drive or interrupt the process until completion.
6. Itọju
Proper care ensures the longevity and optimal performance of your drive.
- Ninu Ode: Use a soft, dry, lint-free cloth to wipe the exterior of the drive. Avoid abrasive cleaners or solvents.
- Fifọ lẹnsi naa: Do not attempt to clean the internal optical lens manually. Use a specialized CD/DVD lens cleaning disc if necessary.
- Disiki mimu: Always handle discs by their edges. Avoid touching the data surface. Store discs in protective cases when not in use.
- Ibi ipamọ: Tọju awakọ naa ni itura, aye gbigbẹ kuro lati orun taara ati awọn iwọn otutu to gaju.
- Yago fun eruku: Keep the drive in a clean environment to prevent dust accumulation, which can affect performance.
7. Laasigbotitusita
If you encounter issues with your external DVD drive, refer to the following common problems and solutions:
7.1. Drive Not Recognized by Computer
- Ṣayẹwo Awọn isopọ: Rii daju pe okun USB ti sopọ ni aabo si kọnputa mejeeji ati ibudo USB ti kọnputa rẹ.
- Gbiyanju Ibudo USB miiran: So drive pọ mọ ibudo USB ti o yatọ lori kọnputa rẹ.
- Tun Kọmputa bẹrẹ: Nigba miiran tun bẹrẹ irọrun le yanju awọn ọran wiwa.
- Ṣayẹwo Oluṣakoso ẹrọ (Windows): Open Device Manager and look for "DVD/CD-ROM drives." If there's an exclamation mark, try updating or reinstalling the driver.
- Check System Information (macOS): Go to Apple Menu > About This Mac > System Report > USB. Check if the drive is listed.
7.2. Disc Read Errors or Slow Performance
- Clean Disc: Inspect the disc for scratches, smudges, or dirt. Gently clean it with a soft, lint-free cloth from the center outwards.
- Try Another Disc: Test with a different, known-good disc to determine if the issue is with the drive or the disc itself.
- Fifọ lẹnsi: Use a specialized CD/DVD lens cleaning disc.
- Resource Usage: Close other demanding applications that might be consuming system resources.
7.3. Disc Tray Does Not Open/Close
- Ṣayẹwo agbara: Ensure the drive is properly connected and receiving power.
- Sọfitiwia Kọ: Attempt to eject the disc through your operating system's software interface first.
- Kọ jade pẹlu ọwọ: If the tray is stuck, locate the small emergency eject hole (often near the eject button). Insert a straightened paperclip into the hole and push gently to manually open the tray.
8. Awọn pato
| Ẹya ara ẹrọ | Sipesifikesonu |
|---|---|
| Nọmba awoṣe | SLIMDVDRW8U2 |
| Ni wiwo Hardware | USB 2.0 |
| Ibi ipamọ Optical Kọ Iyara | 8x (DVD), 24x (CD) |
| Opitika Ibi Ka iyara | 8x (DVD), 24x (CD) |
| Hardware Platform | Kọǹpútà alágbèéká, PC |
| Awọn ẹrọ ibaramu | Most personal computers and laptops with a USB 2.0 port |
| Asopọmọra Technology | USB |
| Fọọmù ifosiwewe | Slim External |
| Iwọn Nkan | 1.92 Poun (iwọn 0.87 kg) |
| Orisun agbara | Agbara USB |
9. Atilẹyin ọja ati imọ Support
StarTech.com provides a comprehensive warranty for its products. For specific warranty details, please refer to the warranty information included with your product or visit the official StarTech.com webojula.
For technical support, troubleshooting assistance, or to download the latest drivers and manuals, please visit the StarTech.com support webojú òpó wẹ́ẹ̀bù tàbí kí o kàn sí ẹ̀ka iṣẹ́ oníbàárà wọn. Àwọn ìwífún ìbáṣepọ̀ lè wà lórí àpótí ọjà tàbí lórí àwọn òṣìṣẹ́ ìjọba. webojula.
Webojula: www.startech.com/support