Ọrọ Iṣaaju
O ṣeun fun riraasing the Muse M-12 CR Radio Alarm Clock. This compact and versatile device combines an FM radio with a dual alarm clock, offering convenience and functionality for your daily routine. Featuring a clear red LED display and intuitive controls, the M-12 CR is designed for ease of use. Please read this manual carefully to ensure proper operation and to fully utilize all features of your new alarm clock.
Package Awọn akoonu
Jọwọ ṣayẹwo pe gbogbo awọn nkan wa ati ni ipo to dara:
- Muse M-12 CR Radio Alarm Clock Unit
- Adapter agbara
- Afowoyi Olumulo (iwe-ipamọ yii)
Ọja Pariview ati Awọn iṣakoso
Familiarize yourself with the various parts and controls of your Muse M-12 CR Radio Alarm Clock.

Nọmba 1: Iwaju ati oke view of the Muse M-12 CR Radio Alarm Clock, highlighting the red LED display and the arrangement of control buttons.
Àwọn bọ́tìnì ìṣàkóso (Pánẹ́lì òkè):
- SNOOZE / DIMMER Button: Press to temporarily silence the alarm (snooze function). Press and hold to adjust display brightness.
- ALARM 1 Button: Press to activate/deactivate Alarm 1. Press and hold to set Alarm 1 time.
- ALARM 2 Button: Press to activate/deactivate Alarm 2. Press and hold to set Alarm 2 time.
- Bọ́tìnì ṢE ÀKÓKÒ: Press and hold to set the current time.
- Bọ́tìnì HR (Wákàtí): Used to adjust the hour during time or alarm setting.
- Bọ́tìnì ÌṢẸ́JÚ (Ìṣẹ́jú): Used to adjust the minute during time or alarm setting.
- VOL- / PREV Button: Decreases volume. In radio mode, short press for previous preset station, long press for backward auto-scan.
- VOL+ / NEXT Button: Increases volume. In radio mode, short press for next preset station, long press for forward auto-scan.
- FM / MEM Button: Press to switch to FM radio mode. Press and hold to automatically scan and store FM stations.
- Bọtini Orun: Activates the sleep timer function.
- NAP Button: Activates the nap timer function.
Ṣeto
1. Asopọ agbara
- Unpack the Muse M-12 CR unit and the power adapter.
- Insert the DC plug of the power adapter into the DC IN jack located at the back of the unit.
- Plug the power adapter into a standard AC wall outlet (100-240V, 50/60Hz). The display will light up, and the clock will be ready for time setting.
2. Battery Backup (Optional)
Lati ṣetọju akoko ati awọn eto itaniji lakoko agbara outage, you can install backup batteries (not supplied). The unit typically uses AAA batteries. Refer to the battery compartment on the bottom of the unit for correct battery type and polarity.
Awọn ilana Iṣiṣẹ
Ṣiṣeto Akoko naa
- Tẹ mọlẹ Akoko SET bọtini titi awọn nọmba wakati yoo bẹrẹ si tan imọlẹ.
- Tẹ awọn HR bọ́tìnì leralera láti ṣàtúnṣe wákàtí náà.
- Tẹ awọn MIN bọ́tìnì leralera láti ṣàtúnṣe ìṣẹ́jú náà.
- Tẹ awọn Akoko SET bọtini lẹẹkansi lati jẹrisi ati jade ipo eto akoko.
Ṣíṣeto Awọn Itaniji (Alarm 1 ati Alarm 2)
The M-12 CR features two independent alarms.
- Tẹ mọlẹ OOGUN 1 or OOGUN 2 bọ́tìnì títí tí àwọn nọ́mbà wákàtí ìkìlọ̀ yóò fi tàn.
- Tẹ awọn HR bọtini lati ṣeto aago itaniji ti o fẹ.
- Tẹ awọn MIN bọtini lati ṣeto iṣẹju itaniji ti o fẹ.
- Tẹ awọn OOGUN 1 or OOGUN 2 button again to select the alarm source (Radio or Buzzer). The corresponding indicator will light up.
- Tẹ awọn OOGUN 1 or OOGUN 2 button one more time to confirm and activate the alarm. The alarm indicator (1 or 2) will appear on the display.
Lati mu itaniji ṣiṣẹ, tẹ ohun ti o baamu OOGUN 1 or OOGUN 2 button until its indicator disappears from the display.
Iṣẹ́ Rédíò (FM)
- Tẹ awọn FM / MEM button to switch to FM radio mode. The frequency will be displayed.
- Automatic Scan and Store: Tẹ mọlẹ FM / MEM button to automatically scan for and store available FM stations (up to 20 presets).
- Itọsọna Afowoyi: Lo awọn VOL- / PREV ati VOL+ / NEXT buttons to manually tune to a specific frequency. Long press for auto-scan to the next strong station.
- Yiyan awọn tito tẹlẹ: Kukuru tẹ awọn VOL- / PREV or VOL+ / NEXT buttons to cycle through stored preset stations.
- Iṣatunṣe Iwọn didun: Lo awọn VOL- / PREV ati VOL+ / NEXT buttons (when not in tuning mode) to adjust the radio volume.
Išẹ lẹẹkọọkan
Nigbati itaniji ba dun, tẹ bọtini naa SOOZE / DIMMER button to temporarily silence the alarm. The alarm will sound again after a few minutes (default snooze time is usually 9 minutes, refer to specific product behavior if different).
Iṣẹ Aago Orun
Aago oorun naa fun ọ laaye lati sun oorun si redio, eyi ti yoo pa laifọwọyi lẹhin akoko ti a ti ṣeto.
- Nigba ti redio ba ndun, tẹ awọn ORUN button repeatedly to cycle through available sleep timer durations (e.g., 120, 90, 60, 30, 15, 10, 5 minutes, or OFF).
- Redio naa yoo pa laifọwọyi lẹhin akoko ti a yan.
Iṣẹ Aago Nap
The nap timer sets an alarm to sound after a short, predefined period.
- Tẹ awọn NAP button repeatedly to select a nap duration (e.g., 120, 90, 60, 30, 15, 10, 5 minutes, or OFF).
- The alarm will sound after the selected nap time has elapsed.
Ifihan Dimmer
Lati ṣatunṣe imọlẹ ti ifihan LED:
- Tẹ awọn SOOZE / DIMMER button (when the alarm is not sounding) to cycle through different brightness levels (e.g., High, Medium, Low, Off).
Itoju
- Ninu: Use a soft, dry cloth to clean the exterior of the unit. Do not use abrasive cleaners, waxes, or solvents as they may damage the finish.
- Ibi: Place the unit on a stable, flat surface away from direct sunlight, heat sources, and excessive dust or moisture.
- Afẹfẹ: Rii daju pe fentilesonu to peye ni ayika ẹyọ lati ṣe idiwọ igbona. Ma ṣe dina awọn ṣiṣi atẹgun.
- Ge asopọ agbara: If the unit is not going to be used for a long period, unplug the power adapter from the wall outlet.
Laasigbotitusita
| Isoro | Owun to le Fa | Ojutu |
|---|---|---|
| Ko si agbara / Ifihan pipa | Power adapter not connected or faulty. Power outlet not active. | Ensure the power adapter is securely plugged into the unit and a working wall outlet. Try a different outlet. |
| Itaniji ko dun | Alarm not activated. Alarm volume too low (for radio alarm). Incorrect alarm time set. | Ensure the alarm indicator (1 or 2) is visible on the display. Increase radio volume if using radio alarm. Verify alarm time is correctly set. |
| Gbigba redio ti ko dara | Antenna not extended or positioned correctly. Interference from other electronic devices. Weak signal in the area. | Fully extend and adjust the FM wire antenna for best reception. Move the unit away from other electronics. Try auto-scanning for stronger stations. |
| Awọn bọtini ko dahun | Iṣiṣe eto igba diẹ. | Unplug the unit from power for a few minutes, then plug it back in to reset. |
Awọn pato
| Awoṣe | M-12 CR |
| Ifihan Iru | LED (pupa) |
| Iwọn Ifihan | 1.5 cm (inch 0.6) |
| Igbohunsafẹfẹ Redio | FM (with 20 preset stations) |
| Awọn iṣẹ itaniji | Dual Alarm (Radio or Buzzer), Snooze, Sleep, Timer (Nap) |
| Orisun agbara | Wired (AC Power Adapter) |
| Awọn iwọn (L x W x H) | 12.9 x 5.3 x 6.5 cm (isunmọ.) |
| Iwọn | 290 g (isunmọ) |
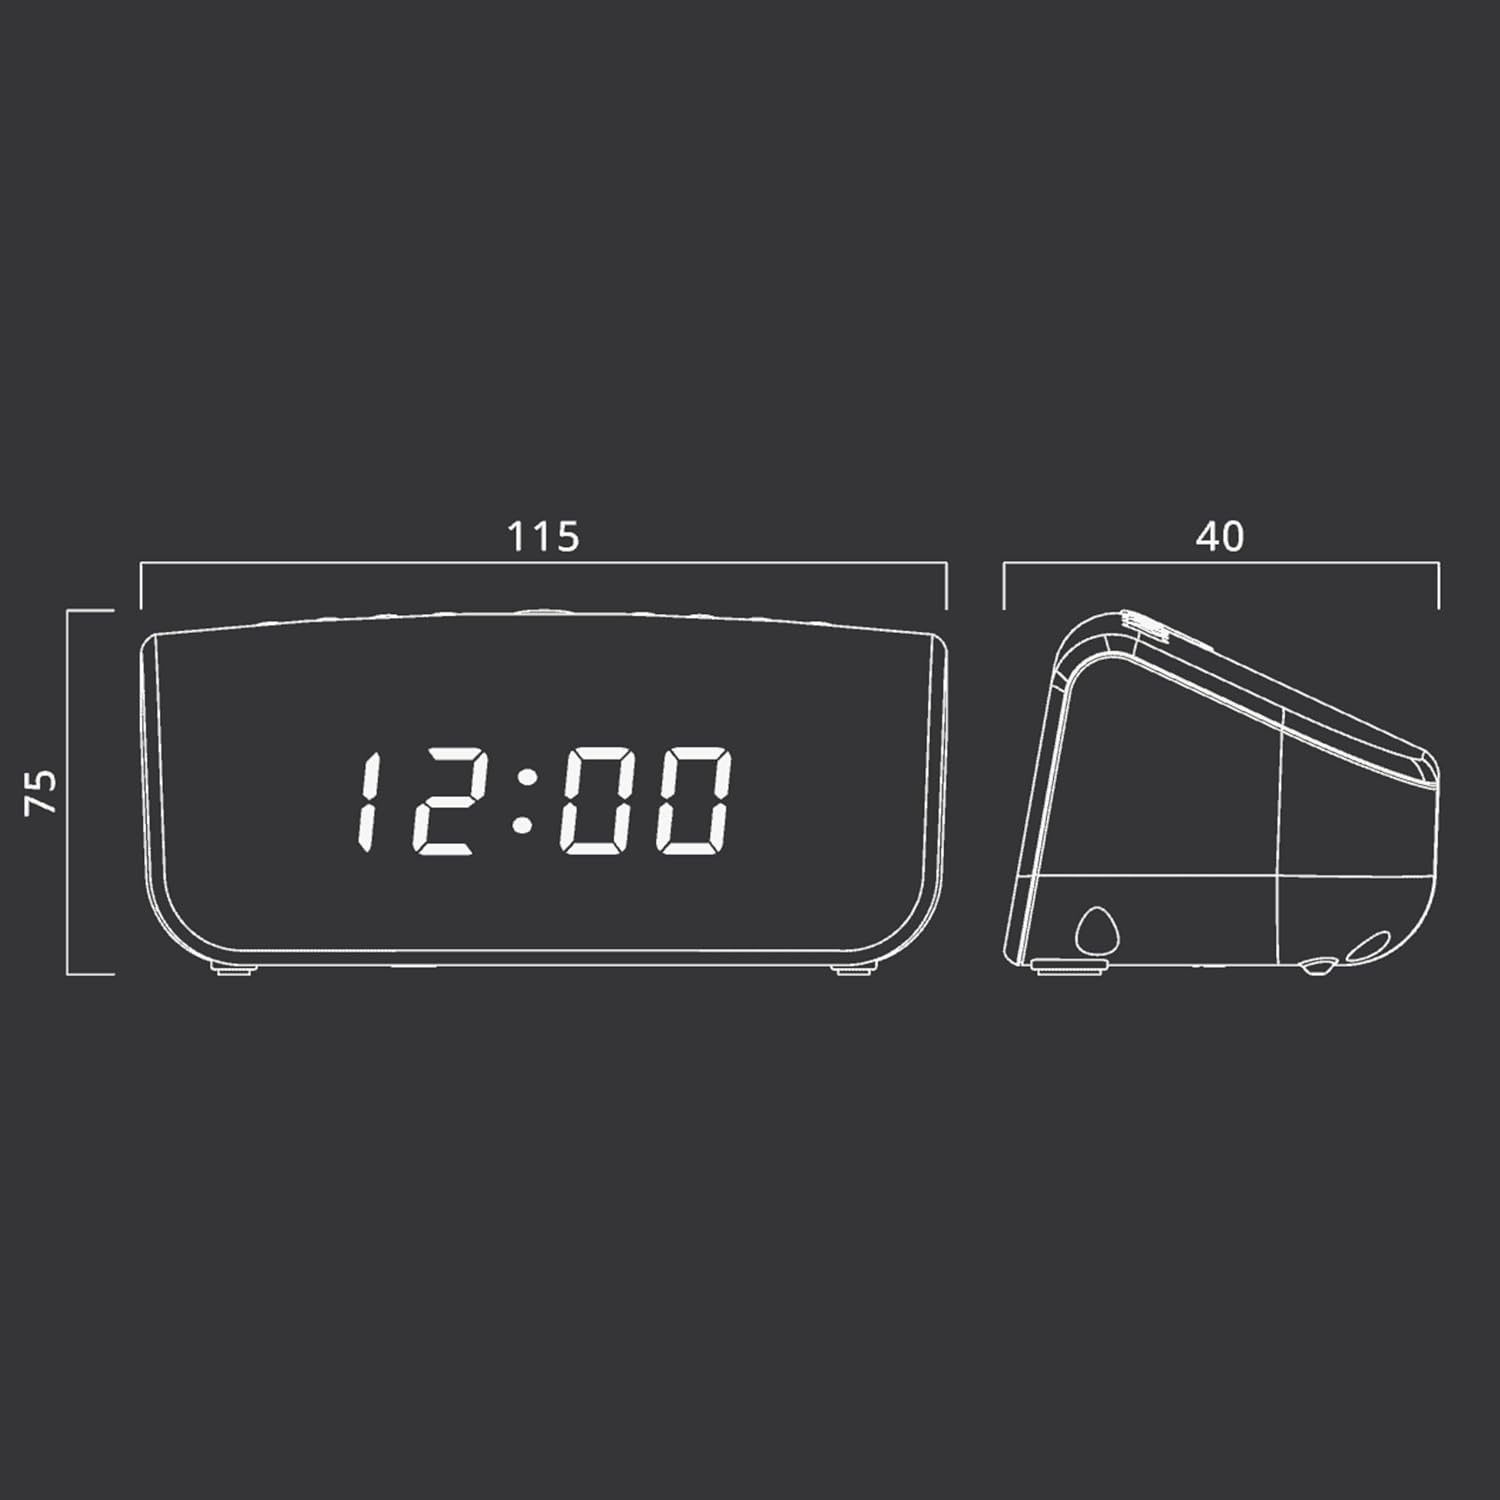
Nọmba 2: Approximate dimensions of the Muse M-12 CR unit.
Atilẹyin ọja ati Support
For warranty information and technical support, please refer to the warranty card included with your product or visit the official Muse webojula. Tọju iwe-ẹri rira rẹ bi ẹri rira fun eyikeyi awọn ibeere atilẹyin ọja.
Fun iranlọwọ siwaju sii, jọwọ kan si iṣẹ alabara Muse.