Ọrọ Iṣaaju
This manual provides essential instructions for the safe and efficient operation, installation, and maintenance of your Sharp R-25AM microwave oven. Please read this manual thoroughly before using the appliance and retain it for future reference. Proper use will ensure optimal performance and extend the lifespan of your microwave oven.
Awọn Itọsọna Aabo pataki
Nigbati o ba nlo awọn ohun elo itanna, awọn iṣọra aabo ipilẹ yẹ ki o tẹle, pẹlu atẹle naa:
- Ka gbogbo awọn ilana ṣaaju lilo ohun elo naa.
- Maṣe gbiyanju lati ṣiṣẹ adiro yii pẹlu ṣiṣi ilẹkun nitori eyi le ja si ifihan ipalara si agbara makirowefu.
- Ma ṣe gbe ohun kan si laarin oju iwaju adiro ati ẹnu-ọna tabi jẹ ki ile tabi aloku mimọ lati ṣajọpọ lori awọn ibi ifamọ.
- Má ṣe lo ààrò náà bí ó bá bàjẹ́. Ó ṣe pàtàkì gan-an kí ilẹ̀kùn ààrò náà ti pa dáadáa, kí ó má sì ṣe bàjẹ́ sí ilẹ̀kùn, ìdè tàbí èdìdì.
- Oṣiṣẹ iṣẹ ti o peye nikan yẹ ki o ṣatunṣe tabi tun ohun elo yii ṣe.
- Rii daju pe ohun elo ti wa ni ilẹ daradara.
- Ma ṣe gbona awọn olomi tabi awọn ounjẹ miiran ninu awọn apoti ti a fi edidi bi wọn ṣe yẹ lati bu gbamu.
- Lo awọn ohun elo onjẹ-ailewu makirowefu nigbagbogbo.
Ọja Pariview
Familiarize yourself with the components of your Sharp R-25AM microwave oven.
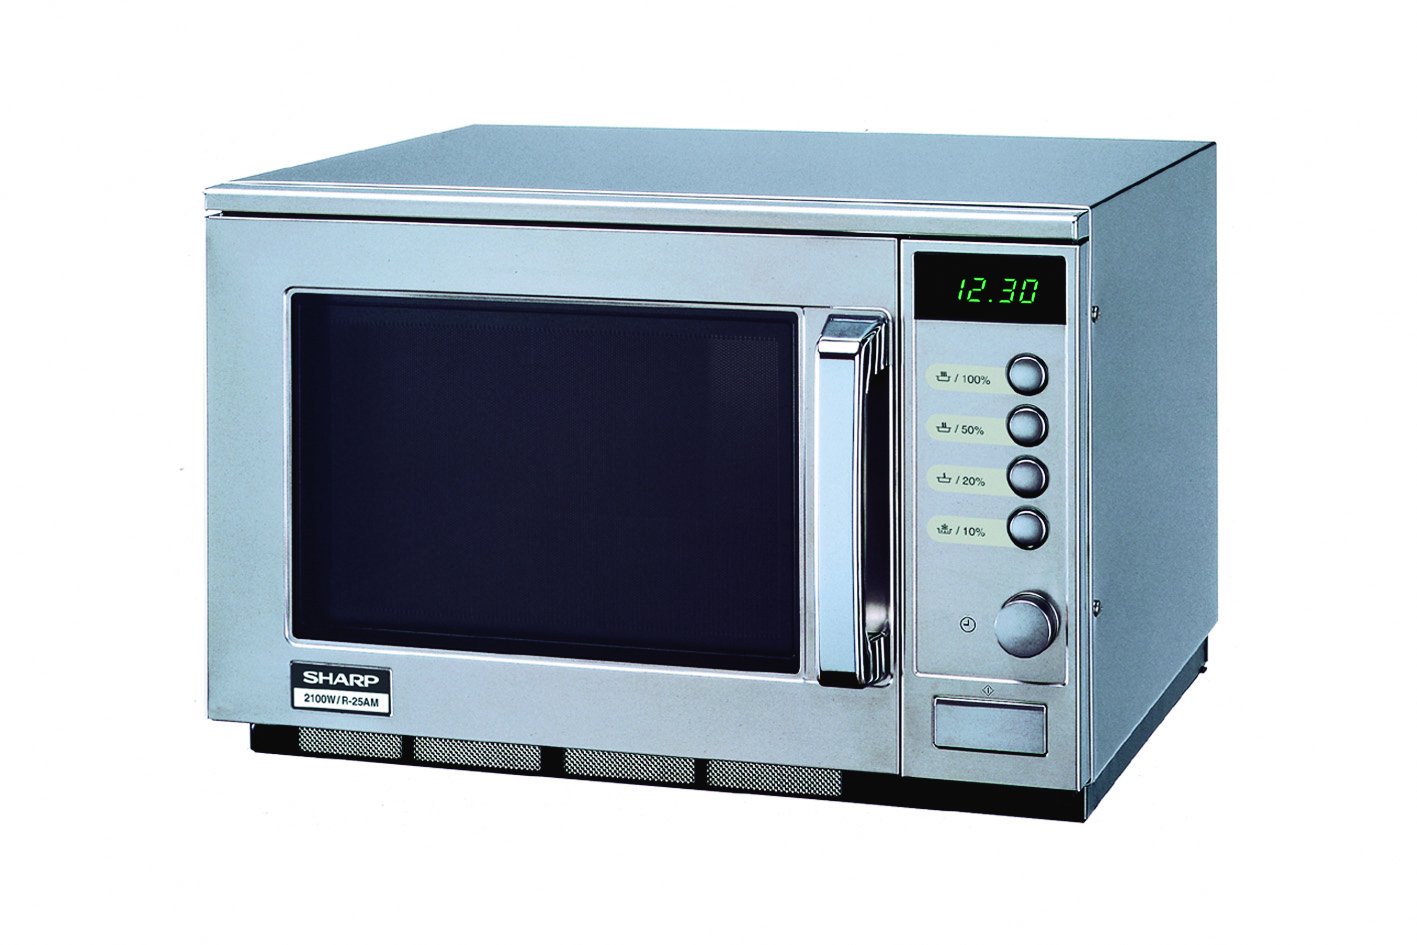
This image displays the front of the Sharp R-25AM microwave oven. It features a stainless steel finish, a dark glass door with a chrome handle, and a control panel on the right. The control panel includes a digital time display (showing '12.30'), four power level buttons (100%, 50%, 20%, 10%), and a rotary dial for setting time or weight. The model number '2100W/R-25AM' is visible on the lower left of the unit.
- Iho adiro: Ààyè inú ilé tí a gbé oúnjẹ sí fún sísè.
- Gilasi Yiyi: Ó ń yí oúnjẹ padà fún sísè oúnjẹ déédéé.
- Apejọ ilẹkun: Includes the door, latch, and viewwindow window.
- Ibi iwaju alabujuto: Contains the digital display, power level buttons, and rotary dial for setting cooking time and functions.
- Imudani ilekun: A máa ń lò ó láti ṣí àti láti ti ìlẹ̀kùn ààrò.
Eto ati fifi sori
- Ṣii silẹ: Remove all packaging materials from inside and outside the oven. Check for any damage. Do not remove the waveguide cover.
- Ibi:
- Place the oven on a flat, stable surface strong enough to hold the oven and the food being cooked.
- Ensure adequate ventilation. Leave a minimum of 10 cm (4 inches) clearance at the rear, 20 cm (8 inches) at the top, and 5 cm (2 inches) on both sides.
- Ma ṣe dina eyikeyi awọn ṣiṣi atẹgun.
- Jeki adiro kuro lati awọn orisun ooru ati awọn aaye oofa ti o lagbara.
- Asopọmọra itanna:
- Plug the power cord into a properly grounded electrical outlet (230V, 50Hz, 16A).
- Ma ṣe lo awọn okun itẹsiwaju tabi awọn oluyipada.
Awọn ilana Iṣiṣẹ
Ṣiṣeto aago
- Ensure the oven is plugged in. The display will show '0:00' or the current time if previously set.
- Tẹ awọn Aago button (often indicated by a clock icon next to the rotary dial).
- Turn the rotary dial to set the hour. Press the Aago bọtini lẹẹkansi.
- Turn the rotary dial to set the minutes. Press the Aago button one more time to confirm.
Makirowefu Sise
- Ounjẹ Ibi: Put food in a microwave-safe container on the glass turntable. Close the oven door securely.
- Yan Ipele Agbara: Press one of the power level buttons (100%, 50%, 20%, 10%) to choose the desired cooking intensity. For example, press '100%' for full power (2100W).
- Ṣeto Akoko sise: Turn the rotary dial to set the desired cooking time. The display will show the time counting down.
- Bẹrẹ Sise: The oven will start automatically after setting the time. Some models may require pressing a separate 'Start' button.
- Ipari Sise: The oven will beep when cooking is complete. Open the door and carefully remove the food.
Defrosting
Iṣẹ́ ìyọ́ omi jẹ́ kí o lè yọ́ oúnjẹ tí ó ti dì tútù dáadáa.
- Gbe awọn tutunini ounje lori turntable.
- Tẹ awọn Dín button (if available, or use a lower power setting like 20% or 50%).
- Turn the rotary dial to set the defrost time or weight, depending on the model's features.
- The oven will begin defrosting. It may be necessary to turn the food over halfway through the defrosting process for even thawing.
Itọju ati Cleaning
Regular cleaning and maintenance will ensure your microwave oven operates effectively and safely.
- Mimọ inu inu:
- Lẹhin lilo kọọkan, mu ese inu ilohunsoke pẹlu ipolowoamp asọ lati yọ ounje spplatters.
- For stubborn stains, place a bowl of water with lemon juice inside and microwave for 2-3 minutes. The steam will loosen the grime, making it easier to wipe clean.
- Ma ṣe lo awọn afọmọ abrasive tabi awọn paadi iyẹfun.
- Ninu Ode:
- Mu ese ita gbangba pẹlu asọ, damp asọ.
- For stainless steel surfaces, use a specialized stainless steel cleaner to maintain its finish.
- Fífọ Turntable: Yiyi gilasi ati oruka rola ni a le yọ kuro ki o fọ ni gbona, omi ọṣẹ tabi ni ẹrọ fifọ. Rii daju pe wọn ti gbẹ patapata ṣaaju gbigbe wọn pada sinu adiro.
- Awọn edidi ilẹkun: Máa fọ àwọn èdìdì ilẹ̀kùn àti àwọn apá tó wà ní ẹ̀gbẹ́ rẹ déédéé pẹ̀lú ìpolówóamp cloth to ensure proper sealing and prevent microwave leakage.
Laasigbotitusita
Ṣaaju ki o to kan si iṣẹ alabara, jọwọ tọka si awọn ọran ti o wọpọ ati awọn ojutu wọnyi:
| Isoro | Owun to le Fa | Ojutu |
|---|---|---|
| Lọla ko bẹrẹ. | Kò sí okùn agbára tí a so mọ́; kò sí ìlẹ̀kùn tí a ti tì dáadáa; fíúsì tí a ti fẹ́ tàbí ẹ̀rọ ìfọ́ ìṣiṣẹ́ ti bàjẹ́. | Rí i dájú pé plug náà wà ní ìjáde tí ó lágbára; ti ìlẹ̀kùn náà ní ààbò; ṣàyẹ̀wò fíúsì ilé tàbí tún ẹ̀rọ ìfọ́wọ́sí ìṣiṣẹ́ náà ṣe. |
| Ounjẹ kii ṣe alapapo. | Door not closed properly; incorrect cooking time or power level set. | Ensure door is closed; verify cooking time and power level settings. |
| Imọlẹ ko ṣiṣẹ. | Boolubu nilo rirọpo. | Kan si oṣiṣẹ iṣẹ ti o peye fun rirọpo boolubu. |
| Turntable ko yiyi. | Turntable not properly placed; debris under turntable. | Ensure turntable and roller ring are correctly positioned; clean any debris. |
Awọn pato
Key technical specifications for the Sharp R-25AM microwave oven:
- Awoṣe: R-25AM
- Brand: Dinku
- Agbara: 20 lita
- Ijade agbara: 2100 Wattis
- Voltage: 230 Volts
- Igbohunsafẹfẹ: 50 Hz
- Iru fifi sori ẹrọ: Countertop
- Ohun elo: Irin ti ko njepata
- Awọn iwọn Ọja (L x W x H): 470 x 510 x 335 mm (isunmọ 18.5 x 20.1 x 13.2 inches)
- Ìwúwo: Kg 33.12 (isunmọ 73 lbs)
- Iru Iṣakoso: Bọtini, Dial Rotari
Atilẹyin ọja ati Support
For warranty information, please refer to the warranty card included with your purchase or visit the official Sharp website. For technical support or service inquiries, please contact Sharp customer service directly. Keep your purchase receipt as proof of purchase for warranty claims.
Note: Availability of spare parts is currently unavailable as per product information.