1. Ifihan
This manual provides comprehensive instructions for the setup, operation, maintenance, and troubleshooting of your Thomson WHP3001BK UHF Wireless Headphones. Please read this manual thoroughly before using the product to ensure proper function and longevity.
2. Awọn ilana aabo
- Do not expose the headphones or transmitter to rain, moisture, or extreme temperatures.
- Yago fun sisọ silẹ tabi tẹriba ẹrọ si awọn ipa to lagbara.
- Ma ṣe gbiyanju lati ṣajọpọ tabi yi ẹyọ naa pada. Tọkasi gbogbo iṣẹ si oṣiṣẹ oṣiṣẹ.
- Keep the product away from medical devices that may be affected by radio waves.
- Sọ awọn batiri sọnu ni ifojusọna ni ibamu si awọn ilana agbegbe.
- Gbigbọ gigun ni awọn ipele iwọn didun giga le fa ibajẹ igbọran.
3. Package Awọn akoonu
Jẹrisi pe gbogbo awọn ohun kan wa ninu package:
- Thomson WHP3001BK Wireless Headphones (1 unit)
- UHF Transmitter/Charging Base (1 unit)
- Audio Connection Cable (3.5mm jack to RCA)
- Adapter agbara
- Rechargeable AAA NiMH Batteries (2 units, pre-installed or separate)
- Afowoyi Olumulo (iwe-ipamọ yii)
4. Ọja Ipariview
Familiarize yourself with the components of your wireless headphone system.
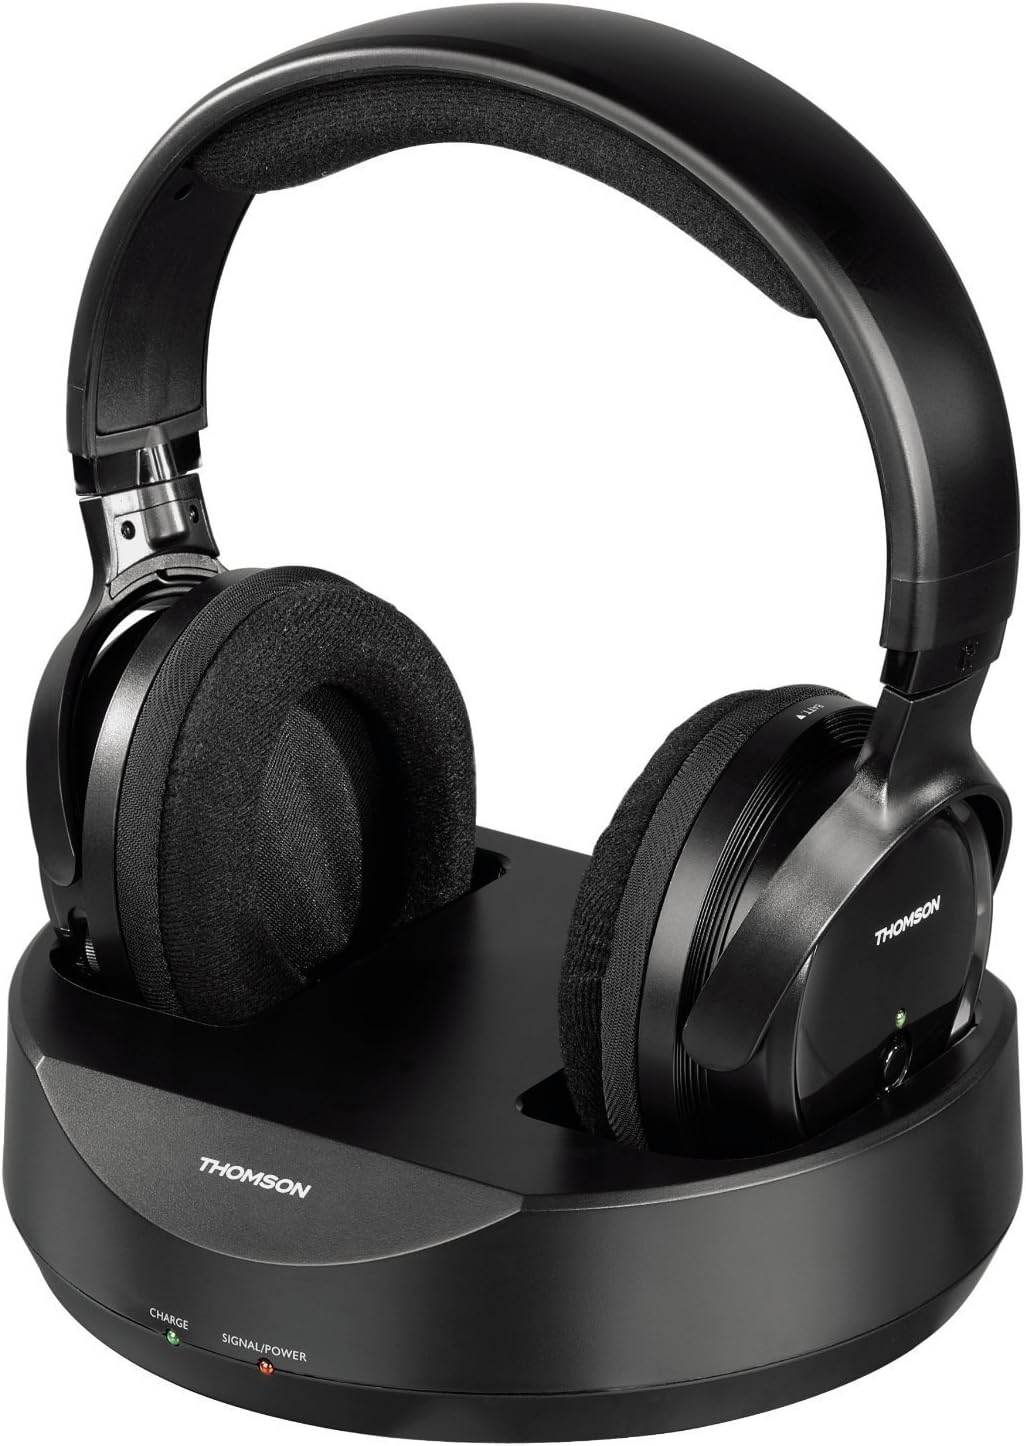
Nọmba 1: Thomson WHP3001BK Wireless Headphones resting on their charging base. The headphones feature large, padded earcups and an adjustable headband. The base unit includes indicator lights for charge and power status.

Nọmba 2: Apa view of the Thomson WHP3001BK Wireless Headphones, highlighting the over-ear design and the power button with LED indicator on the right earcup.

Nọmba 3: Rear panel of the charging base, showing the DC IN port, Audio IN (RCA L/R) ports, and a channel selection switch.

Nọmba 4: Included audio connection cable, featuring a 3.5mm stereo jack on one end and red/white RCA plugs on the other, for connecting the transmitter to an audio source.
5. Eto
5.1. Ngba agbara si awọn Agbekọri
- Connect the power adapter to the DC IN port on the rear of the charging base (Figure 3).
- Plug the power adapter into a wall outlet. The "SIGNAL/POWER" LED on the base should illuminate.
- Place the headphones onto the charging base, ensuring the charging contacts align. The "CHARGE" LED on the base should illuminate, indicating that the headphones are charging.
- Allow approximately 8-10 hours for the initial full charge. Subsequent charges may take less time.
Akiyesi: The headphones use 2 AAA NiMH rechargeable batteries. Ensure these are correctly inserted if not pre-installed.
5.2. Connecting the Transmitter to an Audio Source
The transmitter connects to your audio source (e.g., TV, stereo system, computer) via a 3.5mm jack.
- Identify the audio output port on your source device. This is typically a 3.5mm headphone jack or RCA audio output ports (red and white).
- Using the supplied audio cable (Figure 4), connect the 3.5mm jack end to your source device's headphone output.
- Connect the red and white RCA plugs to the "AUDIO IN" ports on the rear of the charging base (Figure 3).
- If your source device only has RCA outputs, use the RCA ends of the cable for both connections. If your source device has a 3.5mm output, use the 3.5mm end for the source and the RCA ends for the base.
- Ensure the audio source is powered on and playing audio. The "SIGNAL/POWER" LED on the base should turn green when an audio signal is detected.
Pataki: When connecting to a TV's headphone jack, the TV's internal speakers may be muted. To allow others to hear the TV, consider using an alternative audio output (e.g., RCA audio out, optical out with a converter) if available.
5.3. Initial Pairing and Tuning
- Ensure the transmitter is powered on and receiving an audio signal (green "SIGNAL/POWER" LED).
- Turn on the headphones by pressing the power button on the right earcup. The LED on the headphones will illuminate.
- The headphones feature auto-tuning. They will automatically search for and connect to the strongest signal from the transmitter.
- If you experience interference, you may need to adjust the channel switch on the rear of the transmitter (Figure 3) and allow the headphones to re-tune.
6. Isẹ
6.1. Agbara lori / Paa
- To power on the headphones, press and hold the power button on the right earcup until the LED illuminates.
- To power off the headphones, press and hold the power button until the LED turns off.
- The transmitter powers on automatically when connected to power and an audio signal is detected. It will enter standby if no signal is present for a period.
6.2. Iṣakoso iwọn didun
- Adjust the volume using the volume control dial located on the headphones.
- For optimal sound quality and to minimize static or hiss, it is recommended to set the volume of your audio source (TV, stereo) to a high level and then adjust the headphone volume to your desired listening level.
6.3. Ibiti
The Thomson WHP3001BK headphones offer a wireless range of up to 100 meters in open areas and approximately 20-30 meters indoors, depending on environmental factors and obstacles.
7. Itọju
7.1. Ninu
- Fi aṣọ rírọrùn àti gbígbẹ nu agbekọri ati ẹ̀rọ gbigbe naa.
- Ma ṣe lo awọn olutọpa omi tabi awọn ohun elo abrasive.
7.2. Itọju batiri
- Use only the specified NiMH rechargeable AAA batteries.
- Tí a kò bá lo agbekọri naa fún ìgbà pípẹ́, yọ awọn batiri naa kuro lati dènà jijo.
- Rọpo awọn batiri nigbati iṣẹ wọn ba dinku ni pataki.
8. Laasigbotitusita
| Isoro | Owun to le Fa | Ojutu |
|---|---|---|
| Ko si ohun lati olokun. |
|
|
| Aimi tabi kikọlu. |
|
|
| Awọn agbekọri ko gba agbara. |
|
|
9. Awọn pato
| Ẹya ara ẹrọ | Ẹ̀kúnrẹ́rẹ́ |
|---|---|
| Awoṣe | WHP3001BK |
| Asopọmọra Technology | Wireless (Radio-frequency) |
| Agbekọri Iru | Over-Ear (Circum-Auriculaire) |
| Alailowaya Ibiti | Up to 100m (open area), 20-30m (indoors) |
| Audio Input (Transmitter) | 3.5mm Jack / RCA |
| Pataki Awọn ẹya ara ẹrọ | Volume control, Auto-tuning |
| Awọn batiri | 2 x AAA NiMH ti a le gba agbara (pẹlu) |
| Ohun elo | Ṣiṣu |
| Àwọ̀ | Dudu |
| Iwọn Nkan | 960 Grams (including packaging/accessories) |
| Olupese | Hama |
10. Atilẹyin ọja ati Support
For warranty information, please refer to the documentation provided at the time of purchase or contact your retailer. For technical support, please visit the official Thomson webojula tabi kan si wọn onibara iṣẹ Eka.
Jọwọ ṣe idaduro ẹri rira rẹ fun eyikeyi awọn ibeere atilẹyin ọja.