
Ọrọ Iṣaaju
O ṣeun fun riraasing the GPX Weatherx WR282B Weather and Alert Radio. This portable radio is designed to provide you with AM/FM radio reception and access to all 7 NOAA weatherband channels, ensuring you stay informed during various conditions. It offers flexible power options, operating on either AC power or D-size batteries, making it suitable for both indoor and outdoor use.
Please read this manual thoroughly before operating the device to ensure proper use and to maximize its performance and longevity.
Alaye Aabo pataki
- Ka Awọn ilana: Gbogbo ailewu ati ilana iṣiṣẹ yẹ ki o ka ṣaaju ṣiṣe ọja naa.
- Daduro Awọn ilana: Aabo ati awọn ilana iṣiṣẹ yẹ ki o wa ni idaduro fun itọkasi ọjọ iwaju.
- Awọn ikilọ Tẹtisi: Gbogbo awọn ikilo lori ọja ati ninu awọn ilana iṣẹ yẹ ki o faramọ.
- Tẹle Awọn ilana: Gbogbo awọn ilana ṣiṣe ati lilo yẹ ki o tẹle.
- Omi ati Ọrinrin: Do not use this product near water (e.g., near a bathtub, washbowl, kitchen sink, laundry tub, in a wet basement, or near a swimming pool).
- Ninu: Mọ pẹlu asọ gbigbẹ nikan.
- Afẹfẹ: Ma ṣe dina eyikeyi awọn ṣiṣi atẹgun. Fi sori ẹrọ ni ibamu pẹlu awọn ilana ti olupese.
- Ooru: Maṣe fi sori ẹrọ nitosi awọn orisun ooru gẹgẹbi awọn imooru, awọn iforukọsilẹ ooru, awọn adiro, tabi awọn ohun elo miiran (pẹlu ampliifiers) ti o gbe ooru jade.
- Aabo Agbara-Okun: Dabobo okun agbara lati ma rin lori tabi pin, ni pataki ni awọn pilogi, awọn ohun elo irọrun, ati aaye nibiti wọn ti jade kuro ninu ohun elo naa.
- Mànàmáná: Yọọ ohun elo yi nigba iji manamana tabi nigba lilo fun igba pipẹ.
- Ṣiṣẹ: Tọkasi gbogbo iṣẹ si awọn oṣiṣẹ iṣẹ ti o peye. Iṣẹ nilo nigbati ohun elo ba ti bajẹ ni ọna eyikeyi, gẹgẹbi okun ipese agbara tabi plug ti bajẹ, omi ti ta silẹ tabi awọn nkan ti ṣubu sinu ẹrọ, ohun elo naa ti farahan si ojo tabi ọrinrin, ko ṣiṣẹ deede. , tabi ti lọ silẹ.
Awọn ẹya ara ẹrọ
- AM/FM Radio Tuner
- Weatherband - All 7 NOAA Channels
- Swivel Telescopic Antenna
- Iṣakoso iwọn didun
- Audio Line Input (Auxiliary Input)
- Ese Gbe Gbamu
- Dual Power Options: AC/DC Adapter or 3 x 'D' Batteries
Package Awọn akoonu
- GPX Weatherx WR282B Weather and Alert Radio
- AC / DC Power Adapter
- Afowoyi Olumulo (iwe-ipamọ yii)
Awọn iṣakoso ati Awọn Atọka
Familiarize yourself with the various controls and indicators on your WR282B radio.
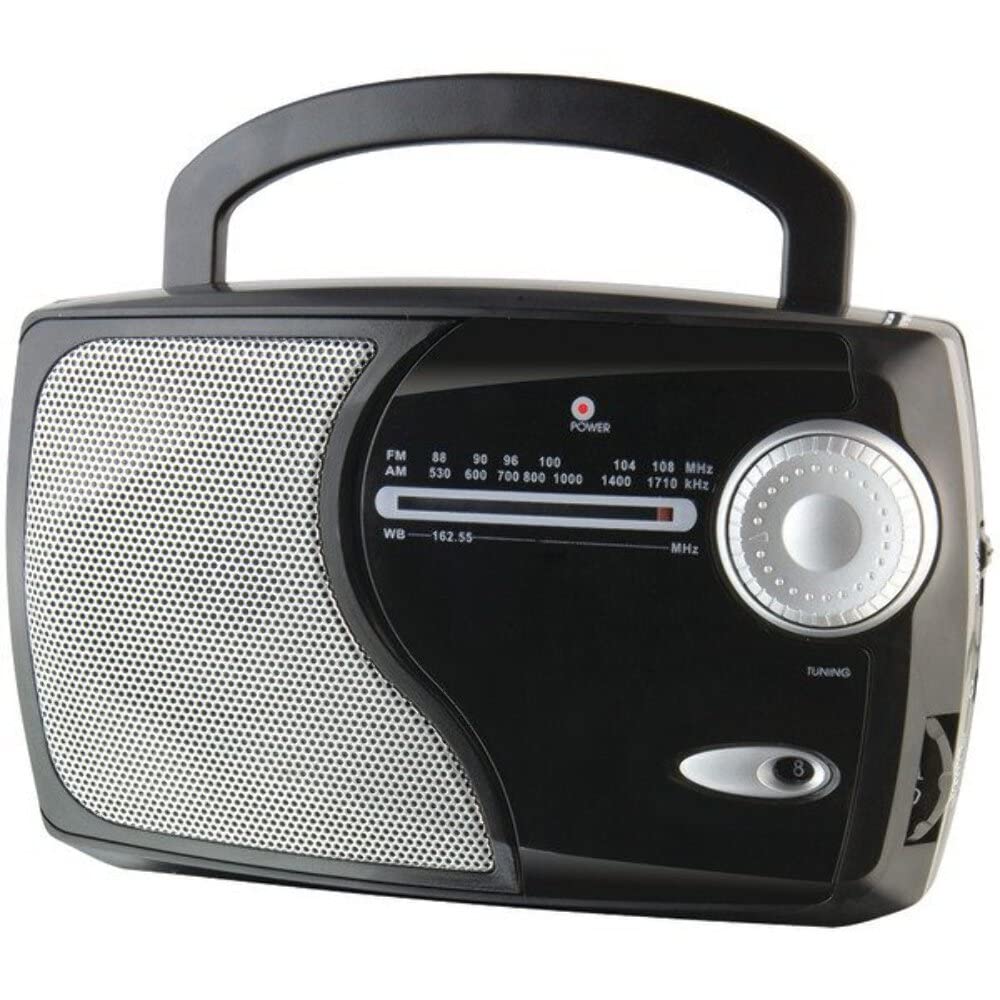
Aworan: Iwaju view of the GPX Weatherx WR282B radio, showing the speaker, tuning dial, and control knobs.
- Bọlu Agbara/Iwọn didun: Turns the radio on/off and adjusts the audio output level.
- Yiyipada Yiyan Ẹgbẹ: Selects between AM, FM, and Weatherband (WB) modes.
- Knob Tuntun: Adjusts the frequency to tune into desired radio stations or weather channels.
- Tuning Indicator: Illuminates when a strong signal is received.
- Ipe Igbohunsafẹfẹ: Ṣe afihan ipo igbohunsafẹfẹ redio lọwọlọwọ.
- Eriali telescopic: Extendable antenna for improved FM and Weatherband reception.
- Iṣawọle Iranlọwọ (AUX IN): Jack 3.5mm fun sisopọ awọn ẹrọ ohun afetigbọ ita.
- Input Agbara AC: Jack for connecting the included AC/DC power adapter.
- Abala Batiri: Located on the back, holds 3 'D' size batteries.
- Ọwọ Gbe: Fun irọrun gbigbe.
Ṣeto
Agbara Redio
The WR282B radio can be powered using either the included AC/DC power adapter or three 'D' size batteries.
1. AC Power Operation
- Ensure the radio is turned off by rotating the Power/Volume knob counter-clockwise until it clicks.
- Insert the small plug of the AC/DC power adapter into the AC Power Input jack on the radio.
- Plug the other end of the AC/DC power adapter into a standard wall outlet (AC 120V~60Hz).
- Redio ti šetan fun lilo pẹlu agbara AC.
Akiyesi: When the AC adapter is connected, battery power is automatically disconnected.
2. Battery Power Operation
- Rii daju pe redio wa ni pipa.
- Wa yara batiri ni ẹhin redio naa.
- Ṣii ideri iyẹwu batiri naa.
- Insert three (3) 'D' size batteries (not included) into the compartment, observing the correct polarity (+/-) as indicated inside the compartment.
- Pa ideri batiri naa ni aabo.
- The radio is now ready for use with battery power.
Pataki: Remove batteries if the radio will not be used for an extended period to prevent leakage and damage.
Awọn ilana Iṣiṣẹ
1. Turning On and Adjusting Volume
- Yiyi awọn Knob Agbara / Iwọn didun clockwise to turn on the radio. Continue rotating to increase the volume to a comfortable listening level.
- Lati paa redio, yi awọn Knob Agbara / Iwọn didun counter-clockwise until it clicks.
2. Selecting a Radio Band (AM/FM/Weatherband)
- Lo awọn Band Selector Yipada to choose your desired listening mode:
- AM: Fun Amplitude Modulation radio stations.
- FM: For Frequency Modulation radio stations.
- WB: For NOAA Weatherband channels.
3. Tuning to a Station or Channel
- Fa awọn Eriali Telescopic fully for optimal FM and Weatherband reception. For AM reception, the radio has a built-in antenna, and adjusting the radio's position may improve reception.
- Yiyi awọn Tunṣe Knob to scan through frequencies on the Titẹ Igbohunsafẹfẹ.
- When a strong signal is received, the Atọka Tuning ina yoo tan imọlẹ.
- For Weatherband (WB) mode, tune to one of the 7 NOAA weather channels (162.400 MHz to 162.550 MHz).
4. Using the Auxiliary Input (AUX IN)
- Connect a 3.5mm audio cable (not included) from your external audio device (e.g., MP3 player, smartphone) to the Ìbáṣepọ̀ Olùrànlọ́wọ́ (AUX IN) jack on the radio.
- Ensure the radio is turned on and the volume is adjusted.
- The audio from your external device will now play through the radio's speaker. Control playback and track selection from your external device.
Itoju
- Ninu: Fi aṣọ rírọrùn, gbígbẹ, nu ìta rédíò náà. Má ṣe lo àwọn ohun ìfọṣọ, epo tàbí àwọn ohun olómi.
- Rirọpo Batiri: Replace all three 'D' batteries when the radio's performance diminishes or if the unit will not be used for an extended period. Always replace with new batteries of the same type.
- Ibi ipamọ: When storing the radio for a long time, remove the batteries to prevent leakage. Store in a cool, dry place away from direct sunlight and extreme temperatures.
- Itọju Antenna: Fi ọwọ́ mú eriali telescopic náà pẹ̀lẹ́pẹ̀lẹ́ kí ó má baà tẹ̀ tàbí kí ó fọ́.
Laasigbotitusita
| Isoro | Owun to le Fa | Ojutu |
|---|---|---|
| Ko si agbara |
|
|
| Gbigba redio ti ko dara |
|
|
| Kò sí ohùn láti ọ̀dọ̀ AUX IN |
|
|
Awọn pato
- Awoṣe: WR282B
- Awọn ẹgbẹ redio: AM, FM, Weatherband (7 NOAA channels)
- Orisun Agbara: AC 120V~60Hz (via included adapter) or 3 x 'D' Batteries (not included)
- Asopọmọra: 3.5mm Input Iranlọwọ
- Eriali: Telescopic (FM/WB), Built-in Ferrite Bar (AM)
- Awọn iwọn ọja: 8.86" L x 2.76" W x 5.51" H (approximately)
- Ìwọ̀n Nkan: 1.06 pounds (without batteries)
Atilẹyin ọja ati Support
For detailed warranty information and customer support, please refer to the warranty card included with your product or visit the official GPX webojula. Tọju iwe-ẹri rira rẹ bi ẹri rira fun eyikeyi awọn ibeere atilẹyin ọja.
If you experience issues not covered in the troubleshooting section, please contact GPX customer service for assistance.