1. Ifihan
This manual provides essential information for the installation, configuration, operation, and maintenance of the Juniper Networks SRX220H-POE Services Gateway. The SRX220H-POE is a high-performance security, routing, and switching platform designed for small to medium-sized branch offices. It offers 8 Gigabit Ethernet ports and 2 mini-PIM slots, with Power over Ethernet (PoE) capabilities.
Jọ̀wọ́ ka ìwé ìtọ́ni yìí dáadáa kí o tó lo ẹ̀rọ náà láti rí i dájú pé ó ṣiṣẹ́ dáadáa àti láti dènà ìbàjẹ́.
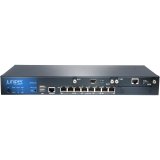
olusin 1: Iwaju view of the Juniper Networks SRX220H-POE Services Gateway, showing the 8 Gigabit Ethernet ports and status indicators.
2. Alaye Aabo
Observe the following safety precautions to prevent injury and damage to the device:
- Aabo Itanna: Ensure the power source matches the device's requirements. Use only the provided power cord.
- Ilẹ: Always connect the device to a properly grounded outlet.
- Afẹfẹ: Ma ṣe dina awọn ṣiṣi atẹgun. Rii daju pe sisan afẹfẹ to peye ni ayika ẹrọ lati ṣe idiwọ igbona.
- Ibi: Install the device in a stable, dry environment, away from direct sunlight, heat sources, and moisture.
- Ṣiṣẹ: Tọ́ka gbogbo iṣẹ́ ìtọ́jú sí àwọn òṣìṣẹ́ tó péye. Má ṣe gbìyànjú láti ṣí tàbí tún ẹ̀rọ náà ṣe fúnra rẹ.
3. Eto
3.1 Ṣiṣii ẹrọ naa
Carefully remove the SRX220H-POE Services Gateway from its packaging. Verify that all components listed below are present:
- Juniper Networks SRX220H-POE Services Gateway unit
- Okun agbara
- Ohun elo agbeko (ti o ba wulo)
- USB console
- Documentation CD/Quick Start Guide
3.2 Ìsopọ̀ Àgbékalẹ̀ (Àṣàyàn)
The SRX220H-POE is rack-mountable. To install the device in a standard 19-inch equipment rack:
- Attach the provided rack-mount brackets to the sides of the SRX220H-POE using the screws supplied with the kit.
- Align the brackets with the rack posts and secure the device using appropriate rack screws.
- Ensure the device is level and securely fastened.
3.3 Nsopọ Agbara
Connect the power cord to the power input on the rear panel of the SRX220H-POE, then plug the other end into a grounded electrical outlet. The device will begin its power-on self-test (POST).
3.4 Asopọ nẹtiwọki akọkọ
Connect an Ethernet cable from your computer to one of the Gigabit Ethernet ports (e.g., ge-0/0/0) on the SRX220H-POE for initial configuration. Alternatively, use the console port with a console cable and terminal emulation software.
4. Ṣiṣẹ ẹrọ naa
4.1 Titan ati Paa
To power on the device, connect the power cord. The device will automatically start. To power off, disconnect the power cord from the electrical outlet. It is recommended to gracefully shut down the system via the command-line interface (CLI) before disconnecting power, if possible.
4.2 Ipilẹ iṣeto ni
Access the device's CLI via the console port or an Ethernet management interface. Default login credentials are typically gbongbo with no password (for initial setup). Refer to the Juniper Networks documentation for detailed configuration guides for Junos OS.
- Setting IP Address: Configure the management interface with a static IP address.
- Awọn akọọlẹ olumulo: Create new user accounts with strong passwords and delete or disable default accounts.
- Security Policies: Implement appropriate security policies for your network environment.
4.3 Agbára lórí Ethernet (PoE)
The SRX220H-POE ports support Power over Ethernet, allowing compatible devices (e.g., IP phones, wireless access points) to receive power and data over a single Ethernet cable. Ensure connected devices are PoE-compatible and do not exceed the total power budget of the SRX220H-POE.
5. Itọju
5.1 Software imudojuiwọn
Regularly check the Juniper Networks support website for the latest Junos OS software updates. Applying updates helps ensure optimal performance, security, and access to new features. Follow the provided upgrade procedures carefully.
5.2 Ninu
Keep the device clean and free of dust. Use a soft, dry cloth to wipe the exterior. Do not use liquid cleaners or aerosol sprays directly on the device. Ensure ventilation openings are clear of obstructions.
5.3 Iṣeto ni Afẹyinti
Periodically back up your device configuration to an external storage device or network location. This allows for quick restoration in case of a system failure or misconfiguration.
6. Laasigbotitusita
This section provides solutions to common issues. For more complex problems, consult the Juniper Networks support documentation or contact technical support.
| Isoro | Owun to le Fa | Ojutu |
|---|---|---|
| Ẹrọ naa ko ṣiṣẹ. | No power, faulty power cord, power supply issue. | Check power cord connection. Verify power outlet functionality. Try a different power cord. |
| Cannot access device via network. | Incorrect IP configuration, network cable issue, firewall blocking access. | Verify IP address and subnet mask. Check network cable connections. Temporarily disable client firewall for testing. Try console access. |
| Poe ẹrọ ko gba agbara. | Device not PoE-compatible, cable issue, power budget exceeded, PoE port disabled. | Ensure device is PoE-compatible. Check Ethernet cable. Verify PoE configuration on the SRX220H-POE. Check total power consumption. |
| Iṣẹ́ nẹ́tíwọ́ọ̀kì tó lọ́ra. | Network congestion, misconfiguration, faulty cable, hardware issue. | Monitor network traffic. Review configuration for bottlenecks. Test with different cables. Check device logs for errors. |
7. Awọn pato
Key technical specifications for the Juniper Networks SRX220H-POE Services Gateway:
- Awoṣe: SRX220H-POE
- Awọn ibudo: 8 x Gigabit Ethernet (GE) ports
- Awọn Iho Imugboroosi: 2 x Mini-PIM slots
- Poe Atilẹyin: Yes, Power over Ethernet on specified ports
- Iranti: 1 GB
- Agbara: 120W
- Okunfa Fọọmu: Agbeko-mountable
- Awọn iwọn (isunmọ): Refer to official Juniper documentation for precise measurements.
- Ìwúwo: Isunmọ 8.82 poun (4 kg)
- Olupese: Àwọn Nẹ́tíwọ́ọ̀kì Juniper
8. Atilẹyin ọja ati Support
Juniper Networks products typically come with a standard limited hardware warranty. For specific warranty terms and conditions applicable to your SRX220H-POE Services Gateway, please refer to the warranty documentation included with your purchase or visit the official Juniper Networks webojula.
8.1 Imọ Support
For technical assistance, product documentation, software downloads, and knowledge base articles, visit the Juniper Networks Support Portal. You may need your product serial number to register for support services.
Atilẹyin Awọn Nẹtiwọọki Juniper Webojula: https://www.juniper.net/support/
For information on extended protection plans, please consult your reseller or Juniper Networks sales representative.