
1. Ifihan
Thank you for choosing the FITNATION Vertical Cycle Trainer. This manual provides essential information for the safe and effective use of your new fitness equipment. Please read this manual thoroughly before assembly and operation to ensure proper use, maximize your workout benefits, and prevent injury.
The FITNATION Vertical Cycle Trainer is designed for indoor use, offering a compact and efficient way to engage in cardiovascular exercise. Its vertical design allows for a space-saving footprint while providing a full cycling experience.
2. Awọn Ilana Aabo pataki
ÌKÌLỌ̀: Kí o tó bẹ̀rẹ̀ ètò ìdánrawò èyíkéyìí, kan sí dókítà rẹ. Èyí ṣe pàtàkì gan-an fún àwọn ènìyàn tí wọ́n ju ọmọ ọdún mẹ́ẹ̀ẹ́dọ́gbọ̀n lọ tàbí àwọn tí wọ́n ní àìsàn tó ti wà tẹ́lẹ̀.
- Always place the cycle trainer on a flat, stable surface.
- Rí i dájú pé gbogbo àwọn boluti àti èso ni a ti mú dáadáa kí a tó lo wọ́n.
- Pa awọn ọmọde ati awọn ohun ọsin kuro ninu ẹrọ lakoko iṣẹ.
- Wọ aṣọ ìdánrawò tó yẹ àti bàtà eré ìdárayá. Yẹra fún aṣọ tí kò ní jẹ́ kí ó wọ inú àwọn ohun tí ń gbéra.
- Do not exceed the maximum user weight limit (if specified by manufacturer, not available in provided data).
- If you experience pain, dizziness, or shortness of breath, stop exercising immediately and consult your physician.
- Perform regular maintenance checks as described in this manual.
- Do not modify the equipment. Use only manufacturer-approved replacement parts.
3. Package Awọn akoonu
Carefully unpack your FITNATION Vertical Cycle Trainer and verify that all components are present and undamaged. If any parts are missing or damaged, do not assemble the unit. Contact customer support immediately.
Awọn akoonu inu apopọ pẹlu:
- Apejọ fireemu akọkọ
- Handlebar Apejọ
- Awọn ẹsẹ ẹsẹ (Osi ati ọtun)
- Iwaju ati ki o ru Stabilizers
- Ohun elo Hardware (boluti, fifọ aṣọ, eso, awọn irinṣẹ)
- Itọsọna olumulo
4. Apejọ ati Oṣo
Assembly typically requires two people. Follow these steps carefully:
-
Step 1: Attach Stabilizers
Attach the front and rear stabilizer bars to the main frame using the provided bolts and washers. Ensure they are securely fastened to provide a stable base.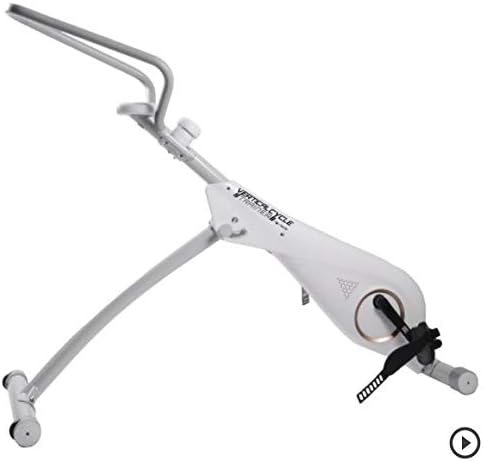
Figure 4.1: Initial assembly showing the main frame and base components.
-
Igbesẹ 2: Fi awọn Pedals sori ẹrọ
Identify the left (L) and right (R) pedals. The left pedal typically threads counter-clockwise, and the right pedal clockwise. Thread them into the crank arms and tighten securely with a wrench. -
Step 3: Attach Handlebar Assembly
Connect the handlebar assembly to the main frame's upright post. Secure it with the designated locking pin or knob, ensuring it is firmly in place and does not wobble.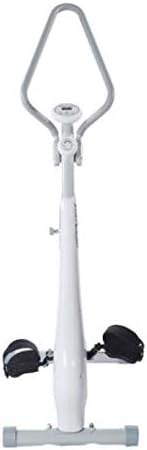
Figure 4.2: Fully assembled FITNATION Vertical Cycle Trainer.
-
Igbesẹ 4: Ṣayẹwo Ipari
Before first use, double-check all connections, bolts, and nuts to ensure they are tight and secure. Test the stability of the unit by gently rocking it.
5. Awọn ilana Iṣiṣẹ
The FITNATION Vertical Cycle Trainer is designed for straightforward operation.
5.1 Siṣàtúnṣe Resistance
The trainer features an adjustable resistance mechanism. Locate the resistance knob, typically found on the main frame near the handlebars. Turn the knob clockwise to increase resistance for a more challenging workout, and counter-clockwise to decrease resistance for an easier ride.
5.2 Using the Display Console (if applicable)
If your model includes a display console, it typically tracks metrics such as time, distance, speed, and calories burned. Refer to the specific console manual for detailed instructions on mode selection, reset functions, and battery replacement.
5.3 Starting Your Workout
- Step onto the pedals, ensuring your feet are securely placed in the foot straps.
- Grasp the handlebars firmly.
- Begin pedaling at a comfortable pace. Adjust resistance as needed throughout your workout.
- Maintain a steady, controlled motion. Avoid jerky movements.
6. Itọju ati Itọju
Regular maintenance will extend the life of your FITNATION Vertical Cycle Trainer and ensure safe operation.
- Ninu: Pa ohun èlò náà rẹ́ pẹ̀lú ìpolówóamp aṣọ lẹ́yìn lílo kọ̀ọ̀kan láti mú òógùn àti eruku kúrò. Má ṣe lo àwọn ohun ìfọṣọ tàbí àwọn ohun èlò ìfọṣọ.
- Lubrication: Periodically check for any moving parts that may require lubrication. Apply a silicone-based lubricant as needed, avoiding contact with the resistance mechanism unless specifically instructed.
- Ṣiṣayẹwo ohun elo: Every few weeks, inspect all bolts, nuts, and screws. Tighten any that have become loose.
- Ibi ipamọ: Store the trainer in a cool, dry place away from direct sunlight and extreme temperatures.
7. Laasigbotitusita
This section addresses common issues you might encounter with your cycle trainer.
| Isoro | Owun to le Fa | Ojutu |
|---|---|---|
| Ariwo gbigbé tàbí ìró fífẹ́ | Loose hardware; lack of lubrication; worn parts. | Check and tighten all bolts. Apply lubricant to moving joints. If noise persists, contact customer support. |
| riru kuro | Uneven surface; loose stabilizer bolts. | Ensure the trainer is on a flat, level surface. Tighten stabilizer bolts. |
| Resistance ko yi pada | Resistance mechanism issue; knob not properly engaged. | Ensure the resistance knob is fully engaged. Check for any obstructions. If problem continues, contact support. |
| Pedals feel loose | Pedals not tightened sufficiently. | Re-tighten pedals firmly with a wrench. Remember the left pedal is reverse-threaded. |
8. Awọn alaye ọja
- Nọmba awoṣe: YP41ZAFXXX01
- Brand: IGBAGBÜ
- Olupese: Viatek
- Àwọn Ìwọ̀n Tí A Pọ̀ (LxWxH): 55.1 x 19.3 x 47.2 inches
- Compact/Base Dimensions (DxWxH): 15"D x 15"W x 6"H (approximate, may refer to base or folded state)
- Awọn Iwọn Idiwọn (LxWxH): 51.2 x 18 x 9.8 inches
- Ìwúwo Apo: 24.04 kilo
- Iṣeduro Lilo: Ninu ile
- UPC: 813061020920
- ASIN: B00A2WHJ32
- Akọkọ Wa: Oṣu Kẹrin Ọjọ 9, Ọdun 2014
9. Atilẹyin ọja ati Onibara Support
For warranty information, technical assistance, or to order replacement parts, please contact FITNATION customer support. Keep your purchase receipt and model number (YP41ZAFXXX01) readily available when contacting support.
While specific warranty terms are not detailed in this manual, most fitness equipment comes with a limited warranty covering manufacturing defects. Please refer to the warranty card included with your product or visit the official FITNATION webojú òpó wẹ́ẹ̀bù fún ìlànà àtìlẹ́yìn tó wà lọ́wọ́lọ́wọ́.
For general inquiries or to explore other FITNATION products, you may visit the FITNATION Store on Amazon.