
Datakom DKM-401
Datakom DKM-401 Digital Multimeter Panel User Manual
Model: DKM-401 | Brand: Datakom
1. Ifihan
The DKM-401 is a low-cost precision instrument designed to display various AC parameters in a 3-phase distribution panel. The standard unit is designed for 230/400V networks. A different version is available for 120/208V systems. The unit fits into a standard 92x92mm panel opening.

Aworan: Iwaju view of the DKM-401 Digital Multimeter, showing the display for L1, L2, L3 currents and frequency/voltage, along with menu buttons.
2. Awọn ẹya ara ẹrọ
- Awọn iwọn RMS otitọ
- Class 0.5 accuracy
- Fọ gbe fifi sori ẹrọ
- Iwaju nronu siseto
- Dinku ijinle nronu
- Iwọn otutu iṣiṣẹ jakejado
- Panel iwaju ti a fidi si (IP54)
- Plug-ni asopọ eto
- Owo pooku
3. Idiwon Parameters
- Ipele to alakoso voltages: U12-U23-U31
- Ipele to didoju voltages: V1-V2-V3
- Phase currents: I1-I2-I3
- Frequency: F
4. fifi sori
4.1. Electrical Installation Guidelines
IKILO: Do not install the unit close to high electromagnetic noise emitting devices like contactors, high current busbars, switchmode power supplies, and the like.
Although the unit is protected against electromagnetic disturbance, excessive disturbance can affect its operation, measurement precision, and data communication quality.
- Lo awọn kebulu ti iwọn otutu ti o yẹ.
- Use adequate cable section, at least 0.75mm² (AWG18).
- For current transformer inputs, use at least 1.5mm² section (AWG15) cable.
- Awọn ti isiyi okun transformer ipari yẹ ki o ko koja 1.5 mita. Ti o ba ti gun USB ti lo, mu awọn USB apakan proportionally.
- Awọn ayirapada lọwọlọwọ gbọdọ ni iṣelọpọ 5A.
IKIRA: Current Transformers must be used for current measurement. No direct connection allowed.
4.2. Panel Cutout and Mounting
The DKM-401 is designed for flush mounting into a standard 92x92mm panel opening. Ensure sufficient depth for installation.

Image: Panel cutout dimensions, indicating a 92x92mm square opening.

Aworan: Apa view illustrating mounting tolerances and the required panel depth of minimum 30mm and 49mm for the unit's body.
The unit is secured using rear retaining brackets. Ensure the panel thickness is within acceptable tolerances for a secure fit.
5. Asopọmọra aworan atọka
Refer to the diagram below for proper electrical connections of the DKM-401 Digital Multimeter. Ensure all connections are made securely and according to local electrical codes.

Image: Detailed connection diagram for the DKM-401, illustrating input terminals for voltage (L1, L2, L3, N) and current transformers (1, 2, 3, 4, 11, 12, 13, 14).
- Connect L1, L2, L3, and Neutral (N) to the corresponding terminals.
- Connect current transformers (CTs) to terminals 1-4, 11-14 as indicated. Ensure correct polarity.
- Fuses (6A) are recommended for protection on the voltage input lines.
6. Isẹ
6.1. Pushbutton Functions
The DKM-401 features three buttons on the front panel for configuration and measurement screen navigation.
| Bọtini | Išẹ |
|---|---|
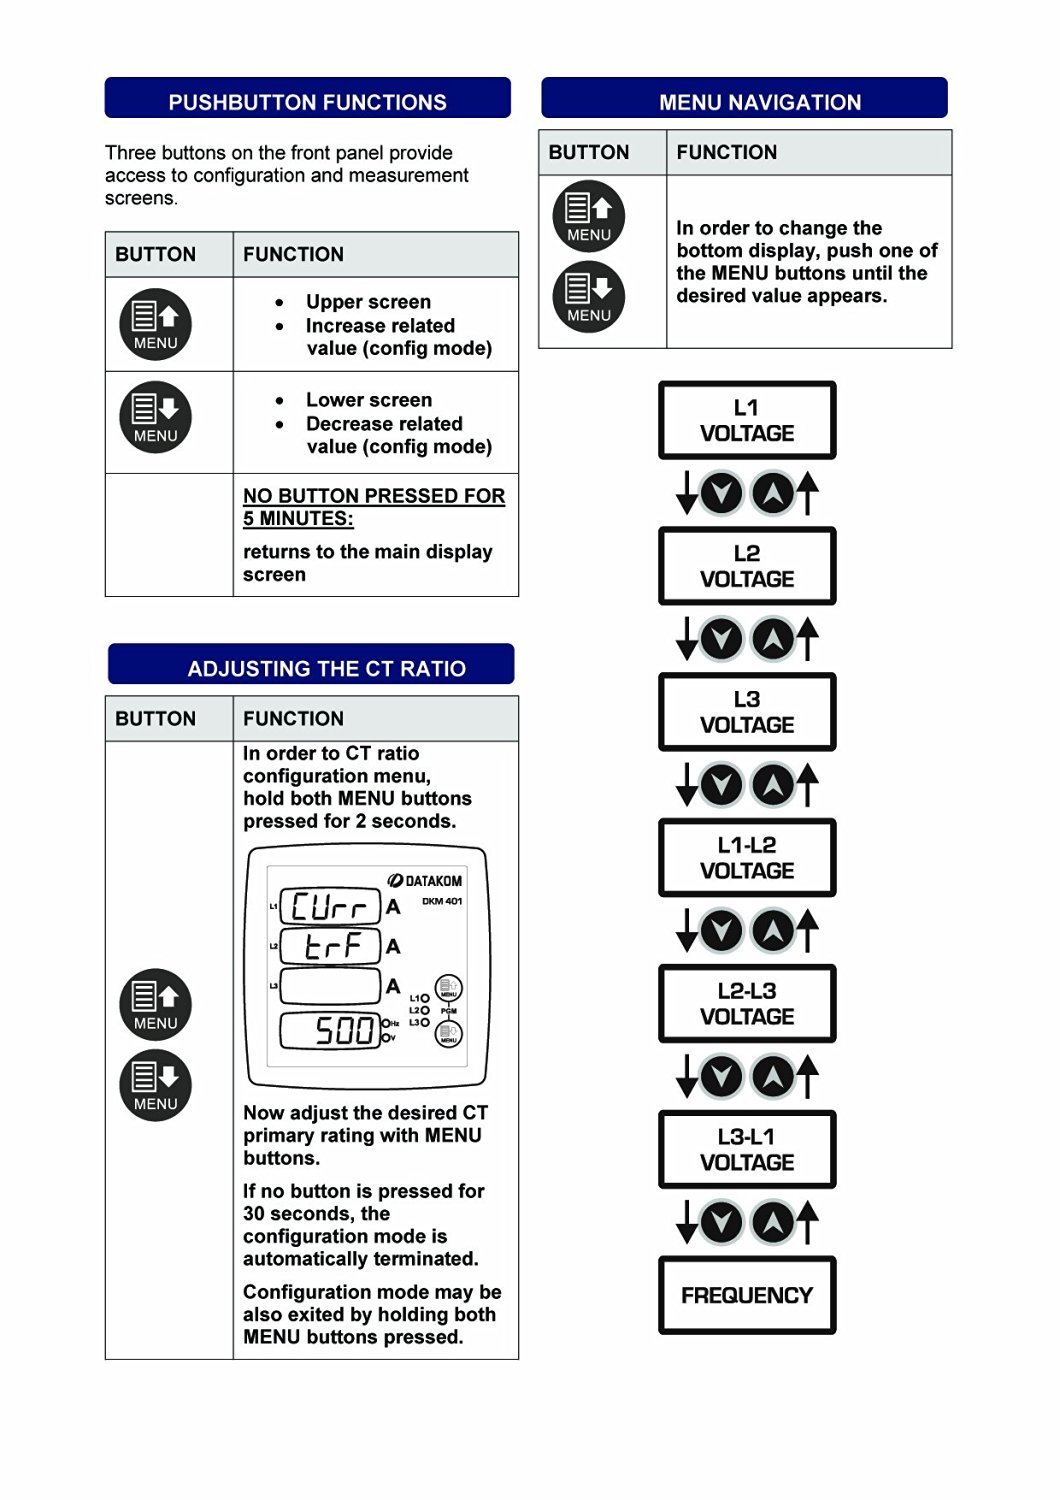 | Upper screen, Increase related value (config mode) |
| Lower screen, Decrease related value (config mode) |
| NO BUTTON PRESSED FOR 5 MINUTES: | Returns to the main display screen |
Image: Table illustrating the functions of the DKM-401's front panel buttons.
6.2. Lilọ kiri Akojọ aṣyn
To change the bottom display, press one of the MENU buttons until the desired value appears. The sequence of displayed values is as follows:
- L-1 VOLTAGE
- L-2 VOLTAGE
- L-3 VOLTAGE
- L1-L2 VOLTAGE
- L2-L3 VOLTAGE
- L3-L1 VOLTAGE
- IGBAGBỌ
Image: Diagram showing the menu navigation flow and the order of parameters displayed on the DKM-401.
6.3. Adjusting the CT Ratio
To enter the CT ratio configuration menu, hold both MENU buttons pressed for 2 seconds. The display will show "Curr" and "ErrA" followed by the current CT ratio (e.g., "500").
Image: DKM-401 display in CT ratio adjustment mode, showing "Curr", "ErrA", and a numerical value.
Use the MENU buttons to adjust the desired CT primary rating. If no button is pressed for 30 seconds, the configuration mode automatically terminates. The configuration mode can also be exited by holding both MENU buttons pressed again.
7. Imọ ni pato
Iṣagbewọle Ipese Agbara:
- 170 - 275VAC, 45 - 66 Hz
- O yatọ si AC ipese voltages wa.
Ibiti igbewọle Wiwọn:
- Voltage: 10 - 300 V AC (L-N), 20 - 520 V AC (L-L)
- Awọn igbewọle lọwọlọwọ: 0.2 - 5.5 A AC
- Igbohunsafẹfẹ: 30 - 100 Hz
Yiye:
- Voltage: 0.5% + 1 oni-nọmba
- Lọwọlọwọ: 0.5% + 1 oni-nọmba
- Igbohunsafẹfẹ: 0.5% + 1 oni-nọmba
Iwọn Iwọn:
- CT ratio: 5/5A to 5000/5A
Lilo Agbara:
- <4 W
Voltage eru:
- <0.1VA fun ipele kan
Ẹrù lọwọlọwọ:
- <1VA fun ipele kan
Iwọn Iṣiṣẹ:
- -20°C si +80°C (-4 si +176°F)
Ọriniinitutu ti o pọju:
- 95% ti kii-condensing.
Iwọn Idaabobo:
- IP 54 (Igbimọ iwaju)
- IP 30 (Back Panel)
Apoti:
- Non-flammable, RoHS compliant, ABS/PC (UL94-V0)
Fifi sori:
- Fifọ iṣagbesori pẹlu ru idaduro biraketi
Awọn iwọn:
- 102x102x53mm (WxHxD)
Ige nronu:
- 92x92mm
Ìwúwo:
- 200 gr
Awọn itọsọna EU:
- Ọdun 2006/95/EC (LVD)
- 2004/108 / EC (EMC)
Awọn ilana itọkasi:
- EN 61010 (ailewu)
- EN 61326 (EMC)
Image: Compilation of technical specifications for the DKM-401 Digital Multimeter.
8. Itọju
The Datakom DKM-401 Digital Multimeter is designed for long-term, reliable operation with minimal maintenance. Follow these general guidelines:
- Ninu: Periodically clean the front panel with a soft, dry cloth. Avoid using abrasive cleaners or solvents that could damage the display or casing.
- Ayewo: Regularly inspect all wiring connections for tightness and signs of wear or damage. Ensure the unit is free from dust and debris, especially around ventilation areas if any.
- Awọn ipo Ayika: Rii daju pe agbegbe iṣẹ wa laarin iwọn otutu ti a sọ ati awọn sakani ọriniinitutu lati ṣe idiwọ ikuna ti tọjọ.
- Ko si Awọn apakan Iṣẹ Olumulo: The DKM-401 contains no user-serviceable parts. Do not attempt to open the enclosure, as this may void the warranty and expose you to electrical hazards.
9. Laasigbotitusita
This section provides solutions to common issues encountered with the DKM-401 Digital Multimeter. If the problem persists, contact technical support.
| Isoro | Owun to le Fa | Ojutu |
|---|---|---|
| No Display / Unit Off | No power supply, incorrect wiring, blown fuse. | Check power connections (170-275VAC). Verify fuses are intact. Ensure wiring matches the connection diagram. |
| Awọn kika ti ko tọ | Incorrect CT ratio setting, faulty wiring, external electromagnetic interference. | Verify the CT ratio setting (Section 6.3). Check all wiring for secure connections and correct polarity. Relocate the unit away from strong electromagnetic fields if possible. |
| Awọn bọtini Idahun | Temporary software glitch, physical button damage. | Power cycle the unit (turn off and on). If buttons remain unresponsive, contact support. |
| Ṣe afihan Awọn Didi | Software error, power instability. | Power cycle the unit. Ensure stable power supply. |
10. Apoti Alaye
- Awọn nkan fun Package: 12 ona
- Iwọn idii: 280 x 170 x 215mm
- Ìwúwo Apo: 2.6 kg
11. Atilẹyin ọja ati Support
Datakom products are manufactured under strict quality control standards. For warranty information, please refer to the documentation included with your purchase or visit the official Datakom webojula.
For technical assistance, troubleshooting, or service inquiries, please contact your authorized Datakom dealer or distributor. When contacting support, please have your product model (DKM-401) and serial number available.
AlAIgBA Ofin: Please note that this Datakom item is not sold to USA and Canada. This manual is for informational purposes only and does not constitute a warranty or guarantee.
Ask a question about this manual
Ask about setup, troubleshooting, compatibility, parts, safety, or missing instructions. Manuals+ will review the question and use this page’s manual context to help answer it.