
1. Alaye Aabo
Please read this manual carefully before operating the GAIN EXPRESS Digital Car Window Tint Meter WTM-1100. Retain this manual for future reference.
- Ma ṣe gbiyanju lati tunto tabi yi ẹrọ naa pada. Eyi le sọ atilẹyin ọja di ofo ati ki o fa ibajẹ.
- Jeki ẹrọ naa kuro ninu omi ati ọriniinitutu pupọ.
- Yago fun ṣiṣafihan ẹrọ naa si awọn iwọn otutu to gaju tabi oorun taara fun awọn akoko gigun.
- Use only the specified battery type (AAA alkaline batteries) for power.
- Handle the measuring probes with care to prevent damage to the optical components.
- Ensure proper alignment of the probes during measurement to obtain accurate readings.
2. Ọja Ipariview
The GAIN EXPRESS WTM-1100 is a portable digital window tint meter designed for accurately measuring the Visible Light Transmission (VLT) through various transparent or translucent materials, including automotive windows, filmed glass, and other samples. While the product title mentions capabilities for UV IR Rejection and Spectrum Testing, the primary measurement detailed in the specifications is Visible Light Transmission at 550 nanometers. It features a clear LCD display, one-key calibration, and a compact design for ease of use.
Awọn ẹya pataki:
- Wiwọn pipe: Precisely measures Visible Light Transmission (VLT) from 0% to 100%.
- Awọn ohun elo to pọ: Suitable for automotive, aerospace, glass products, plastic sheets, and more.
- Ifihan Digital: Features a 10mm LCD display for clear reading results.
- Ipinnu giga: Provides accurate and reliable readings with high resolution.
- Apẹrẹ to gbe: Solid structure, small size, and lightweight for easy carrying and use.
- Ipo Idiwọn Tesiwaju: Allows for ongoing measurements.
- Orisun Imọlẹ Inu: Enables use in various lighting conditions, day or night.
- One-Key Calibration: Simplifies the calibration process for user convenience.
- Optional PC Connectivity: Can be connected to a PC via an optional RS232C cable and software (not included) for expanded functionality.

Figure 2.1: GAIN EXPRESS Digital Car Window Tint Meter WTM-1100. This image shows the main unit of the tint meter, highlighting its compact design and digital display.

Figure 2.2: Labeled components of the WTM-1100 Tint Meter. This image identifies the RS-232 port, display, calibration key, power key, and measuring probes.
3. Eto
3.1 Fifi sori batiri
The WTM-1100 meter is powered by four AAA alkaline batteries. To install or replace batteries:
- Wa ideri iyẹwu batiri ni ẹhin ẹrọ naa.
- Gbe ideri naa ṣii.
- Insert four AAA alkaline batteries, ensuring correct polarity (+/-).
- Pa ideri batiri naa ni aabo.

Figure 3.1: Battery compartment. This image shows the open battery compartment on the back of the device, ready for battery insertion.
3.2 Power On and Self-Calibration
After battery installation, the device will perform a self-calibration upon power-on. This ensures accuracy without manual adjustment.
- Tẹ awọn Agbara button to turn on the instrument.
- The instrument will automatically self-calibrate. During this process, the display will show initial values and then settle to 100% VLT (or similar initial values depending on the model variant).
- Once self-calibration is complete, the device is ready for use.
Video 3.1: LS162 Transmission Meter Instruction Guide. This video demonstrates the battery installation, power-on sequence, and automatic self-calibration of a similar transmission meter, showing the display settling to initial values.
4. Awọn ilana Iṣiṣẹ
4.1 Gbigba Idiwon
To measure the light transmission of a sample:
- Ensure the device is powered on and has completed its self-calibration.
- Carefully insert the material (e.g., window, film) into the test slot between the transmitter and receiver probes.
- Ensure the two markings on the probe are properly aligned for accurate results.
- The measured Visible Light Transmission (VLT) percentage will be displayed instantly on the LCD.
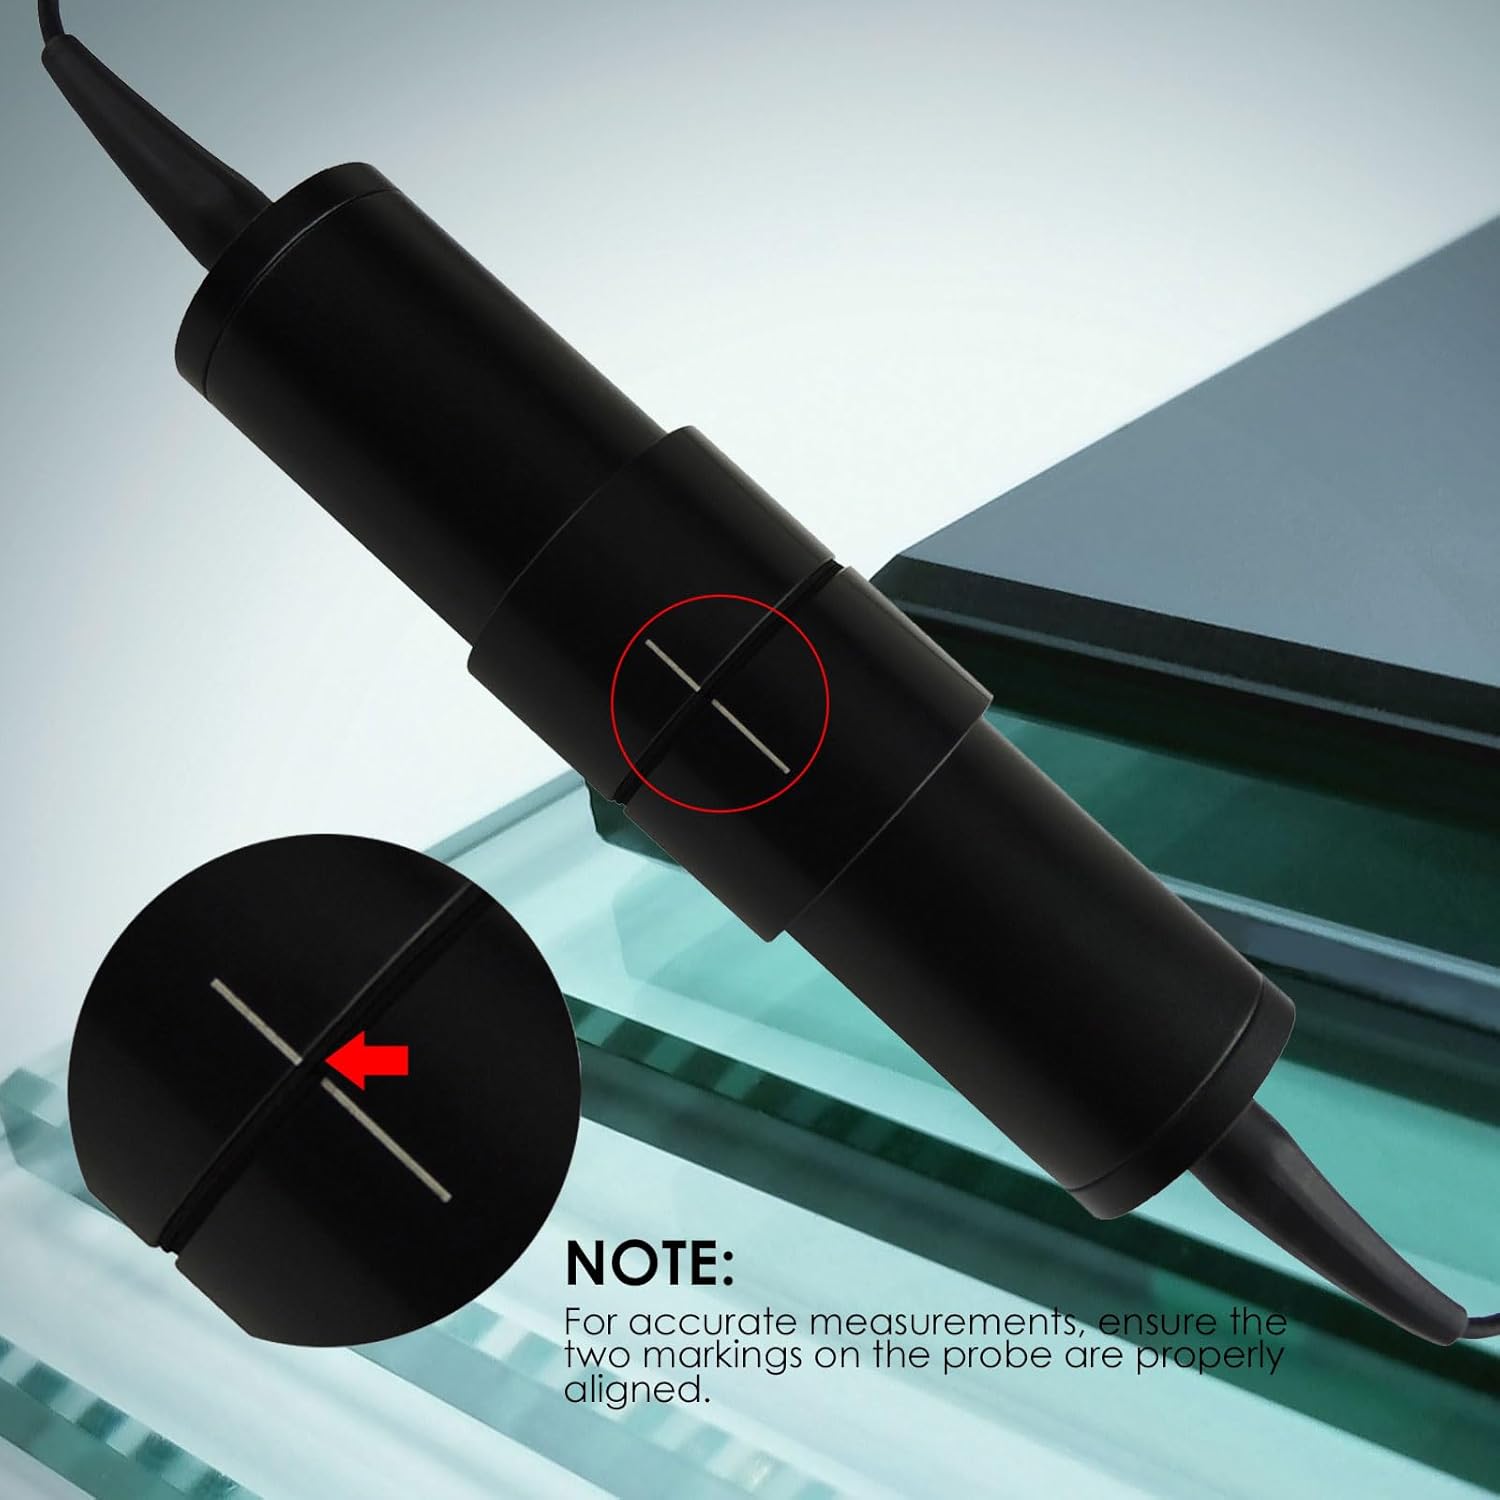
Figure 4.1: Proper probe alignment. This image illustrates how to align the two markings on the measuring probe to ensure accurate readings.
Video 4.1: Window Tint Meter Operation. This video demonstrates the process of placing a window between the transmitter and receiver to obtain a tint measurement.
4.2 Checking Calibration
To quickly verify the accuracy of the device's calibration:
- Use the included reference sample (test sheet) if available.
- Place the receiver probe on top of the test sheet.
- Compare the value shown on the LCD with the specified value on the test sheet. They should match closely.
Video 4.2: Calibration Check. This video shows how to verify the meter's accuracy by comparing its reading with a reference sample.
4.3 Data idaduro Išė
The device features a data hold function to freeze the current reading on the display.
- After taking a measurement, short press the DATA TRANS button (or equivalent data hold button) to lock the displayed value.
- The "HOLD" indicator may appear on the screen.
- To release the hold and return to live measurement, short press the button again.

Figure 4.2: One-key calibration. This image highlights the 'CAL' button, which is used for calibration or data hold depending on the model variant.
Video 4.3: Data Hold Function. This video demonstrates how to use the data hold function to lock a measurement on the display.
4.4 RS232C Connectivity (Optional)
The WTM-1100 can be connected to a PC for data transfer and analysis using an optional RS232C cable and software (not included).
- Locate the RS-232 port on the device.
- Connect the RS232C cable (purchased separately) from the device to your PC.
- Install the appropriate software on your PC to enable data communication.

Figure 4.3: RS232C port. This image shows the RS232C port located on the side of the device for optional PC connectivity.
5. Itọju
5.1 Ninu
- Fi aṣọ rírọrùn tí ó gbẹ nu ìta ẹ̀rọ náà.
- Do not use abrasive cleaners or solvents, as these may damage the casing tabi ifihan.
- Keep the optical components of the probes clean and free from dust or smudges. Use a soft, lint-free cloth specifically designed for optics if necessary.
5.2 Batiri Rirọpo
When the low battery indicator appears on the display, replace the batteries as described in Section 3.1. Always replace all four batteries at once with new AAA alkaline batteries.
5.3 Ibi ipamọ
Store the device in a dry, cool place, away from direct sunlight and extreme temperatures. The recommended storage environment is -70 to 50 degrees Celsius with less than 80% relative humidity (non-condensing).
6. Laasigbotitusita
| Isoro | Owun to le Fa | Ojutu |
|---|---|---|
| Ẹrọ naa ko ṣiṣẹ. | Awọn batiri ti o ku tabi ti ko tọ ti fi sori ẹrọ. | Check battery polarity. Replace with new AAA alkaline batteries. |
| Awọn kika aipe tabi aisedede. |
|
|
| Display shows "Low Battery" or similar. | Awọn batiri ti wa ni kekere. | Replace all four AAA alkaline batteries. |
7. Awọn pato
| Paramita | Iye |
|---|---|
| Nọmba awoṣe | WTM-1100 |
| Orisi wiwọn | Mita gbigbe |
| Ipinnu | 0.1 |
| Yiye | ≤ 2% |
| Igi gigun | 550 Nanometers (Visible Light) |
| Iwọn Iwọn | 0~100% Light Transmission |
| Sample Sisanra | Less than 18mm / 0.4 inch |
| Orisun agbara | Battery Powered (4 x AAA alkaline batteries) |
| Iwọn Išẹ ti o kere ju Voltage | 1.5 Volts |
| Oke otutu Rating | Awọn iwọn Celsius 50 |
| Ayika ti nṣiṣẹ | 0-50°C, <80% RH (No condensation) |
| Ibi ipamọ Ayika | -70-50°C, <80% RH |
| Iwọn Nkan | 100 giramu |
| Awọn iwọn Ọja (L x W x H) | 25.4 x 5.1 x 20.3 centimita |
| Ni wiwo | RS-232C (optional, not included) |

Figure 7.1: Specifications. This image provides a visual summary of the key technical specifications for the WTM-1100.

Figure 7.2: Dimensions. This image shows the physical dimensions of the main unit and the probe.
8. Atilẹyin ọja ati Support
GAIN EXPRESS products are manufactured to high-quality standards. For warranty information and technical support, please refer to the warranty card included with your product or contact your retailer. Keep your purchase receipt as proof of purchase.
For further assistance, please visit the GAIN EXPRESS store on Amazon or contact their customer service directly.
Olupese: Gain Express Holdings Ltd
Ibi Iṣowo: To Kwa Wan, Kowloon, 000, HK