Ọrọ Iṣaaju
This instruction manual provides comprehensive guidance for the StarTech.com M.2 SATA External SSD Enclosure. This device allows you to convert a SATA M.2 solid-state drive into a portable, high-speed USB 3.0 (5Gbps) external drive with UASP support. Please read this manual carefully before installation and operation to ensure proper use and optimal performance.
Package Awọn akoonu
Jẹrisi pe gbogbo awọn paati wa ninu package rẹ:
- 1 x M.2 NGFF SATA Enclosure
- 1 x USB 3.0 Cable (USB-A to Micro-B)
- 1 x Mini Screwdriver
- 1 x SSD Screw Kit
- 1 x Ilana itọnisọna

Image: All components included in the package, such as the enclosure, USB cable, screwdriver, and screw kit.
Ibamu
This enclosure is designed for specific M.2 SSD types. Please ensure your SSD meets the following criteria:
- Ni wiwo: SATA M.2 SSDs only.
- Iru bọtini: Supports M.2 SATA Type with B Key Interface and B+M Key Interface.
- Ko Ibaramu: M.2 NVMe or AHCI PCIe SSDs (M Key interface).
- Drive Sizes: Supports common M.2 SSD lengths including 30mm (2230), 42mm (2242), 60mm (2260), and 80mm (2280).
- Awọn ọna ṣiṣe: Compatible with any operating system, including Windows, macOS, Chrome OS, and Linux, without requiring additional drivers.

Image: Visual representation of compatible M.2 SATA B Key and B+M Key interfaces, and incompatible M Key NVMe/AHCI PCIe interfaces.

Image: Illustration of the various standard M.2 SATA drive sizes (2230, 2242, 2260, 2280) that fit into the enclosure.
Eto ati fifi sori
Follow these steps to install your M.2 SATA SSD into the enclosure:
- Yọ Oju-ara kuro: Use the included screwdriver to remove the enclosure's faceplate and slide out the internal drive tray.
- Connect SSD: Carefully connect your M.2 SATA SSD to the M.2 port on the drive tray. Ensure it is seated firmly.
- SSD ti o ni aabo: Press the drive down toward the standoff and secure it in place with the appropriate screw from the SSD screw kit.
- Reassemble Enclosure: Slide the drive tray back into the enclosure and re-secure the faceplate with the screw.
- Sopọ si Kọmputa: Attach the USB cable to the enclosure and then connect it to an available USB 3.0 port on your computer.
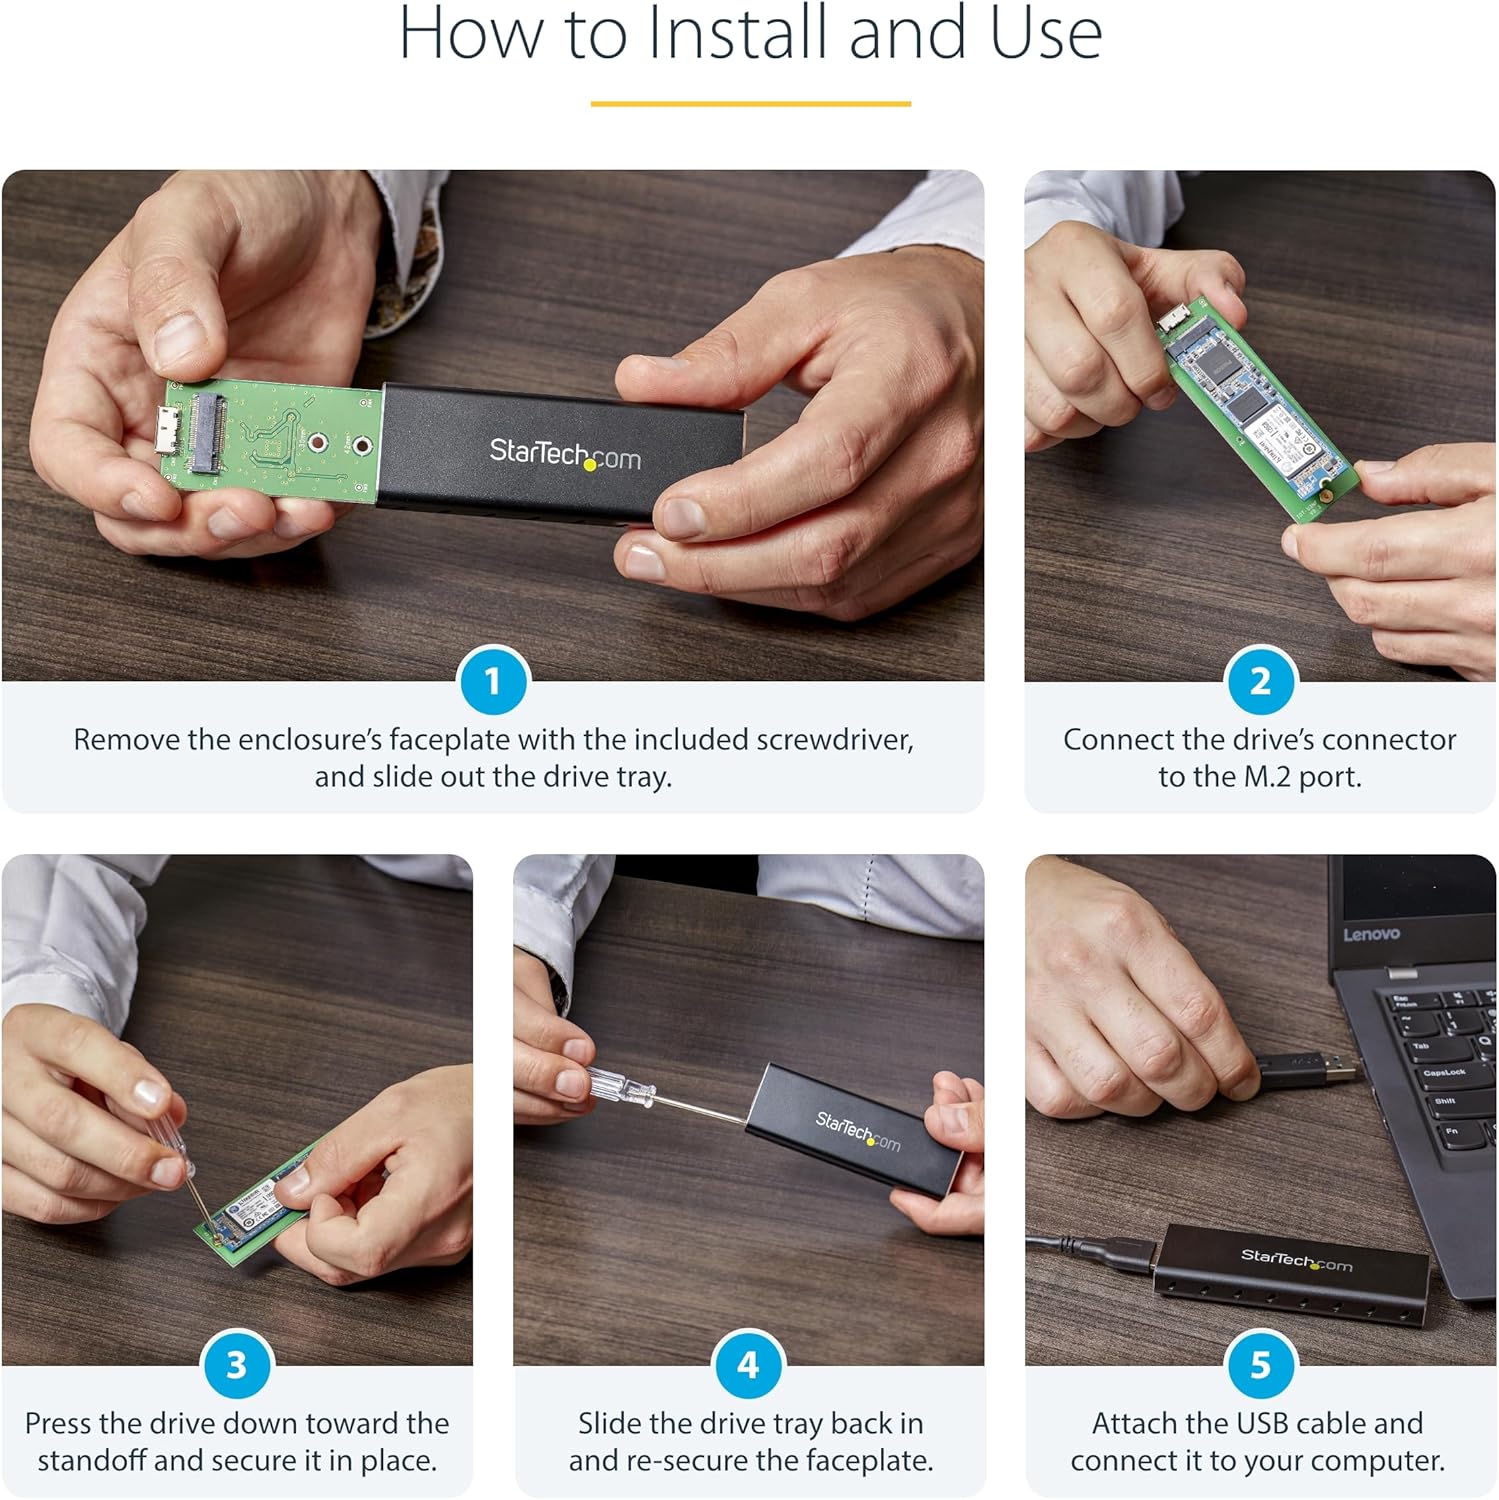
Image: A series of five images demonstrating the installation process: removing the faceplate, connecting the SSD, securing it, reassembling, and connecting to a computer.
Awọn ilana Iṣiṣẹ
Once installed, the enclosure operates as a standard external USB drive.
- Iṣẹ́ Awakọ Láìsí Awakọ̀: The enclosure supports plug-and-play functionality across various operating systems, requiring no additional software or drivers.
- Atilẹyin UASP: When connected to a UASP-enabled host computer, the enclosure can achieve up to 70% faster transfer speeds compared to traditional USB 3.0.
- Agbara: The enclosure is USB-powered and does not require an external power adapter.

Image: The M.2 SSD enclosure connected to a laptop, highlighting its compatibility with multiple operating systems without requiring drivers.

Image: The portable M.2 SATA enclosure connected to a laptop, demonstrating its use as an external drive.
Itoju
To ensure the longevity and optimal performance of your enclosure:
- Ninu: Use a soft, dry cloth to clean the exterior of the enclosure. Avoid liquid cleaners.
- Pipade Ooru: The aluminum construction and ventilation holes are designed to dissipate heat. Ensure these vents are not obstructed during operation to maintain a cool environment for your SSD.
- Idaabobo ti ara: The durable aluminum construction protects your drive. Avoid dropping the enclosure or subjecting it to excessive force.

Image: The enclosure's durable aluminum body, highlighting its dimensions and ventilation holes designed for heat dissipation.
Laasigbotitusita
If you encounter issues with your M.2 SATA External SSD Enclosure, refer to the following common problems and solutions:
- A ko mọ Awakọ:
- Ensure the M.2 SSD is correctly seated and secured within the enclosure.
- Verify that your M.2 SSD is a SATA type (B Key or B+M Key) and not an NVMe/AHCI PCIe type (M Key).
- Gbiyanju lati so apade pọ mọ ibudo USB ti o yatọ lori kọnputa rẹ.
- Ṣayẹwo Iṣakoso Disk (Windows) tabi IwUlO Disk (macOS) lati rii boya a ti rii kọnputa ṣugbọn aimọ tabi ti a ko ṣe agbekalẹ.
- Awọn iyara Gbigbe lọra:
- Ensure the enclosure is connected to a USB 3.0 port on your computer. USB 2.0 ports will result in slower speeds.
- Confirm that your operating system and host controller support UASP for optimal performance.
- Check the health of your M.2 SSD.
- Enclosure Overheating:
- Ensure the ventilation holes on the enclosure are not blocked.
- Avoid placing the enclosure in direct sunlight or confined spaces.
Awọn pato
| Ẹya ara ẹrọ | Sipesifikesonu |
|---|---|
| Ni wiwo Hardware | USB 3.0 |
| Data Gbigbe Oṣuwọn | Up to 600 Megabits Per Second (5Gbps with UASP) |
| Awọn ẹrọ ibaramu | PC, Mac |
| Supported Devices Quantity | 1 |
| Ohun elo apade | Aluminiomu |
| Àwọ̀ | Dudu |
| Awọn iwọn Ọja (L x W x H) | 3.7" x 1.1" x 0.4" (98mm x 34mm x 12mm) |
| Iwọn Nkan | 0.05 kilo |
| Supported M.2 SSD Sizes | 2230, 2242, 2260, 2280 |
| M.2 Key Support | B Key, B+M Key (SATA) |
Atilẹyin ọja
This StarTech.com M.2 SATA External SSD Enclosure is backed by a 2-odun atilẹyin ọja.
For detailed warranty terms and conditions, please refer to the official StarTech.com webaaye tabi kaadi atilẹyin ọja ti o wa pẹlu ọja rẹ.
Atilẹyin
For technical support, troubleshooting assistance, or to access additional resources, please visit the official StarTech.com webojula:
You may also find helpful information in the FAQ section or by contacting their customer service directly.