Ọrọ Iṣaaju
O ṣeun fun riraasing the STOGA Ubox STV040 Dual Lens Car DVR Camera. This manual provides detailed instructions for the proper installation, operation, and maintenance of your device. Please read this manual thoroughly before using the product to ensure optimal performance and safety.
Package Awọn akoonu
Jọwọ ṣayẹwo awọn akoonu package lori ṣiṣi. Ti awọn ohun kan ba nsọnu tabi bajẹ, kan si alagbata rẹ.
- 1 x STOGA Ubox STV040 Car DVR Camera
- 1 x Aṣaja ọkọ ayọkẹlẹ
- 1 x Car Mount
- 1 x External GPS Module
- 1 x Itọsọna olumulo
Ọja Pariview
Familiarize yourself with the components and features of your STOGA Ubox STV040 Car DVR Camera.

Nọmba 1: Iwaju view of the DVR camera with the display screen active.

Nọmba 2: Iwaju view detailing the dual wide-angle lenses and surrounding controls.
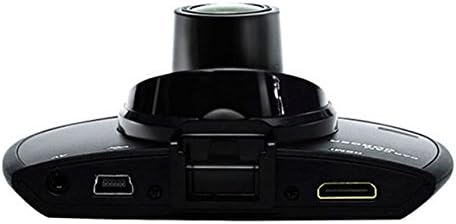
Nọmba 3: Oke view illustrating the connectivity ports (HDMI, USB, AV).

Nọmba 4: Angled perspective of the DVR camera, showing its compact design.
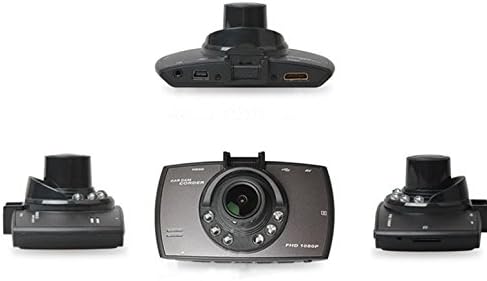
Nọmba 5: Okeerẹ view of the DVR camera from various angles.
Ṣeto
1. Fifi kaadi Micro SD sori ẹrọ
Insert a Micro SD card (Class 6 or higher, 4GB-32GB) into the designated slot on the DVR camera. Ensure the card is inserted correctly until it clicks into place. The device supports continuous loop recording and emergency event recording.
2. Iṣagbesori Kamẹra
- Attach the car mount to the windshield in a position that does not obstruct your view.
- Securely attach the DVR camera to the car mount.
- Adjust the camera angle to ensure both lenses capture the desired view (front and interior/side). The dual lenses are 180-degree rotatable.
3. Asopọ agbara
Connect the car charger to the DVR camera's power input and plug the other end into your vehicle's 12V power outlet (cigarette lighter socket). The camera will typically power on automatically when the vehicle starts and power off when the vehicle is turned off.
4. Asopọmọra Modulu GPS (Aṣayan)
Connect the external GPS module to the designated GPS port on the DVR camera. This enables GPS logging, recording location data along with video footage.
Awọn ilana Iṣiṣẹ
Titan / Paa
- Aifọwọyi: The camera powers on and starts recording automatically when the car engine starts. It powers off automatically when the engine is turned off.
- Afowoyi: Tẹ bọtini agbara ki o si dimu mọ lati tan ẹrọ naa tabi pa pẹlu ọwọ.
Awọn igbasilẹ Gbigbasilẹ
- Gbigbasilẹ Loop: The camera continuously records video in segments. When the memory card is full, it automatically overwrites the oldest unlocked footage.
- Gbigbasilẹ pajawiri (G-Sensor): The built-in G-Sensor detects sudden impacts or collisions. In such an event, the current video segment is automatically locked and protected from being overwritten.
Lilọ kiri Akojọ aṣyn
Use the control buttons located on the device to navigate through the menu options on the 2.0" TFT LCD screen. Adjust settings such as video resolution, date/time stamp, language (English, Chinese, Japanese, Russian), and G-Sensor sensitivity.
Sisisẹsẹhin
- Stop recording if currently active.
- Enter playback mode via the menu.
- Yan fidio ti o fẹ file for playback on the device screen.
- Alternatively, remove the Micro SD card and insert it into a computer to view files.
Ọrọigbaniwọle Idaabobo
The device supports password protection to prevent unauthorized access to recordings. Refer to the on-screen menu for setting up and managing this feature.
Itoju
- Ninu: Use a soft, dry cloth to clean the camera lenses and screen. Avoid abrasive cleaners or solvents.
- Kaadi SD Micro: Format the Micro SD card regularly (e.g., once a month) to ensure optimal performance and prevent data corruption. Back up important files ṣaaju ki o to kika.
- Iwọn otutu: Yẹra fún fífi ẹ̀rọ náà sí ojú otútù tó le koko, oòrùn tààrà fún ìgbà pípẹ́, tàbí ọriniinitutu gíga.
- Awọn imudojuiwọn famuwia: Ṣayẹwo awọn olupese ká website periodically for any available firmware updates to improve performance and add features.
Laasigbotitusita
| Isoro | Owun to le Fa / Solusan |
|---|---|
| Kamẹra ko ṣiṣẹ. |
|
| Gbigbasilẹ duro lairotẹlẹ. |
|
| Didara fidio ti ko dara. |
|
| GPS ko ṣiṣẹ. |
|
| Battery does not hold charge. |
|
Awọn pato
| Ẹya ara ẹrọ | Ẹ̀kúnrẹ́rẹ́ |
|---|---|
| Nọmba awoṣe | Ubox STV040 |
| Ifihan | 2.0" TFT LCD (960 x 240 pixels) |
| Awọn lẹnsi | Dual 140-degree A+ wide-angle, 180-degree rotatable |
| Sensọ | CMOS |
| Ipinnu fidio | 1280 x 480 @ 30 fps, 640 x 480 @ 30 fps |
| Fidio kika | AVI |
| Aworan kika | M-JPG |
| Alẹ Iranran | Iṣẹ iṣẹ iran oru ni infurarẹẹdi |
| Ibi ipamọ | Micro TF (SD HC) card, 4GB-32GB, Class 6 and above |
| GPS | Supports external GPS module |
| G-Sensọ | Integrated, supports emergency event recording lock |
| Gbohungbo/ Agbọrọsọ | Ti ṣepọ |
| Abajade | CVBS (Video Output) |
| Batiri | 3.7V 700mA Lithium-Polymer battery |
| Ibamu System isẹ | Windows 2000/XP/Vista/Windows 7 |
| Awọn ede atilẹyin | English, Chinese, Japanese, Russian |
Atilẹyin ọja ati Support
For warranty information and technical support, please refer to the documentation provided with your purchase or contact your retailer. Keep your purchase receipt as proof of purchase for warranty claims.
For further assistance, you may also visit the official STOGA webojú-òpó wẹ́ẹ̀bù (tí ó bá wà) tàbí kí o kàn sí ẹ̀ka iṣẹ́ oníbàárà wọn.