1. Ifihan
Thank you for choosing the NuWave 6.5 Quart Stainless Steel Pressure Cooker. This manual provides essential information for the safe and effective use of your appliance. Please read all instructions carefully before first use and retain for future reference.
Alaye Aabo pataki
- Always ensure the lid is properly sealed before operating.
- Do not overfill the pressure cooker.
- Never force the lid open while the cooker is pressurized.
- Allow pressure to release completely before opening.
- Keep hands and face away from the steam release valve during operation and pressure release.
- Lo iṣọra nigbati o ba n mu awọn aaye gbigbona mu.
- Ohun elo yii kii ṣe ipinnu fun lilo nipasẹ awọn eniyan ti o dinku ti ara, imọlara, tabi awọn agbara ọpọlọ ayafi ti abojuto.
2. Ọja Ipariview ati irinše
The NuWave 6.5 Quart Stainless Steel Pressure Cooker is designed for efficient cooking. Familiarize yourself with its main components:

Nọmba 2.1: The NuWave 6.5 Quart Stainless Steel Pressure Cooker, showcasing its main body and lid.
Awọn eroja pataki:
- Ikoko akọkọ: Irin alagbara, irin ikole.
- Ideri: Features a sealing gasket, pressure indicator, and steam release valve.
- Imudani akọkọ: Ergonomic handle for safe handling and lid locking mechanism.
- Imudani Iranlọwọ: For two-handed lifting.
- Àtọwọdá Tu Titẹ: Controls steam release and pressure levels.
- Àmì Ìfúnpá: Visual cue for internal pressure status.

Nọmba 2.2: Close-up of the lid handles and the red locking button, which secures the lid to the pot.

Nọmba 2.3: Oke view of the pressure release valve, showing settings for steam release and pressure levels (1 and 2).
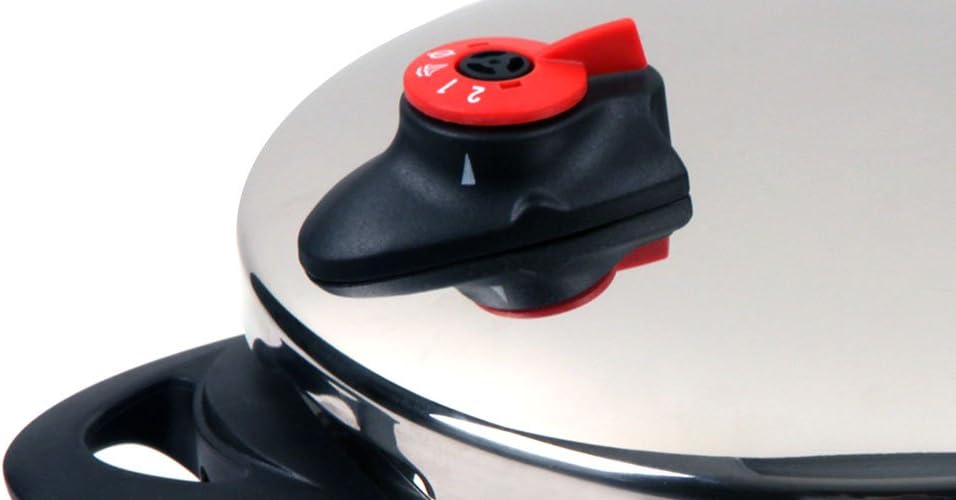
Nọmba 2.4: Apa view of the pressure release valve, indicating its position on the lid.
3. Eto ati First Lo
3.1 Unpacking ati Ni ibẹrẹ Cleaning
- Remove all packaging materials and labels from the pressure cooker.
- Wash the pot, lid, and all removable parts (sealing gasket, pressure release valve) with warm, soapy water.
- Rinse thoroughly and dry completely before assembly.
3.2 Ṣíṣe àkójọpọ̀ ìbòrí náà
- Ensure the sealing gasket is correctly seated inside the lid rim.
- Place the pressure release valve onto its designated post on the lid, ensuring it is securely fitted.
4. Awọn ilana Iṣiṣẹ
4.1 Kíkún Ohun Èlò Títẹ̀
- Add ingredients and liquid to the pot. Do not fill more than 2/3 full for most foods, and no more than 1/2 full for foods that expand (e.g., rice, beans).
- Ensure there is always a minimum amount of liquid (typically 1 cup) to generate steam.

Nọmba 4.1: Example of the pressure cooker filled with ingredients such as seafood and vegetables, ready for cooking.

Nọmba 4.2: The pressure cooker containing various types of rice, demonstrating its capacity for different food preparations.
4.2 Sealing the Lid
- Align the lid with the pot, ensuring the handles are offset.
- Lower the lid onto the pot and rotate the main handle until it locks securely into place with the auxiliary handle. You should hear a click.
- Ensure the pressure release valve is set to the desired pressure setting (e.g., 1 or 2) or to the sealed position, as per your recipe.
4.3 Sísè lábẹ́ ìfúnpá
- Place the pressure cooker on a suitable heat source (induction, gas, or electric stovetop).
- Heat on high until the pressure indicator rises and steam begins to escape from the valve.
- Reduce heat to maintain a steady, gentle stream of steam or a consistent wobble of the pressure regulator.
- Begin timing your recipe once full pressure is reached.
4.4 Ifiweranṣẹasing Ipa
Awọn ọna akọkọ meji lo wa fun idasilẹasing titẹ:
- Itusilẹ Adayeba: Remove the cooker from heat and allow it to cool down naturally. The pressure indicator will drop on its own. This method is suitable for foods that benefit from additional cooking time, such as stews and roasts.
- Tu ni kiakia: Carefully turn the pressure release valve to the "steam release" position. Steam will rapidly escape. This method is suitable for delicate foods like vegetables to prevent overcooking. Exercise extreme caution to avoid steam burns.
Ṣí ìdènà náà nìkan nígbà tí àmì ìfúnpá bá ti lọ sílẹ̀ pátápátá tí kò sì sí èéfín tí ń jáde.
5. Itọju ati Cleaning
5.1 Daily Cleaning
- After each use, wash the pot and lid with warm, soapy water.
- Remove the sealing gasket and wash it separately. Inspect for cracks or damage.
- Clean the pressure release valve and pressure indicator thoroughly to ensure no food particles obstruct them.
- The pot is dishwasher safe. Hand washing is recommended for the lid and its components to prolong their lifespan.
- Gbẹ gbogbo awọn ẹya patapata ṣaaju titoju.
5.2 Ibi ipamọ
Tọ́jú ẹ̀rọ ìfúnpá pẹ̀lú ìbòrí tí a ti yí tàbí tí a ti bò ó díẹ̀ kí afẹ́fẹ́ lè máa rìn kiri àti kí ó má baà rùn.
6. Laasigbotitusita
| Isoro | Owun to le Fa | Ojutu |
|---|---|---|
| Titẹ ko dagba. | Lid not sealed properly; insufficient liquid; sealing gasket damaged; pressure release valve open. | Ensure lid is locked; add more liquid; inspect/replace gasket; close pressure release valve. |
| Nya jijo lati ideri. | Sealing gasket improperly seated or damaged; food debris on rim; lid not closed correctly. | Reposition/replace gasket; clean rim; re-lock lid. |
| A ko le ṣii ideri lẹhin sise. | Internal pressure still present. | Do not force. Allow pressure to release fully (natural or quick release) until the pressure indicator drops. |
7. Awọn pato
- Awoṣe: 31201
- Agbara: 6.5 mẹẹdogun
- Ohun elo: Irin ti ko njepata
- Àwọ̀: Fadaka
- Awọn iwọn: 18 x 16 x 10 inches
- Ìwọ̀n Nkan: 9.48 iwon
- Ibamu: Electric Stovetop, Gas Stovetop, Induction Compatible Base
- Ailewu Apoti: Pot only (hand wash lid components)
8. Atilẹyin ọja ati Support
For warranty information and customer support, please refer to the documentation included with your purchase or visit the official NuWave webojula. Jeki ẹri rira rẹ fun awọn iṣeduro atilẹyin ọja.