KICKER 42IQ5004
Kicker IQ500.4 Q-Class Amplifier Afowoyi olumulo
Model: 42IQ5004
1. Ifihan
This manual provides detailed instructions for the installation, operation, and maintenance of your Kicker IQ500.4 Q-Class Amplifier. Jọ̀wọ́ ka ìwé ìtọ́ni yìí dáadáa kí o tó gbìyànjú láti fi sori ẹ̀rọ tàbí ṣiṣẹ́ láti rí i dájú pé a lò ó dáadáa àti láti dènà ìbàjẹ́.
The Kicker IQ500.4 is a 4-channel car amplifier featuring advanced digital signal processing (DSP) capabilities, designed to deliver high-quality audio performance in automotive environments.
2. Alaye Aabo
Nigbagbogbo ṣe akiyesi awọn iṣọra aabo wọnyi:
- Disconnect the vehicle's battery before making any power connections.
- Rii daju didasilẹ to dara lati ṣe idiwọ awọn eewu itanna.
- Maṣe fi han awọn amplifier si ọrinrin tabi awọn iwọn otutu to gaju.
- Use appropriate gauge wiring for power and speaker connections as specified in the installation section.
- Kan si alamọdaju insitola ti o ko ba ni idaniloju nipa eyikeyi apakan ti ilana fifi sori ẹrọ.
- Ọja yii ni awọn kemikali ti a mọ si Ipinle California lati fa akàn ati awọn abawọn ibimọ tabi ipalara ibisi miiran (Ikilọ 65 Ilana).
3. Package Awọn akoonu
Jẹrisi pe gbogbo awọn ohun kan wa ninu package:
- Kicker IQ500.4 Q-Class Ampitanna
- Iṣagbesori Hardware
- Afowoyi Olumulo (iwe-ipamọ yii)
- USB Cable (for TWEEQ app connection)
4. Eto ati fifi sori
4.1 Iṣagbesori awọn Ampitanna
Select a dry, stable location for mounting the amplifier, ensuring adequate ventilation. Avoid mounting in direct sunlight or areas prone to vibration.
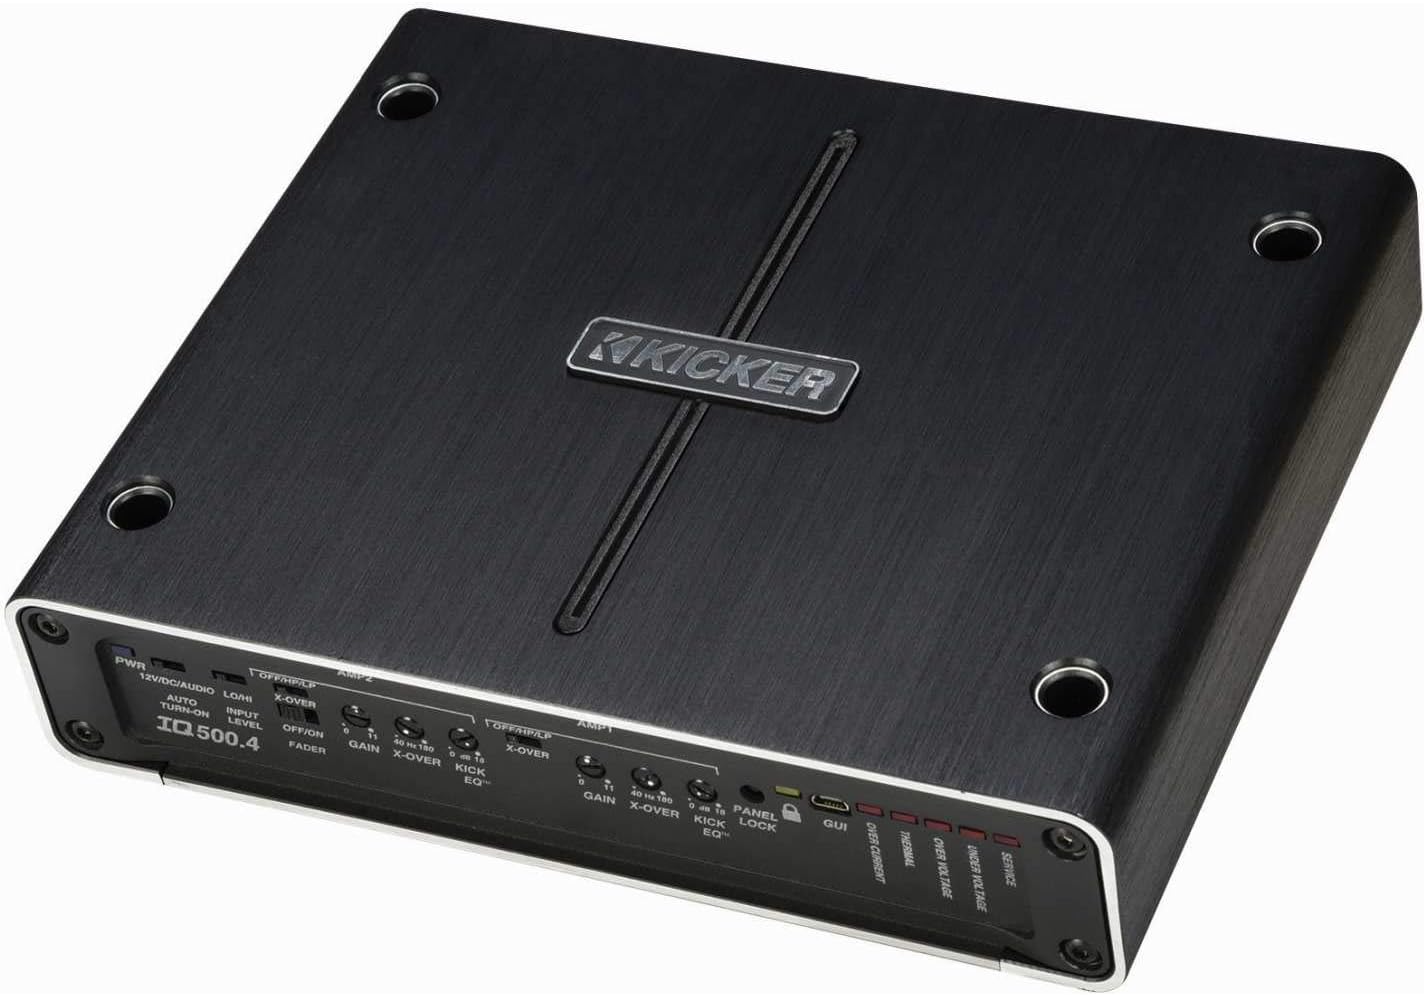
olusin 4.1: Top view of the Kicker IQ500.4 Q-Class Amplifier, highlighting the control panel and overall design.
4.2 Awọn isopọ onirin
Ensure all connections are secure and properly insulated. Refer to the diagram below for typical wiring configurations.

olusin 4.2: Ẹyìn view of the Kicker IQ500.4 Q-Class Amplifier, detailing the power, ground, remote, input, and output connections.
Awọn isopọ Agbara:
- + 12V (Agbara): Connect to the positive terminal of the vehicle's battery using appropriate gauge wire (e.g., 4-gauge for optimal performance).
- GND (Ilẹ): So mọ́ ojú irin tí ó mọ́, tí kò ní àwọ̀ nínú ẹ̀rọ ọkọ̀ náà. Rí i dájú pé ó so mọ́ra dáadáa.
- REM (Titan-latọna jijin): Sopọ si itọsọna titan isakoṣo latọna jijin lati ẹyọ ori rẹ.
Awọn isopọ Iṣawọle/Ojade:
- Ìtẹ̀síwájú (RCA): Connect to the RCA outputs of your head unit or signal processor.
- Output (Speaker): Connect to your speakers. The amplifier supports 4-ohm stable bridged mode.
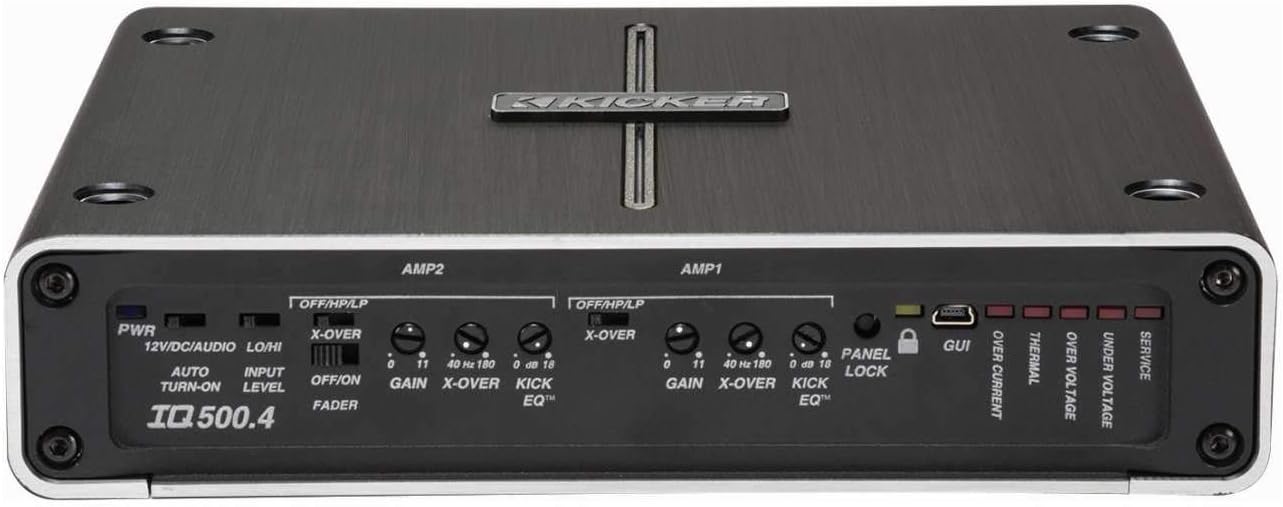
Nọmba 4.3: Alaye view ti awọn amplifier's control panel, showing gain, crossover, and KickEQ adjustments.

Figure 4.4: Close-up of the input and output terminals, including RCA inputs and speaker wire connections.
5. Ṣiṣẹ awọn Ampitanna
5.1 Initial Setup and Gain Matching
After installation, set the gain controls to match the output voltage of your head unit. Start with the gain at minimum and slowly increase until distortion is heard, then back off slightly.
5.2 Digital Signal Processing (DSP) with TWEEQ App
The IQ500.4 features advanced DSP capabilities accessible via the TWEEQ app for PC, iOS, or Android. Download the app from kicker.com/tweeq. Connect your device to the amplifier nipasẹ USB.
TWEEQ App Features:
- TWEEQ Wizard: Automatically sets basic tune, including speaker type/size and time-alignment based on listening position.
- Input Signal Routing and Mixing: Customize signal paths.
- Variable High- and Low-Pass Filters: Adjustable from 10-20,000 Hz with selectable crossover characteristics (Butterworth, Linkwitz) and slopes (6, 12, 18, 24 dB/octave).
- Variable KickEQ+ Bass Boost: Adjustable from 0-18 dB, 24-80 Hz, with 0.5-10 Q.
- Idaduro akoko ti o le ṣatunṣe: Fine-tune sound staging (0-20 ms in 0.02, 0.1, and 1.0 ms increments).
- 31-Band Onisọgba ayaworan: +/-12 dB/band for precise frequency adjustments.
- Dynamic Compressor/Limiter: Fully adjustable (1:1 to 10:1 ratio).
The Panel Lock function disables onboard controls when using the TWEEQ app, ensuring settings are managed digitally.
6. Itọju
- Pa awọn amplifier mọ ki o si free ti eruku. Lo asọ asọ ti o gbẹ fun mimọ.
- Rii daju dara fentilesonu ni ayika amplifier lati se overheating.
- Lokọọkan ṣayẹwo gbogbo awọn asopọ onirin fun wiwọ ati ipata.
7. Laasigbotitusita
| Isoro | Owun to le Fa | Ojutu |
|---|---|---|
| Ko si Agbara | Fiusi ti a fẹ; Agbara alaimuṣinṣin / asopọ ilẹ; Ko si isakoṣo latọna jijin ifihan agbara. | Check/replace fuse; Secure connections; Verify remote wire connection to head unit. |
| Ko si Ijade ohun | Incorrect input/output connections; Gain set too low; Speaker wires shorted. | Verify RCA and speaker connections; Adjust gain; Check speaker wiring for shorts. |
| Ohun Daru | Ere ṣeto ga ju; Awọn eto adakoja ti ko tọ; Agbọrọsọ impedance mismatch. | Reduce gain; Adjust crossover settings via TWEEQ app; Ensure speaker impedance is compatible. |
| Amplifier Overheating | Insufficient ventilation; Low impedance load; Prolonged high-volume use. | Ensure clear airflow around amplifier; Check speaker impedance; Reduce volume or allow cool-down period. |
8. Awọn pato
| Ẹya ara ẹrọ | Ẹ̀kúnrẹ́rẹ́ |
|---|---|
| Awoṣe | IQ500.4 |
| Awọn ikanni | 4-ikanni |
| Agbára RMS (4 ohms) | 65 watt x 4 |
| Agbára RMS (2 ohms) | 125 watt x 4 |
| RMS Power (Bridged 4 ohms) | 250 watt x 2 |
| Ìbámu CEA-2006 | Bẹẹni |
| Variable High-Pass Filter | 40-180 Hz, 24 dB/octave |
| Variable Low-Pass Filter | 40-180 Hz, 24 dB/octave |
| KickEQ Bass didn | 0-18 dB ni 40 Hz |
| Iṣaṣe ifihan agbara oni nọmba (DSP) | Via TWEEQ app (PC, iOS, Android) |
| Oludogba | 31-band graphic (+/-12 dB/band) |
| Idaduro akoko | 0-20 ms |
| Awọn iwọn (L x W x H) | 9.45 x 7.52 x 2.05 inches |
| Iwọn Nkan | 6.67 iwon |
| Voltage | 14.4 Volts |
9. Atilẹyin ọja ati Support
For warranty information and technical support, please refer to the official Kicker website or contact Kicker customer service directly. Keep your proof of purchase for warranty claims.
Kicker Official Webojula: www.kicker.com
Ask a question about this manual
Ask about setup, troubleshooting, compatibility, parts, safety, or missing instructions. Manuals+ will review the question and use this page’s manual context to help answer it.