
1. Ifihan
This manual provides detailed instructions for the installation, operation, and maintenance of your Avision FL-1501B document scanner. Please read this manual thoroughly before using the scanner to ensure proper and safe operation. Keep this manual for future reference.

Figure 1: Avision FL-1501B Document Scanner with its automatic document feeder (ADF) and output tray extended.
2. Alaye Aabo
Observe the following safety precautions to prevent damage to the scanner and ensure user safety:
- Lo oluyipada agbara nikan ti a pese pẹlu ọlọjẹ naa.
- Ma ṣe fi ẹrọ iwo naa han si omi tabi ọriniinitutu ti o pọ ju.
- Gbe scanner sori iduro, ipele ipele.
- Yẹra fun idinamọ awọn ṣiṣi atẹgun.
- Má ṣe gbìyànjú láti tú tàbí tún ẹ̀rọ ìṣàyẹ̀wò náà ṣe fúnra rẹ. Tọ́ka sí àwọn òṣìṣẹ́ iṣẹ́ tó péye.
- Keep the scanner away from direct sunlight and heat sources.
3. Package Awọn akoonu
Jẹrisi pe gbogbo awọn ohun kan wa ninu package:
- Avision FL-1501B Scanner Unit
- Adapter agbara
- Okun USB
- Quick Bẹrẹ Itọsọna
- Software CD (or download instructions)
4. Eto
4.1 Ṣiṣii ati Gbe
- Carefully remove the scanner from its packaging.
- Remove all protective tapes and packing materials.
- Place the scanner on a flat, stable surface with adequate space for document feeding and output.

Figure 2: The Avision FL-1501B scanner in its closed position, suitable for storage or before extending trays.
4.2 Nsopọ Scanner
- Connect the power adapter to the scanner's power input port and then to an electrical outlet.
- Connect the USB cable to the scanner's USB port and then to an available USB port on your computer.
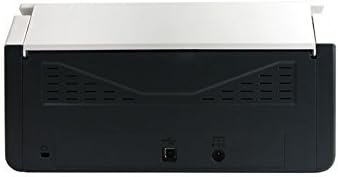
Figure 3: Rear panel of the scanner, illustrating the power input and USB connection ports.
4.3 Fifi sori ẹrọ awakọ ati sọfitiwia
Before using the scanner, you must install the necessary drivers and scanning software on your computer.
- Insert the provided Software CD into your computer's optical drive, or download the latest drivers and software from the official Avision webojula.
- Follow the on-screen instructions to complete the installation process. It is recommended to install all bundled software for full functionality.
- Tun kọmputa rẹ bẹrẹ ti o ba ṣetan.
5. Isẹ
5.1 Awọn iwe aṣẹ ikojọpọ
- Extend the input tray and output tray of the scanner.
- Ṣatunṣe awọn itọsọna iwe lati baamu iwọn awọn iwe aṣẹ rẹ.
- Place the documents face down, top edge first, into the automatic document feeder (ADF). Ensure the stack is neatly aligned. The scanner supports a maximum input sheet capacity of 100 sheets.

olusin 4: Ẹgbẹ profile of the scanner, showing the fully extended input and output trays ready for document feeding.
5.2 Lilo Ibi iwaju alabujuto
The scanner features a control panel for quick access to common scanning functions.

Nọmba 5: Alaye view of the scanner's control panel, featuring a digital display, function selection buttons, Cancel, Scan, and Power buttons.
- Bọtini agbara: Press to turn the scanner on or off.
- Function Buttons (Up/Down Arrows): Use these to select different scanning profiles or functions displayed on the digital screen.
- Bọtini Ṣiṣayẹwo: Initiates the scanning process based on the currently selected function.
- Bọtini Fagilee: Stops the current scanning operation.
5.3 Ṣíṣe Àyẹ̀wò
- Rii daju pe ẹrọ ọlọjẹ ti wa ni titan ati ti sopọ si kọnputa rẹ.
- Load your documents into the ADF as described in section 5.1.
- Open the Avision scanning software on your computer (e.g., Button Manager, Capture Tool).
- Select your desired scanning settings (e.g., color mode, resolution, destination folder, single-sided/duplex).
- Click the "Scan" button in the software or press the Ṣayẹwo button on the scanner's control panel to begin scanning.
- The scanned images will be processed and saved according to your software settings.
6. Itọju
6.1 Ninu Scanner
Regular cleaning helps maintain optimal scanning performance.
- Turn off the scanner and disconnect the power cable before cleaning.
- Lo asọ rirọ, ti ko ni lint ni sere dampened with water or a mild, non-abrasive cleaner to wipe the exterior of the scanner.
- To clean the glass platen (if applicable) and rollers, open the scanner cover. Use a specialized scanner cleaning kit or a soft cloth with isopropyl alcohol.
- Allow all components to dry completely before reconnecting power.
6.2 famuwia imudojuiwọn
Periodically check the Avision website for firmware updates. Firmware updates can improve performance, add features, or resolve issues. Follow the instructions provided with the firmware update package carefully.
7. Laasigbotitusita
Ti o ba pade awọn ọran pẹlu ẹrọ iwoye rẹ, tọka si awọn iṣoro ti o wọpọ ati awọn ojutu wọnyi:
| Isoro | Owun to le Fa | Ojutu |
|---|---|---|
| Scanner ko ni agbara lori. | Okùn agbára kò sopọ̀ mọ́; ibi tí agbára bá ti bàjẹ́. | Rii daju pe okun agbara ti sopọ ni aabo. Gbiyanju iṣan agbara ti o yatọ. |
| Computer does not detect scanner. | Okùn USB ti tú; awọn awakọ ko fi sori ẹrọ tabi bajẹ. | Check USB cable connection. Reinstall scanner drivers. Try a different USB port. |
| Scanned images are blurry or streaky. | Scanner glass or rollers are dirty; document misfeed. | Clean the scanner's internal components (refer to Section 6.1). Ensure documents are loaded correctly. |
| Documents jam in the ADF. | Documents are wrinkled or stapled; paper guides not adjusted. | Straighten documents. Remove staples/clips. Adjust paper guides to fit document width. |
8. Awọn pato
| Ẹya ara ẹrọ | Ẹ̀kúnrẹ́rẹ́ |
|---|---|
| Brand | Iranran |
| Awoṣe | FL-1501B |
| Scanner Iru | Scanner iwe |
| Ipinnu Scanner | 600 dpi |
| O pọju Input dì Agbara | 100 iwe |
| Media Iru | Iwe |
| Wattage | 24 watt |
| Ọja Mefa | 33 x 32.32 x 80.94 cm |
| Iwọn Nkan | 5.67 kg |
| Ọjọ Akọkọ Wa | Oṣu Kẹjọ Ọjọ 6, Ọdun 2016 |
9. Atilẹyin ọja ati Support
9.1 atilẹyin ọja Alaye
Avision products are manufactured to high-quality standards. This product is covered by a limited warranty against defects in materials and workmanship. The specific terms and duration of the warranty may vary by region. Please refer to the warranty card included with your product or visit the official Avision webaaye fun alaye atilẹyin ọja alaye.
9.2 Imọ Support
For technical assistance, driver downloads, or further information, please visit the official Avision support website or contact your local Avision service center. Contact details can typically be found on the Avision webojula tabi ni ọja rẹ ká iwe.