
Ọrọ Iṣaaju
This manual provides detailed instructions for the installation, operation, and maintenance of your Venstar T1900 Residential Slimline Platinum Thermostat. Please read this manual thoroughly before attempting to install or operate the thermostat to ensure proper function and to avoid potential damage.
Alaye Aabo pataki
- Always turn off power to the heating/cooling system at the main circuit breaker or fuse box before installing or servicing the thermostat.
- This thermostat operates on 24 Volts AC. Do not connect to line voltage (120V tabi 240V).
- Onímọ̀ ẹ̀rọ tó mọ̀ nípa wayà iná mànàmáná ló yẹ kó fi sori ẹ̀rọ náà tí o kò bá mọ àwọn wáyà iná mànàmáná.
- Do not short circuit the terminals on the gas valve or at the system control to test the thermostat. This will damage the thermostat and void the warranty.
- Ensure all wiring connections are secure and insulated to prevent short circuits.
Package Awọn akoonu
Jẹrisi pe package rẹ ni awọn nkan wọnyi ninu:
- Venstar T1900 Thermostat Unit
- Ohun elo iṣagbesori (awọn skru ati awọn ìdákọró ogiri)
- Afowoyi Olumulo (iwe-ipamọ yii)
Ọja Pariview
The Venstar T1900 is a 7-day programmable digital thermostat designed for residential use. It offers precise temperature control and energy-saving scheduling capabilities. This thermostat is compatible with heat/cool, heat pump, and dual-fuel systems, controlling up to three heat stages ati meji itura stages.
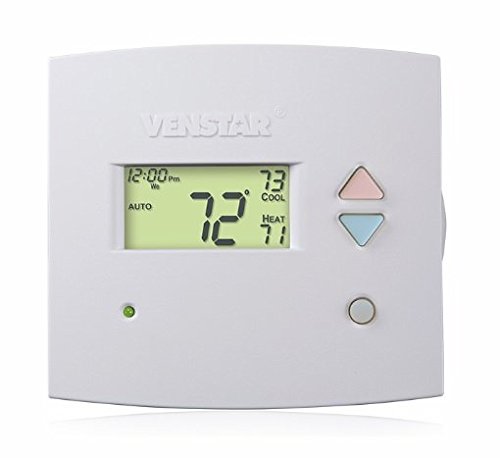
Nọmba 1: Iwaju view of the Venstar T1900 Thermostat. This image displays the thermostat's LCD screen and control buttons, indicating its slimline design.
Awọn ẹya pataki:
- Ṣíṣe Ìṣètò fún Ọjọ́ 7: Allows for customized heating and cooling schedules for each day of the week.
- Ibamu eto: Works with heat/cool, dual-fuel, and heat pump systems.
- Olona-Stage Iṣakoso: Manages up to three heat stages ati meji itura stages.
- Agbara Iṣakoso Latọna jijin: Controllable by phone using an optional add-on (sold separately).
- Automatic or Manual Operation: Provides flexibility for scheduled or on-demand temperature adjustments.
Fifi sori Itọsọna
Awọn irinṣẹ ti a beere:
- Screwdriver (Phillips ati/tabi flathead)
- Drill with appropriate drill bit (if installing new wall anchors)
- Waya strippers
- Ikọwe
- Ipele (aṣayan)
1. Pa Agbara
Locate the circuit breaker or fuse box that controls your heating and cooling system. Turn off the power completely before proceeding with any wiring.
2. Yọ Thermostat atijọ kuro (ti o ba wulo)
- Fara yọ ideri ti thermostat atijọ rẹ kuro.
- Ya àwòrán àwọn ìsopọ̀ wáyà tó wà tẹ́lẹ̀ fún ìtọ́kasí.
- Label each wire with the terminal designation it was connected to (e.g., R, G, Y, W).
- Disconnect the wires and remove the old thermostat's mounting plate from the wall.
3. Mount the New Thermostat Base
- Separate the front cover of the T1900 thermostat from its base plate.
- Position the base plate on the wall where you want to install the thermostat. Ensure it is level.
- Samisi awọn iṣagbesori ihò pẹlu kan ikọwe.
- Lu awọn ihò awakọ ti o ba jẹ dandan ki o si fi awọn ìdákọ̀ró ogiri sii.
- Secure the thermostat base plate to the wall using the provided screws.
4. Awọn gbigbe
Connect the wires from your HVAC system to the corresponding terminals on the T1900 thermostat base. Refer to the wiring diagram provided with your specific HVAC system for precise connections. Ensure wires are stripped approximately 3/8 inch and securely fastened under the terminal screws.
Common Terminal Designations:
- R/Rc/Rh: 24V Power (Heating/Cooling)
- C: Common (24V return)
- G: Olufẹ
- Y/Y1: Compressor Stage 1 (Itutu)
- Y2: Compressor Stage 2 (Itutu)
- W/W1: Ooru Stage 1 (Alapapo)
- W2: Ooru Stage 2 (Alapapo)
- O / B: Reversing Valve (Heat Pumps)
Note: The T1900 supports various system types. Consult the detailed wiring diagrams in the full installation manual for specific configurations (e.g., heat pump with auxiliary heat, conventional multi-stage systems).
5. Attach Thermostat to Base
Once wiring is complete and verified, carefully align the thermostat front cover with the mounted base plate and snap it into place.
6. Mu Agbara pada
Return to your circuit breaker or fuse box and restore power to your heating and cooling system.
Eto Ibẹrẹ
Upon initial power-up, the thermostat may prompt you to configure basic settings. Follow the on-screen instructions to set the current date, time, and system type (e.g., Conventional, Heat Pump).
System Type Configuration:
It is crucial to correctly configure the thermostat for your specific HVAC system. Incorrect settings can lead to improper operation or damage. Access the installer settings menu (refer to the full installation guide for specific button sequences) to select:
- Iru eto: Heat/Cool, Heat Pump, Dual Fuel
- Nọmba ti Heat Stages
- Nọmba ti Cool Stages
- Reversing Valve Operation: O (Itutu) tabi B (Igbona)
Awọn ilana Iṣiṣẹ
Ni oye Ifihan naa:
The LCD screen displays the current temperature, set temperature, system mode, fan mode, time, and programming status. Refer to the icons and indicators on the screen for current operational status.
Setting System Mode:
Tẹ awọn MODE bọtini lati yiyi nipasẹ awọn ipo eto ti o wa:
- gbigbona: The system will operate to maintain the heating setpoint.
- Itura: The system will operate to maintain the cooling setpoint.
- LATIO: The thermostat automatically switches between heating and cooling as needed to maintain the set temperature range.
- PA: Eto alapapo ati itutu agbaiye ti wa ni pipa.
Setting Fan Mode:
Tẹ awọn FAN button to cycle through fan modes:
- LATIO: Awọn àìpẹ nṣiṣẹ nikan nigbati alapapo tabi itutu eto ti wa ni actively ṣiṣẹ.
- LATI: Afẹ́fẹ́ náà máa ń ṣiṣẹ́ nígbà gbogbo, láìka ìpè gbígbóná tàbí ìtútù sí.
Ṣatunṣe iwọn otutu:
Lo awọn UP ati SILE arrow buttons to adjust the desired temperature setpoint. In programmable modes, this will temporarily override the schedule until the next scheduled change.
Programming Schedules (7-Day):
The T1900 allows for 7-day programming, enabling different schedules for each day of the week. This feature helps save energy by adjusting temperatures when you are away or asleep.
- Tẹ awọn ETO bọtini lati tẹ ipo siseto.
- Lo awọn OJO button to select the day or group of days you wish to program (e.g., Mon-Fri, Sat-Sun, or individual days).
- Lo awọn AKOKO button to cycle through the four available periods: Wake, Leave, Return, Sleep.
- Lo awọn UP ati SILE arrow buttons to set the desired temperature for each period.
- Lo awọn DIMU button to exit programming mode or save changes.
Refer to the detailed programming section in the full user guide for advanced options and specific button sequences.
Remote Control (Optional Add-on):
The Venstar T1900 thermostat can be controlled remotely via a phone using an optional add-on module (sold separately). This module connects to the thermostat and allows for remote access and control through a dedicated application. Installation and setup instructions for the remote control module are provided with the module itself.
Itoju
Ṣiṣe itọju thermostat:
To maintain the appearance and functionality of your thermostat, periodically wipe the exterior with a soft, damp asọ. Ma ṣe lo awọn afọmọ abrasive, nkanmimu, tabi awọn ohun elo kemikali, nitori iwọnyi le ba ṣiṣu ati awọn paati itanna jẹ.
Rirọpo Batiri:
The Venstar T1900 thermostat does not require batteries for operation as it is powered by the 24V AC system.
Laasigbotitusita
If you experience issues with your Venstar T1900 thermostat, consult the following common problems and solutions:
| Isoro | Owun to le Fa | Ojutu |
|---|---|---|
| Iboju thermostat ti ṣofo | Ko si agbara si thermostat. | Check the circuit breaker for your HVAC system. Ensure all wiring connections are secure. |
| Heating/Cooling system does not respond | Ti yan ipo eto ti ko tọ; oro onirin; titiipa eto. | Verify the system mode (HEAT/COOL/AUTO). Check wiring connections. Wait 5 minutes for system lockout to reset. |
| Kika iwọn otutu dabi pe ko pe | Thermostat location; sensor obstruction. | Ensure the thermostat is not exposed to direct sunlight, drafts, or heat sources. Clean any dust from the thermostat vents. |
| Programming schedule is not working | Program not saved; temporary override active; incorrect time/day setting. | Ensure programs are saved. Check if a temporary override is active and cancel it. Verify current time and day settings. |
| Fan runs continuously in AUTO mode | Fan mode set to ON; wiring issue. | Press the FAN button to ensure it is set to AUTO. Check fan wiring. |
If these solutions do not resolve the issue, please contact customer support or a qualified HVAC technician.
Awọn pato
| Ẹya ara ẹrọ | Sipesifikesonu |
|---|---|
| Brand | Venstar |
| Orukọ awoṣe | Venstar T1900 |
| Adarí Iru | Titari Bọtini |
| Pataki Ẹya | Eto siseto |
| Àwọ̀ | Funfun |
| Awọn Lilo Ni pato Fun Ọja | Heat Pump, Heater |
| Iwọn Iṣakoso Iru | Programmable, Smart/Remote (with add-on) |
| Voltage | 24 folti AC |
| Ifihan Iru | LCD tabi LED |
| Ọna Iṣakoso | Remote (with add-on) |
| Imọlẹ ẹhin | Bẹẹni |
| Ọja Mefa | 5.3 x 2 x 2 inches |
| Iwọn Nkan | 0.01 iwon |
| Ti beere awọn batiri? | Rara |
Alaye atilẹyin ọja
Venstar products are manufactured to high-quality standards. This product is covered by a limited warranty against defects in materials and workmanship. The specific terms and duration of the warranty may vary. Please refer to the warranty card included with your product or visit the official Venstar webAaye fun alaye atilẹyin ọja alaye ati awọn ilana iforukọsilẹ.
Onibara Support
For technical assistance, troubleshooting, or warranty inquiries, please contact Venstar customer support. You can typically find contact information, including phone numbers and email addresses, on the official Venstar webAaye (www.venstar.com) or on the product packaging.
When contacting support, please have your thermostat model number (T1900) and any relevant purchase information ready.