Ọrọ Iṣaaju
This manual provides comprehensive instructions for the setup, operation, and maintenance of your GPX Digital AM/FM Clock Radio, model C224B. Please read this manual thoroughly before using the device to ensure proper functionality and to maximize your user experience. Keep this manual for future reference.
Ọja Pariview
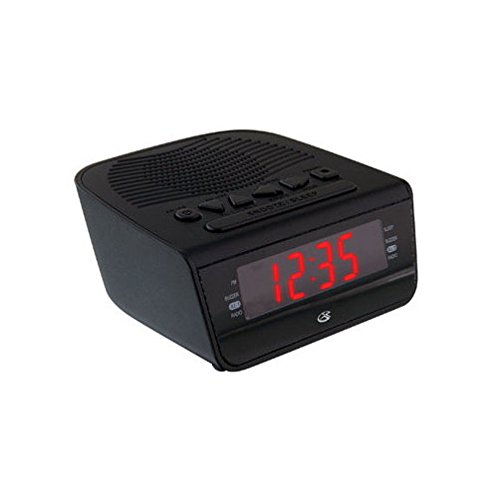
Nọmba 1: Iwaju view of the GPX Digital AM/FM Clock Radio. This image shows the compact black unit with its digital display and control buttons.
The GPX Digital AM/FM Clock Radio (C224B) is designed for reliable timekeeping and audio entertainment. Key features include a clear multi-display clock, AM/FM radio tuner, dual alarm functionality, and a battery backup option to ensure continuous operation during power interruptions. Its compact and modern design makes it suitable for various indoor settings.
Ṣeto
1. Unpacking
Carefully remove the clock radio from its packaging. Ensure all components are present: the clock radio unit and the power adapter.
2. Asopọ agbara
- Plug the power adapter into the DC input jack located on the back of the clock radio.
- Plug the other end of the power adapter into a standard wall outlet (AC 120V, 60Hz).
- The display will illuminate, indicating the unit is receiving power.
3. Fifi sori ẹrọ Afẹyinti Batiri (Aṣayan)
Fun agbara afẹyinti nigba rẹtages, install batteries (not included).
- Wa yara batiri ni isalẹ ti kuro.
- Ṣii ideri iyẹwu batiri naa.
- Insert the required batteries (e.g., 2 x AAA, check unit for specific type) according to the polarity markings (+ and -).
- Pa ideri batiri naa ni aabo.
Akiyesi: Batteries are for backup only and will not power the display or radio functions continuously. They preserve time and alarm settings during a power interruption.
Awọn ilana Iṣiṣẹ
1. Ṣiṣeto Akoko naa
- Tẹ mọlẹ Akoko SET bọtini titi ti ifihan yoo fi tan imọlẹ.
- Lo awọn WAKATI ati ISEJU awọn bọtini lati ṣatunṣe akoko.
- Tẹ Akoko SET lẹẹkansi lati jẹrisi ati ipo eto akoko jade.
2. Ṣíṣeto Awọn Itaniji (Alarm 1 ati Itaniji 2)
This unit features dual alarms, allowing you to set two independent wake-up times.
- Tẹ mọlẹ Itaniji 1 SET (tabi Itaniji 2 SET) button until the alarm time flashes.
- Lo awọn WAKATI ati ISEJU awọn bọtini lati ṣatunṣe akoko itaniji ti o fẹ.
- Tẹ Itaniji 1 SET (tabi Itaniji 2 SET) again to confirm the time.
- Immediately after confirming the time, use the Ipo ALARMU button to select the alarm source: BUZZER or RADIO.
- The alarm icon (e.g., AL1 or AL2) will appear on the display, indicating the alarm is active.
To turn off an alarm, press the corresponding Itaniji 1 Tan/PA (tabi Itaniji 2 Tan/PA) button. The alarm icon will disappear.
3. Iṣẹ́ Rédíò Àárọ̀/FM
- Tẹ awọn RADIO TAN/PA bọtini lati tan redio.
- Tẹ awọn BAND bọtini lati yipada laarin AM ati FM.
- Lo awọn TUNE + or TÚNṢẸ́ - buttons to manually tune to a desired station.
- To automatically scan for the next available station, press and hold TUNE + or TÚNṢẸ́ - fun iṣẹju diẹ.
- Satunṣe iwọn didun nipa lilo awọn Idibo + or ÌWỌN - awọn bọtini.
- Lati paa redio, tẹ awọn RADIO TAN/PA bọtini lẹẹkansi.
4. Iṣẹ lẹẹkọọkan
Nigbati itaniji ba ndun, tẹ awọn ṢEGBE bọ́tìnì láti pa ìró náà rẹ́ fún ìgbà díẹ̀ fún ìṣẹ́jú mẹ́sàn-án. Ìró náà yóò tún dún lẹ́yìn àkókò ìdákẹ́jẹ́ẹ́.
5. Iṣẹ orun
Iṣẹ́ oorun naa gba redio laaye lati dun fun akoko ti a ṣeto ṣaaju ki o to pa laifọwọyi.
- Nigba ti redio ba ndun, tẹ awọn ORUN bọtini leralera lati yi kẹkẹ nipasẹ awọn akoko oorun ti o wa (fun apẹẹrẹ, 90, 60, 30, 15 iṣẹju, PA).
- Redio naa yoo pa laifọwọyi lẹhin akoko ti a yan.
Itoju
1. Ninu
To clean the unit, wipe the exterior with a soft, slightly damp cloth. Do not use abrasive cleaners or solvents, as these may damage the finish. Ensure the unit is unplugged before cleaning.
2. Batiri Rirọpo
If the battery backup function is not working, or if the unit loses time during a power outage, the backup batteries may need replacement. Follow the "Battery Backup Installation" steps in the Setup section to replace them.
Laasigbotitusita
| Isoro | Owun to le Fa | Ojutu |
|---|---|---|
| Ẹka ko ni agbara lori. | Ohun ti nmu badọgba agbara ko ti sopọ tabi aṣiṣe iṣan. | Rí i dájú pé ohun tí a fi ń so agbára pọ̀ mọ́ ẹ̀rọ náà àti ibi tí ó ń ṣiṣẹ́ lórí ògiri. Gbìyànjú ibi tí ó yàtọ̀ síra. |
| Itaniji ko dun. | A kò ṣètò itaniji, iwọn didun itaniji kere ju, tabi itaniji ti wa ni pipa. | Verify alarm time and source (buzzer/radio) are set correctly. Ensure alarm is activated (icon visible). Increase radio volume if alarm source is radio. |
| Gbigba redio ti ko dara. | Ifihan agbara tabi kikọlu. | Adjust the position of the unit or the antenna (if external). Move away from other electronic devices that may cause interference. |
| Akoko / eto ti sọnu lẹhin agbara utage. | Awọn batiri afẹyinti ti ku tabi ko fi sii. | Install fresh backup batteries or replace existing ones. |
Awọn pato
- Awoṣe: C224B
- Orisun Agbara: AC 120V, 60Hz (main); Battery Powered (backup)
- Iru ifihan: LED Digital Ifihan
- Awọn ẹgbẹ redio: AM/FM
- Awọn iwọn (Isunmọ): 5.12" W x 5.12" H
- Ìwọ̀n (Fún): 3 iwon
- Àwọ̀: Dudu
- Ohun elo: Ṣiṣu
Atilẹyin ọja ati Support
For warranty information or technical support, please refer to the warranty card included with your product or visit the official GPX website. Do not attempt to repair this unit yourself, as this may void your warranty.
GPX Official Webojula: www.gpx.com