
1. Ifihan
This manual provides comprehensive instructions for the safe and efficient operation of your VERITAS Sarah Sewing Machine, Model 1301. Designed for ease of use, this machine is suitable for beginners and experienced sewers alike, offering essential functions for various sewing projects. Please read this manual thoroughly before using the machine to ensure proper setup, operation, and maintenance.

Aworan 1.1: The VERITAS Sarah Sewing Machine. This image displays the compact white sewing machine with red accents, featuring two rotary dials on the front for stitch selection and length adjustment.

Aworan 1.2: Key benefits for users. This image highlights the machine's suitability for all who want to start sewing, requiring no prior experience, offering particularly simple operation, and being excellent for all common fabrics, including fine materials like chiffon, silk, and satin.
2. Aabo ikilo
Lati rii daju iṣiṣẹ ailewu ati ṣe idiwọ ipalara tabi ibajẹ, jọwọ tẹle awọn itọnisọna ailewu wọnyi:
- Children and individuals with limited physical, sensory, or mental capabilities should only use the machine after receiving thorough instruction and under constant supervision.
- Never leave the machine unattended, especially in areas accessible to children.
- Always disconnect the machine from the power supply before cleaning, performing maintenance, or when not in use.
- Keep fingers away from all moving parts, especially the needle, during operation.
- Lo awọn ẹya ẹrọ nikan ati awọn asomọ ti olupese ṣe iṣeduro.
- Do not operate the machine if it has a damaged cord or plug, or if it is not working properly.
- Ensure the machine is placed on a stable, level surface during use.
3. Awọn akoonu Apoti
Upon unpacking your VERITAS Sarah Sewing Machine, please verify that all the following items are included:
- VERITAS Sarah Sewing Machine
- 5 Quality Needles
- All-round Sewing Foot
- Ẹsẹ idalẹnu
- Buttonhole Ẹsẹ
- Fẹlẹ
- Okun Ripper
- 3 Bobbins
- Embroidery and Darning Plate
- Screwdriver
- Edge Ruler
- 2 Felt Pads
- Ilana itọnisọna

Aworan 3.1: Extensive accessories included with the VERITAS Sarah. This image shows various accessories such as quality needles, a zipper foot, and highlights the machine's suitability for multi-layer fabrics.
4. Key Awọn ẹya ara ẹrọ
The VERITAS Sarah Sewing Machine is equipped with features designed for efficient and versatile sewing:
- 13 Stitch Programs: Offers a variety of essential stitches for different sewing needs.
- 4-Step Buttonhole Function: Simplifies the creation of consistent buttonholes.
- Gígùn Aṣọ Tí A Lè Ṣàtúnṣe: Easily set stitch length between 0 and 4 mm using a rotary wheel.
- Motor Torque giga: Capable of handling thicker fabrics such as denim and canvas.
- Integrated Wire Cutter: For convenient thread trimming.
- Free Arm Function: Ideal for sewing cylindrical items like sleeves, cuffs, and pant hems.
- Glare-Free LED Light: Ó ń tan ìmọ́lẹ̀ sí ibi ìránṣọ fún ìríran tó dára síi.
- Automatic Thread Tensioner: Helps maintain optimal thread tension for balanced stitches.
- Snap-On Presser Foot System: Allows for quick and easy changing of presser feet, includes 6 different feet.
- Iyara Riṣọ: Tó tó 750 ìrán ní ìṣẹ́jú kan.
- Removable Accessory Compartment: Provides convenient storage for tools and accessories.
- Ikole ti o lagbara: Features a stable, durable aluminum die-cast frame.

Aworan 4.1: Performance features of the VERITAS Sarah. This image highlights a sewing speed of 750 stitches per minute, the Snap-On presser foot system including 6 presser feet, and the integrated LED sewing light.

Aworan 4.2: Stitch capabilities of the VERITAS Sarah. This image illustrates the maximum stitch length of 4 mm, maximum stitch width of 5 mm, 13 different stitches, a 4-step automatic buttonhole function, and adjustable stitch length.
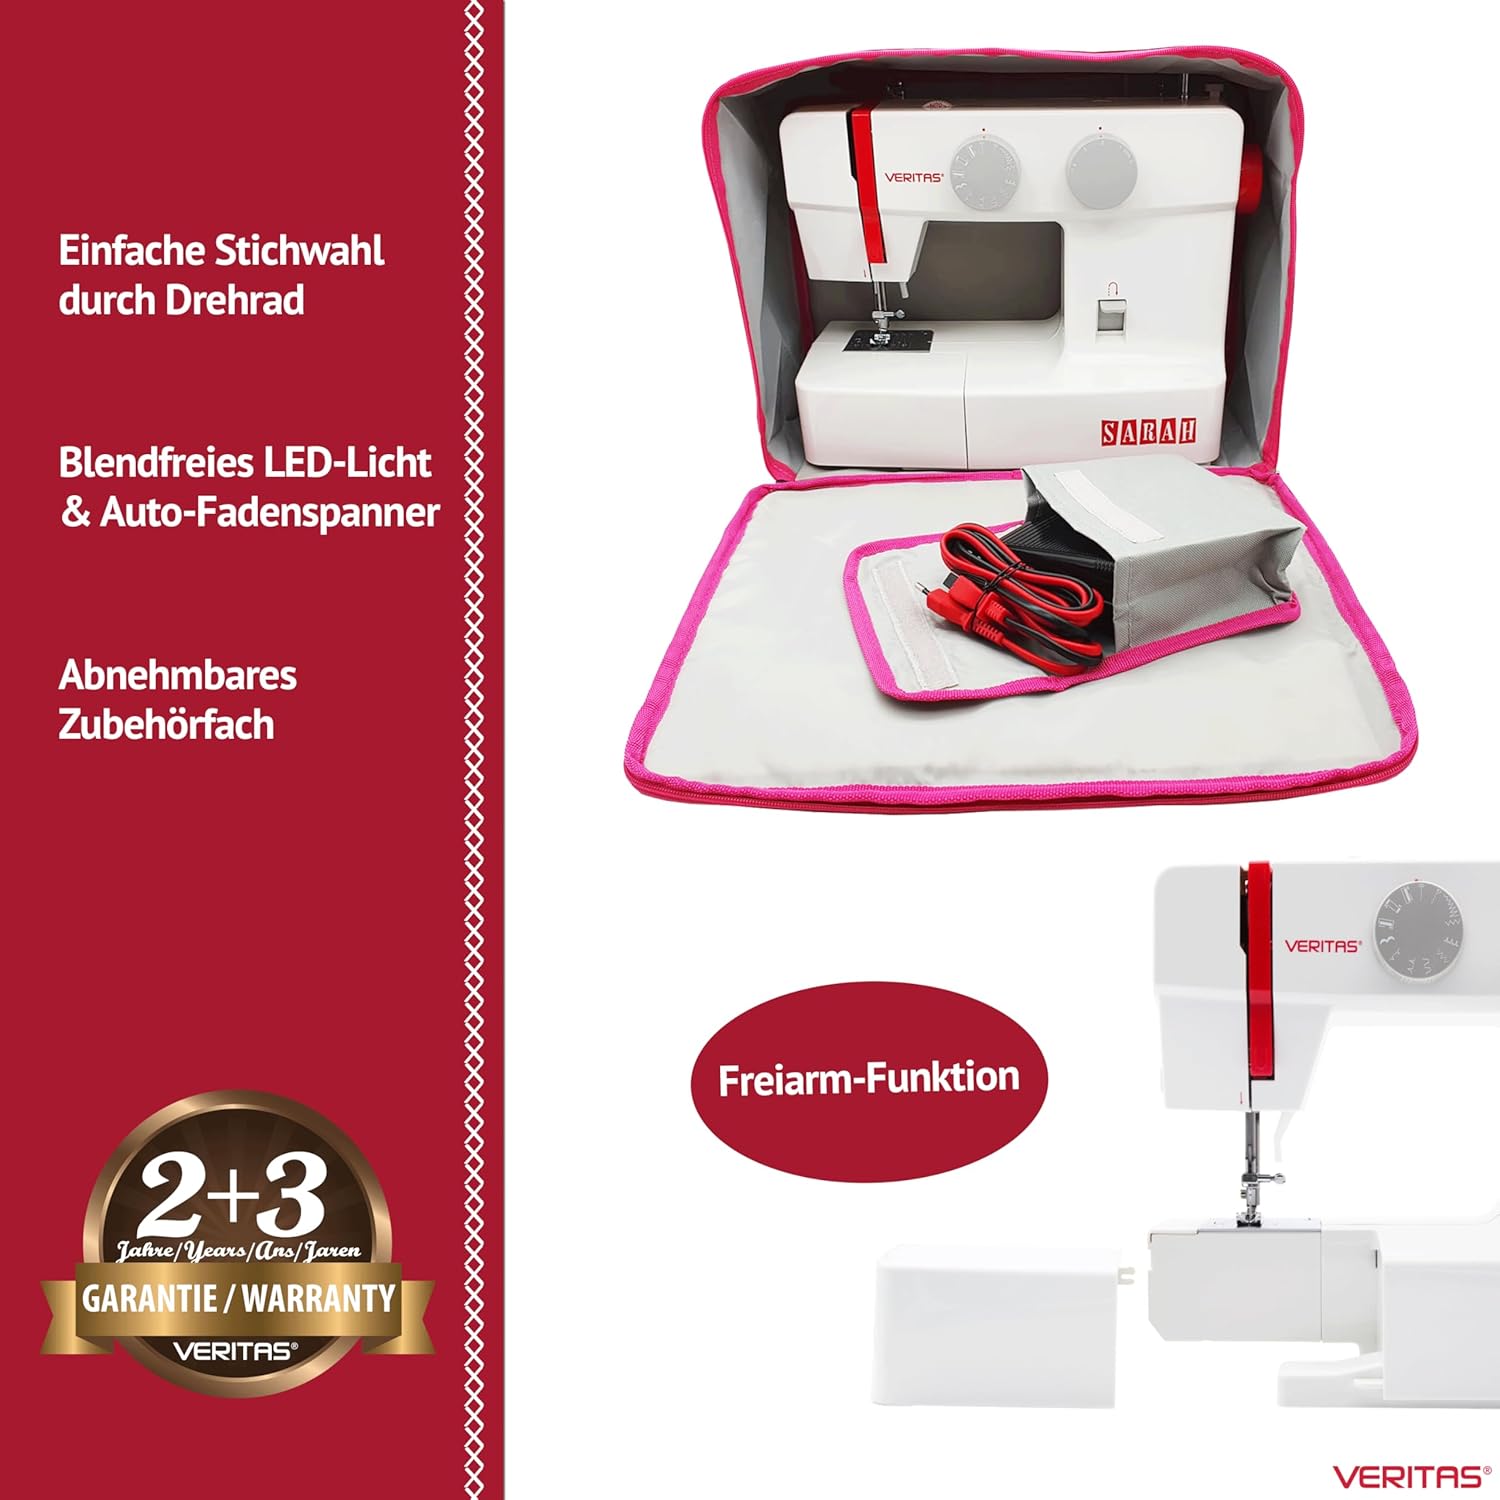
Aworan 4.3: Convenience features of the VERITAS Sarah. This image shows easy stitch selection via a rotary dial, glare-free LED light, auto-thread tensioner, a removable accessory compartment, and the free-arm function.
5. Eto
5.1 Ṣiṣii ati Gbe
- Fi pẹ̀lẹ́pẹ̀lẹ́ yọ ẹ̀rọ ìránṣọ kúrò nínú àpò rẹ̀.
- Gbé ẹ̀rọ náà sí orí ilẹ̀ tí ó dúró ṣinṣin, tí ó sì ní ìmọ́lẹ̀ tó péye.
- Rí i dájú pé àyè tó wà ní àyíká ẹ̀rọ náà fún ìṣiṣẹ́ tó rọrùn àti ìfọwọ́sowọ́pọ̀ aṣọ.
5.2 Asopọ agbara
- So plug adarí ẹsẹ̀ pọ̀ mọ́ ihò agbára ẹ̀rọ náà.
- Pulọọgi okun agbara sinu iṣan itanna to dara.
- Turn on the machine using the power switch, usually located on the side or back.
5.3 Ìyípo Bobbin
- Gbe okun ti o tẹle ara lori pin spool.
- Ṣe itọsọna o tẹle ara nipasẹ itọsọna o tẹle ara oke ati ni ayika disiki ẹdọfu yikaka bobbin.
- Insert the thread through the hole in the bobbin and place the bobbin onto the bobbin winder spindle.
- Titari bobbin winder spindle si ọtun.
- Gently press the foot controller to start winding. Stop when the bobbin is full.
- Gé okùn náà kí o sì tì ọ̀pá ìfàmọ́ra bobbin padà sí òsì.
5.4 Fi sii Bobbin
- Ṣii bobbin ideri awo.
- Fi bobbin ọgbẹ́ náà sínú àpótí bobbin, kí o sì rí i dájú pé okùn náà ti yọ́ sí ọ̀nà tó tọ́ (nígbà gbogbo, ó sábà máa ń yípo sí ọ̀nà òdìkejì).
- Ṣe itọsọna o tẹle ara nipasẹ orisun omi ẹdọfu ati sinu iho itọsọna o tẹle ara.
- Pa bobbin ideri awo.
5.5 Asapo Oke Okun
- Gbe lefa ẹsẹ tẹ.
- Gbe okun ti o tẹle ara lori pin spool.
- Tẹle ọna ifunmọ nọmba ti a tọka si lori ẹrọ, didari o tẹle ara nipasẹ gbogbo awọn itọsọna ati awọn disiki ẹdọfu.
- Bring the thread down and through the needle eye from front to back.
- Pull about 15 cm (6 inches) of thread through the needle eye and under the presser foot.
5.6 Mímú Ọ̀rọ̀ Bobbin Wá
- Mu okun oke mu diẹ pẹlu ọwọ osi rẹ.
- Tan kẹkẹ ọwọ si ọ lati sọ abẹrẹ naa silẹ sinu awo abẹrẹ ati lẹhinna gbe soke lẹẹkansi.
- The upper thread will catch the bobbin thread, forming a loop. Pull the loop to bring the bobbin thread up through the needle plate hole.
- Fa awọn okun mejeeji (oke ati bobbin) labẹ ẹsẹ titẹ ati si ẹhin ẹrọ naa.
6. Awọn ilana Iṣiṣẹ
6.1 aranpo Yiyan
The VERITAS Sarah offers 13 different stitch patterns. To select a stitch, turn the stitch selection dial (left rotary wheel) until the desired stitch pattern aligns with the indicator mark.
6.2 Ṣíṣe àtúnṣe Gígùn Arán
Adjust the stitch length using the stitch length dial (right rotary wheel). You can set the length between 0 and 4 mm. For most general sewing, a length of 2.5 mm is suitable.
6.3 Bíbẹ̀rẹ̀ sí Ránṣẹ́
- Gbe aṣọ naa labẹ ẹsẹ titẹ.
- Kekere lefa ẹsẹ tẹ.
- Gently press the foot controller to start sewing. The harder you press, the faster the machine will sew.
- Guide the fabric gently with both hands, but do not push or pull it forcefully.
6.4 yiyipada Sewing
Láti mú kí àwọn ìrán ní ìbẹ̀rẹ̀ àti òpin ìrán, tẹ bọ́tìnì ìfàsẹ́yìn/bọ́tìnì náà kí o sì di mú. Ẹ̀rọ náà yóò rán sẹ́yìn. Tú bọ́tìnì/bọ́tìnì náà sílẹ̀ láti bẹ̀rẹ̀ sí ní rán ní iwájú.
6.5 Píparí Ìránpọ̀ kan
- Yan àwọn ìrán díẹ̀ láti fi mú kí ìrán náà dúró dáadáa.
- Raise the needle to its highest position by turning the handwheel towards you.
- Gbe lefa ẹsẹ tẹ.
- Pull the fabric towards the back of the machine.
- Use the integrated thread cutter or scissors to cut the threads, leaving about 10-15 cm (4-6 inches) of thread.
6.6 Buttonhole Sewing (4-Step)
- So ẹsẹ bọtini iho.
- Mark the buttonhole position on your fabric.
- Select the first step of the buttonhole program on the stitch selection dial.
- Ran apa akọkọ ti bọtini iho naa.
- Change to the next step on the dial and sew the bar tack.
- Continue through all four steps, following the machine's instructions for each segment of the buttonhole.
- Use the seam ripper to carefully open the buttonhole.
6.7 Rírán apá ọ̀fẹ́
To use the free arm, simply slide off the accessory compartment. This exposes the narrow free arm, making it easier to sew small, circular items.
7. Itọju
Regular maintenance ensures the longevity and optimal performance of your sewing machine. Always disconnect the machine from the power supply before performing any maintenance.
7.1 Cleaning the Bobbin Area
- Yọ abẹ́rẹ́ náà, ẹsẹ̀ títẹ̀, àti àwo abẹ́rẹ́ náà kúrò.
- Yọ apoti bobbin kuro.
- Use the small brush provided to remove any lint and dust accumulated in the bobbin area and feed dog teeth.
- Tun awọn ẹya ara jọ.
7.2 Fífi epo kun (Ti o ba wulo)
Refer to the detailed instruction manual for specific oiling points and frequency. Generally, a few drops of sewing machine oil in designated areas can keep moving parts running smoothly. Avoid over-oiling.
7.3 Rirọpo abẹrẹ
Replace the needle regularly (after 8-10 hours of sewing) or if it becomes bent, dull, or broken. Use the screwdriver to loosen the needle clamp screw, remove the old needle, insert a new one with the flat side facing the back, and tighten the screw. Ensure the needle is fully inserted.
8. Laasigbotitusita
This section addresses common issues you might encounter. For more detailed troubleshooting, consult the full instruction manual.
8.1 Skipped Stitches
- Nitori: Abẹrẹ ti ko tọ, abẹrẹ tẹ, okun ti ko tọ, iwọn abẹrẹ ti ko tọ fun aṣọ.
- Ojutu: Replace the needle with a new, correct type and size for your fabric. Re-thread the machine completely, ensuring all guides are followed.
8.2 Thread Breakage (Upper Thread)
- Nitori: Incorrect upper thread tension, improperly threaded, burr on needle eye or thread path, poor quality thread, needle inserted incorrectly.
- Ojutu: Check and adjust upper thread tension. Re-thread the machine. Inspect the needle and thread path for rough spots. Use good quality thread. Ensure needle is correctly inserted.
8.3 Thread Breakage (Bobbin Thread)
- Nitori: Improperly wound bobbin, incorrect bobbin insertion, lint in bobbin case, incorrect bobbin tension.
- Ojutu: Re-wind the bobbin evenly. Re-insert the bobbin correctly. Clean the bobbin case area.
8.4 Uneven Stitches / Looping
- Nitori: Incorrect thread tension (upper or bobbin), improper threading, wrong needle size, pulling fabric.
- Ojutu: Adjust thread tensions. Re-thread both upper and bobbin threads. Use the correct needle. Allow the feed dogs to move the fabric naturally.
8.5 ẹrọ Ko Bibẹrẹ
- Nitori: Power cord not plugged in, power switch off, bobbin winder spindle engaged, machine jammed.
- Ojutu: Check power connections. Ensure power switch is on. Disengage bobbin winder spindle. Check for thread jams in the bobbin area or needle plate.
9. Awọn pato
| Brand | VERITAS |
| Nọmba awoṣe | 1301 |
| Awọn iwọn Ọja (L x W x H) | 37 x 16 x 29.5 cm |
| Iwọn Nkan | 5 kg |
| Ohun elo | Metal (Aluminum Die-Cast Frame), Plastic |
| Àwọn Ètò Àṣọpọ̀ | 13 |
| Buttonhole Iru | Awọn Igbesẹ 4-Aifọwọyi |
| Gígùn Àránpọ̀ Tó Pọ̀ Jùlọ | 4 mm |
| Fífẹ̀ Àṣọpọ̀ Tó Gíga Jùlọ | 5 mm |
| Iyara masinni | 750 stitches / iseju |
| Itanna | LED |
| Orisun agbara | Okun Itanna |

Aworan 9.1: Dimensions of the VERITAS Sarah Sewing Machine. This image provides a visual representation of the machine's length (37 cm), width (16 cm), and height (29.5 cm).
10. Atilẹyin ọja ati Support
10.1 atilẹyin ọja Alaye
The VERITAS Sarah Sewing Machine comes with a 5-odun olupese ká atilẹyin ọja. This typically includes a standard 2-year warranty, which can be extended by an additional 3 years upon product registration. Please refer to the warranty card included in your packaging or the manufacturer's official website for detailed terms and conditions regarding warranty claims and registration procedures.

Aworan 10.1: Comparison highlighting VERITAS quality and warranty. This image emphasizes the stable aluminum die-cast frame, high piercing power for all fabrics, modern manufacturing, and the 5-year extended manufacturer's warranty upon registration.
Aworan 10.2: Visual representation of the 2+3 year warranty for the VERITAS Sarah. This image clearly shows "2+3 Jahre/Years/Ans/Jaren GARANTIE/WARRANTY VERITAS".
10.2 Onibara Support
For technical assistance, spare parts, or further inquiries, please contact VERITAS customer support. Contact details can typically be found on the manufacturer's webaaye tabi ninu iwe ti o wa pẹlu ọja rẹ.