
Dinuy terminal micro 5
Dinuy Terminal Micro 5 Digital Time Switch User Manual
Awoṣe: Terminal Micro 5
Brand: Dinuy
1. Ifihan
This manual provides comprehensive instructions for the installation, operation, and maintenance of your Dinuy Terminal Micro 5 Digital Time Switch. Please read this manual carefully before using the device to ensure safe and efficient operation. This device is designed to control electrical circuits based on programmed time schedules.
2. Alaye Aabo pataki
- Ewu Itanna: Installation and maintenance should only be performed by a qualified electrician in accordance with all local and national electrical codes.
- Disconnect power at the main circuit breaker before installing or servicing the device.
- Ma ṣe fi ẹrọ naa han si ọrinrin, awọn iwọn otutu to gaju, tabi awọn agbegbe ibajẹ.
- Rii daju pe gbogbo awọn asopọ wa ni aabo ati ni idayatọ daradara lati ṣe idiwọ awọn iyika kukuru.
- Do not exceed the maximum load capacity specified for the device.
3. Ọja Ipariview
The Dinuy Terminal Micro 5 is a compact digital time switch designed for DIN rail mounting. It features a clear LCD display for time and program status, along with intuitive buttons for easy programming.
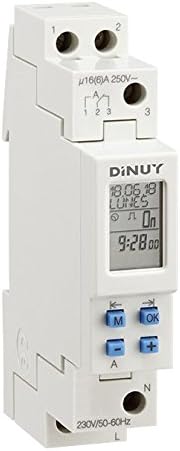
Figure 1: Dinuy Terminal Micro 5 Digital Time Switch
This image displays the Dinuy Terminal Micro 5 digital time switch. The device is white, designed for DIN rail mounting. The top section shows terminals labeled '1' and '2' for power input. Below this, there are terminals '1', '2', '3' for the switched output, with a rating of 'μ16(6)A 250V~'. The central part features a digital LCD screen displaying 'DINUY', '18.06.18', 'LUNES' (Monday), 'On', and '9:28.00'. Below the screen are four blue buttons: 'M' (Mode), 'OK', '-' (Minus/Left arrow), and '+' (Plus/Right arrow). The bottom section shows terminals 'N' (Neutral) and 'L' (Live) for the main power supply, with '230V/50-60Hz' indicated.
3.1. Awọn irinše
- Ifihan LCD: Shows current time, day, program status, and programming menus.
- Bọ́tìnì 'M' (Ipò): Used to navigate through different modes (e.g., time setting, program setting).
- Bọ́tìnì 'Ó DÁRA': Jẹrisi awọn aṣayan ati eto.
- '-' Button (Minus/Left Arrow): Decreases values or moves left in menus.
- '+' Button (Plus/Right Arrow): Increases values or moves right in menus.
- Terminals L & N: Main power supply input (230V/50-60Hz).
- Àwọn ibùdó 1, 2, àti 3: Switched output contacts (μ16(6)A 250V~).
4. Fifi sori ẹrọ ati Oṣo
4.1. Iṣagbesori
The Dinuy Terminal Micro 5 is designed for DIN rail mounting. Snap the device onto a standard 35mm DIN rail in your electrical panel.
4.2. Aworan aworan
WARNING: Ensure power is disconnected before wiring.
- Connect the main Live (L) wire to the 'L' terminal at the bottom of the device.
- Connect the main Neutral (N) wire to the 'N' terminal at the bottom of the device.
- For the switched output, connect the load's Live wire to terminal '1' or '3' (depending on desired contact type, typically '1' for normally open).
- Connect the incoming Live wire for the load to terminal '2'.
- Refer to the markings on the device for precise terminal identification: Input power (L, N) and Switched output (1, 2, 3).
4.3. Ibẹrẹ Agbara-soke
After wiring, restore power. The display should illuminate. If the display is blank, check power connections. The device may require initial time and date setting.
5. Awọn ilana Iṣiṣẹ
5.1. Ṣiṣeto Akoko ati Ọjọ lọwọlọwọ
- Press the 'M' button repeatedly until the time setting mode is displayed (e.g., flashing hours).
- Use the '+' and '-' buttons to adjust the hour. Press 'OK' to confirm.
- Repeat for minutes, then for the current day of the week.
- Press 'OK' to save and exit the time setting mode.
5.2. Ṣíṣeto/Ṣíṣeto Awọn Eto TÍTÁN/Ṣípa
The device allows setting multiple ON/OFF programs for different days or groups of days.
- Press the 'M' button until 'PROG' or a similar indicator appears.
- Use '+' or '-' to select a program number (e.g., '1 ON'). Press 'OK'.
- Set the desired ON time (hour and minute) using '+' and '-' and confirming with 'OK'.
- Select the days for this program (e.g., Mon-Fri, daily, specific days) using '+' and '-' and confirming with 'OK'.
- Repeat for the corresponding OFF time ('1 OFF').
- Tẹsiwaju fun awọn eto afikun bi o ṣe nilo.
- Press 'M' to exit programming mode and return to normal operation.
5.3. Yiyọ Afowoyi
To temporarily override the programmed schedule, press the 'M' button briefly during normal operation. This will cycle through 'ON', 'OFF', and 'AUTO' modes. Select 'AUTO' to resume programmed operation.
6. Itọju
The Dinuy Terminal Micro 5 requires minimal maintenance. Ensure the device is kept clean and free from dust. Use a soft, dry cloth for cleaning. Do not use abrasive cleaners or solvents.
7. Laasigbotitusita
- Ẹrọ ko ṣiṣẹ lori: Check main power supply and wiring connections (L and N terminals). Ensure the circuit breaker is on.
- Load not switching: Verify that the program is correctly set and the device is in 'AUTO' mode. Check the load's wiring and functionality. Ensure the load does not exceed the device's maximum switching capacity.
- Incorrect time display: Reset the current time and day as per section 5.1.
- Programs not executing: Ensure the device is in 'AUTO' mode. Recheck program settings for correct ON/OFF times and selected days.
8. Imọ ni pato
| Ẹya ara ẹrọ | Sipesifikesonu |
|---|---|
| Olupese | Dinuy |
| ID Ọjà Olùpèsè | IH TER MC5 |
| Nọmba awoṣe | terminal micro 5 |
| Iṣagbewọle Voltage | 230V AC, 50-60Hz |
| Yipada Agbara | μ16(6)A 250V~ |
| Iṣagbesori Iru | DIN Rail |
| Package Mefa | 11.2 x 6.8 x 5 cm |
| Iwọn Ọja | 100 g |
9. atilẹyin ọja Information
This product is covered by the manufacturer's standard warranty. Please refer to the warranty card included with your purchase or contact Dinuy customer support for detailed warranty terms and conditions. Keep your proof of purchase for warranty claims.
10. Onibara Support
For technical assistance, troubleshooting not covered in this manual, or warranty inquiries, please contact your local Dinuy distributor or visit the official Dinuy webojula fun alaye olubasọrọ.
Ask a question about this manual
Ask about setup, troubleshooting, compatibility, parts, safety, or missing instructions. Manuals+ will review the question and use this page’s manual context to help answer it.