1. Ifihan
This manual provides detailed instructions for the installation, operation, and maintenance of your ASRock AB350M-HDV MicroATX Motherboard. The ASRock AB350M-HDV is designed to support AMD Socket AM4 A-Series APUs (Bristol Ridge) and Ryzen Series CPUs (Summit Ridge), featuring a Digi Power design and 7 Power Phase design for stable performance. It supports DDR4 memory and offers various connectivity options including SATA3, USB 3.0, and an Ultra M.2 slot.
2. Ọja Ipariview
The ASRock AB350M-HDV motherboard is a MicroATX form factor board, ideal for compact PC builds. It features essential components for a modern computing system.

olusin 2.1: Angled view of the ASRock AB350M-HDV Motherboard, showcasing its compact MicroATX design and various components.
Awọn ẹya pataki:
- Supports AMD Socket AM4 A-Series APUs (Bristol Ridge) and Ryzen Series CPUs (Summit Ridge).
- DDR4 memory support up to 3200+ (OC) for Ryzen CPUs and 2400 for A-series APUs.
- 1 PCIe 3.0 x16 slot and 1 PCIe 2.0 x1 slot for expansion cards.
- 4 SATA3 ports and 1 Ultra M.2 (PCIe Gen3 x4 & SATA3) slot for storage.
- 6 USB 3.0 ports (2 front, 4 rear) and 2 USB 2.0 ports for peripheral connectivity.
- Integrated Gigabit Ethernet for network connectivity.
- Video outputs: VGA, DVI, HDMI.

olusin 2.2: Top-isalẹ view of the ASRock AB350M-HDV Motherboard, highlighting the CPU socket, RAM slots, M.2 slot, and PCIe slots.
3. Eto ati fifi sori
Follow these steps carefully to install your ASRock AB350M-HDV motherboard and its components.
3.1 Sipiyu fifi sori
- Wa iho AM4 Sipiyu lori modaboudu.
- Gbé ẹrù ìdènà náà sókè ní ẹ̀gbẹ́ ihò náà.
- Mu aami onigun mẹta pọ si lori Sipiyu pẹlu aami ti o baamu lori iho. Farabalẹ gbe Sipiyu sinu iho lai fi agbara mu.
- Kúrò ìdènà ẹrù láti fi CPU sí ipò rẹ̀.
- Fi Sipiyu kula ni ibamu si awọn ilana olupese rẹ.
3.2 RAM (Memory) Installation
- Locate the DDR4 DIMM slots. This motherboard has 4 slots.
- Ṣii awọn agekuru ni awọn mejeji opin ti DIMM Iho.
- Parapọ ogbontarigi lori Ramu module pẹlu awọn bọtini ni DIMM Iho.
- Insert the RAM module firmly into the slot until the clips snap into place. Ensure both clips are closed.
3.3 Fifi sori ẹrọ Ẹrọ ipamọ (SATA & M.2)
Awọn awakọ SATA:
- Connect one end of a SATA data cable to a SATA3 port on the motherboard.
- Connect the other end of the SATA data cable to your hard drive or SSD.
- So okun agbara SATA kan lati ẹyọ ipese agbara rẹ (PSU) si ẹrọ ibi ipamọ.
M.2 SSD:
- Wa Iho Ultra M.2 lori modaboudu.
- Yọ skru M.2 ati standoff kuro ninu iho naa.
- Fi M.2 SSD sinu iho ni igun 30-ìyí.
- Push the M.2 SSD down and secure it with the screw and standoff.
3.4 Awọn isopọ agbara
- Connect the 24-pin ATX power connector from your PSU to the 24-pin power socket on the motherboard.
- Connect the 8-pin (or 4-pin) ATX 12V power connector from your PSU to the corresponding socket near the CPU.
3.5 Iwaju Panel Awọn isopọ
Connect the cables from your PC case (Power Button, Reset Button, HDD LED, Power LED, USB, Audio) to the corresponding headers on the motherboard. Refer to the motherboard layout diagram in your physical manual for exact header locations.
3.6 Graphics Kaadi fifi sori
- Wa aaye PCIe 3.0 x16.
- Yọ ideri iho imugboroja ti o baamu kuro ninu ọran PC rẹ.
- Align the graphics card with the PCIe slot and press it down firmly until it clicks into place.
- Ṣe aabo kaadi awọn eya aworan si ọran pẹlu dabaru kan.
- Connect any required PCIe power cables from your PSU to the graphics card.
4. Awọn ilana Iṣiṣẹ
4.1 First Boot ati BIOS / UEFI Oṣo
- Lẹhin apejọ gbogbo awọn paati, so atẹle rẹ, keyboard, ati Asin.
- Agbara lori eto rẹ.
- Lakoko ibẹrẹ, tẹ bọtini naa leralera DEL or F2 bọtini lati tẹ BIOS/UEFI oso IwUlO.
- In the BIOS, you can configure boot order, system time, and other advanced settings. Save changes and exit to boot into your operating system installation media.
4.2 Driver fifi sori
After installing your operating system, install the necessary drivers for the motherboard components. These typically include chipset drivers, audio drivers, LAN drivers, and any specific utility drivers. Drivers can be found on the ASRock official webojula fun nyin pato modaboudu awoṣe.
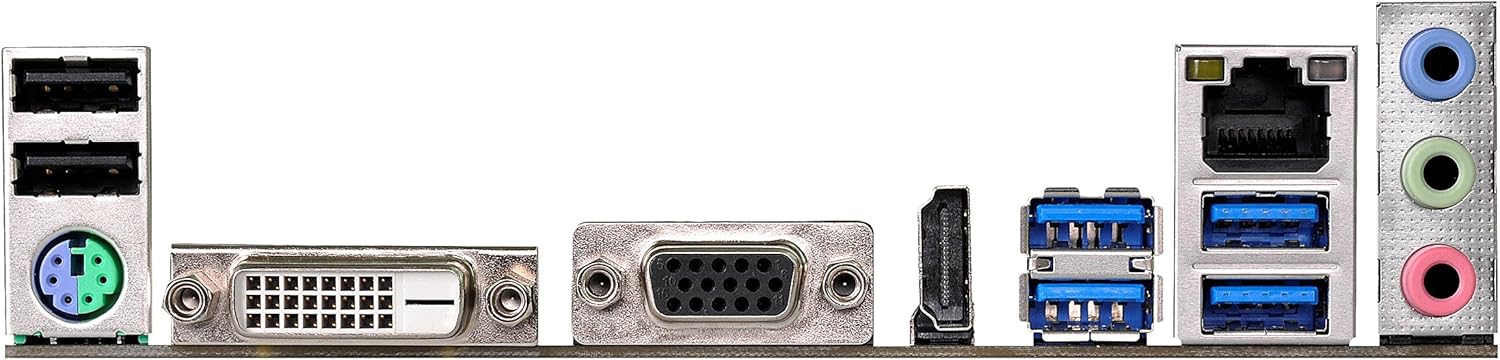
Figure 4.1: Rear I/O panel of the ASRock AB350M-HDV Motherboard, showing USB ports, video outputs (VGA, DVI, HDMI), LAN port, and audio jacks.
5. Itọju
Itọju to dara ṣe idaniloju gigun ati iṣẹ ti o dara julọ ti modaboudu rẹ.
5.1 Ninu
- Nigbagbogbo nu eruku lati modaboudu ati irinše lilo fisinuirindigbindigbin air.
- Rii daju pe eto naa ti wa ni pipa ati yọọ kuro ṣaaju ṣiṣe mimọ.
- Yago fun lilo awọn olutọpa omi taara lori awọn paati.
5.2 BIOS / UEFI Awọn imudojuiwọn
Lorekore ṣayẹwo ASRock website for BIOS/UEFI updates. Updates can improve compatibility, stability, and performance. Follow the instructions provided by ASRock carefully when performing a BIOS update to avoid system damage.
6. Laasigbotitusita
Abala yii n pese awọn ojutu si awọn ọran ti o wọpọ ti o le ba pade.
6.1 Kò sí Agbára / Kò sí Ìfìwéránṣẹ́ (Àtúnyẹ̀wò Ara-ẹni-Pada-Lórí)
- Ṣayẹwo Awọn isopọ Agbara: Ensure the 24-pin and 8-pin (or 4-pin) CPU power connectors are securely seated.
- Verify PSU: Test your power supply unit (PSU) to ensure it is functional and providing adequate power.
- Tun awọn eroja pada: Remove and re-install the CPU, RAM, and graphics card to ensure they are properly seated.
- Ko CMOS kuro: Refer to your physical manual for instructions on how to clear the CMOS (Complementary Metal-Oxide-Semiconductor) settings, which can resolve boot issues.
6.2 Ko si Abajade Ifihan
- Abojuto Asopọ: Ensure your monitor is correctly connected to the graphics card or motherboard (if using an APU with integrated graphics).
- Kaadi eya aworan: If using a dedicated graphics card, ensure it is properly installed and has sufficient power. Test with another graphics card if possible.
- APU Compatibility: If using an AMD A-Series APU, ensure your monitor is connected to the motherboard's video outputs (VGA, DVI, HDMI). Ryzen CPUs without integrated graphics require a dedicated graphics card.
6.3 Operating System Not Booting
- Bere fun bata: Check the BIOS/UEFI settings to ensure the correct boot device (e.g., SSD/HDD with OS) is prioritized.
- Ohun elo ipamọ: Verify that your storage device is detected in the BIOS.
- Fifi sori ẹrọ OS: If the OS is newly installed, ensure the installation process completed successfully.
7. Awọn pato
| Brand | ASRock |
| Orukọ awoṣe | AB350M-HDV |
| Sipiyu Socket | Iho AM4 |
| Chipset Iru | AMD Promontory B350 |
| Awọn isise ibaramu | AMD A-Series APUs (Bristol Ridge), Ryzen Series CPUs (Summit Ridge) |
| Ramu Memory Technology | DDR4 |
| Iyara aago iranti | 2133 MHz (Base), up to 3200+ (OC) for Ryzen CPU |
| Iho iranti Wa | 4 |
| Graphics Card Interface | PCI Express (1x PCIe 3.0 x16, 1x PCIe 2.0 x1) |
| Total SATA Ports | 4 (SATA3) |
| M.2 Iho | 1 (Ultra M.2, PCIe Gen3 x4 & SATA3) |
| Lapapọ Awọn ibudo USB | 8 (USB 3.0, 2x USB 2.0) |
| Awọn abajade fidio | VGA, DVI, HDMI |
| Main Power Asopọmọra Iru | ATX 24-Pin |
| Fọọmù ifosiwewe | MicroATX |
| Iwọn Nkan | 1.3 iwon |
8. atilẹyin ọja Information
The ASRock AB350M-HDV Motherboard comes with a 1 Odun atilẹyin ọja. For specific terms and conditions, please refer to the warranty card included with your product or visit the official ASRock webojula.
9. Atilẹyin
Fun iranlọwọ siwaju sii, atilẹyin imọ-ẹrọ, tabi awọn igbasilẹ awakọ, jọwọ ṣabẹwo si ASRock osise webojula:
You can also find contact information for customer service and support resources on their webojula.