
Buffalo CN295
Buffalo CN295 Coffee Percolator 15L User Manual
Model: CN295 | Brand: Buffalo
1. Ifihan
This manual provides essential information for the safe and efficient operation of your Buffalo CN295 Coffee Percolator. Please read it thoroughly before first use and keep it for future reference.
The Buffalo CN295 is a robust 15-liter coffee percolator designed for commercial and large-scale use. Key features include:
- Water level indicator for easy monitoring.
- Fast brewing time of approximately 62 minutes when full.
- Boil-dry safety cut-out to prevent damage.
- Integrated drip tray to minimize spills.
- Secure locking lid for safety during operation.
2. Alaye Aabo
Nigbagbogbo tẹle awọn iṣọra aabo ipilẹ nigba lilo awọn ohun elo itanna lati dinku eewu ina, mọnamọna, ati ipalara.
- Rii daju pe ohun elo naa ti sopọ si iṣan agbara ti ilẹ.
- Maṣe fi ohun elo naa bọ inu omi tabi awọn olomi miiran.
- Keep hands and face away from the steam vent during operation.
- Always unplug the percolator before cleaning or when not in use.
- Ma ṣe ṣiṣẹ ohun elo pẹlu okun ti o bajẹ tabi plug.
- Ohun elo yii wa fun lilo iṣowo ati pe o yẹ ki o ṣiṣẹ nipasẹ oṣiṣẹ ti oṣiṣẹ.
- Ensure the lid is securely locked before brewing.
- Use caution when handling hot liquids and surfaces.
3. Ọja Ipariview ati irinše
Familiarize yourself with the different parts of your Buffalo CN295 Coffee Percolator.

olusin 3.1: Iwaju View of the Buffalo CN295 Coffee Percolator. This image shows the overall design of the percolator, including the main body, water level indicator, dispensing tap, and the base with control lights and power switch.

Figure 3.2: Percolator in Use with Coffee Cup. This image illustrates the percolator dispensing coffee into a cup, highlighting the functionality of the tap and the drip tray.

Figure 3.3: Power Switch and Indicator Lights. A alaye view of the red ON/OFF switch and the green "READY" and red "BOIL" indicator lights located on the base of the unit.
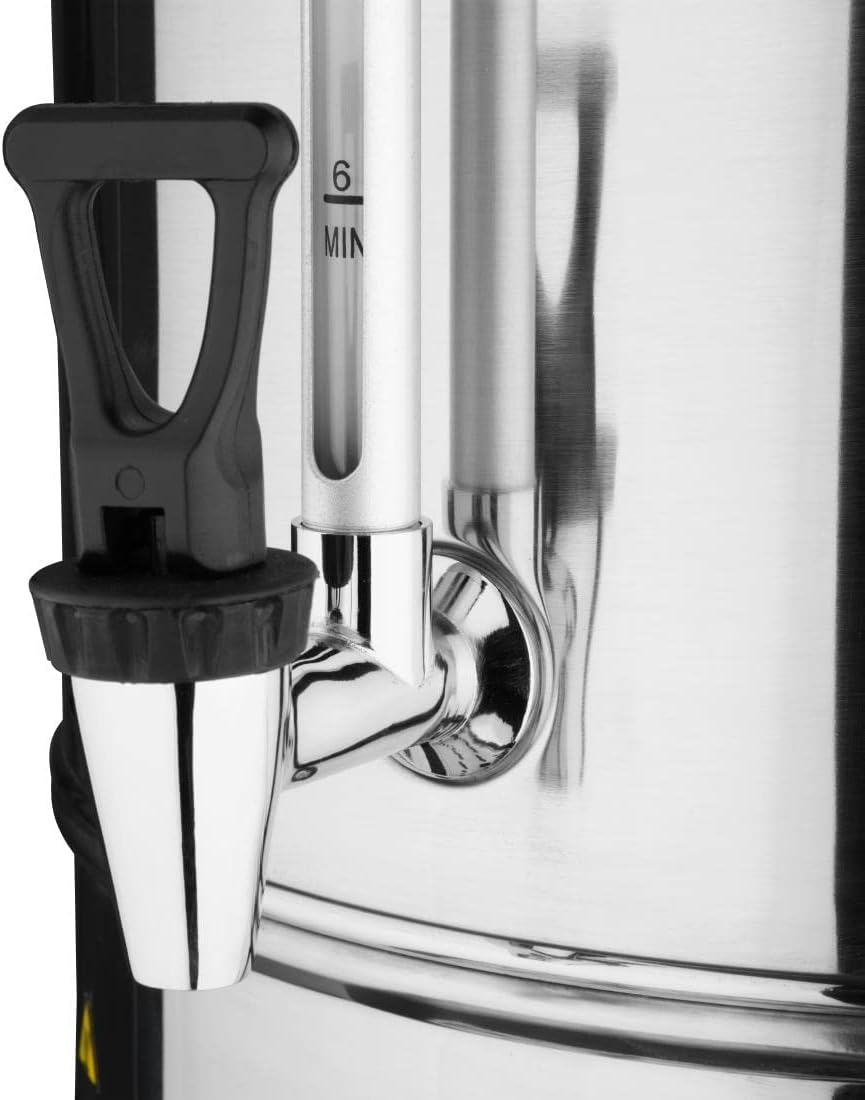
Figure 3.4: Water Level Indicator and Dispensing Tap. This image provides a closer look at the transparent water level tube with markings and the black dispensing tap, showing how liquid is drawn from the percolator.

Figure 3.5: Internal Coffee Basket. An oke view showing the perforated coffee basket inside the percolator, where ground coffee is placed for brewing.
4. Eto
- Ṣii silẹ: Carefully remove the percolator and all accessories from the packaging. Retain packaging for future storage or transport.
- Ìfọ̀mọ́ àkọ́kọ́: Before first use, wash the coffee basket, lid, and internal components with warm, soapy water. Rinse thoroughly and dry. Wipe the exterior of the percolator with a damp asọ.
- Ibi: Place the percolator on a stable, level, heat-resistant surface, away from walls and other appliances to allow for proper ventilation. Ensure the power cord can reach a grounded outlet without strain.
- First Use (Water Only): Fill the percolator with clean water up to the MAX fill line. Do not add coffee. Close the lid securely. Plug the unit into a suitable power outlet and turn it ON. Allow the water to complete a full brewing cycle. Dispense all water through the tap. This process cleans the internal system and removes any manufacturing residues. Repeat if necessary.
5. Awọn ilana Iṣiṣẹ
- Mura Awọn aaye Kofi: Use coarse ground coffee suitable for percolators. Fine grounds may clog the filter. For a 15L capacity, refer to coffee-to-water ratio guidelines (e.g., 1:18 ratio, approximately 830g of coffee for 15L of water).
- Fi omi kun: Remove the lid and coffee basket assembly. Fill the percolator with cold, fresh water up to the desired level, observing the water level indicator. Do not exceed the MAX fill line.
- Ṣafikun Kofi: Place the coffee grounds into the coffee basket. Ensure the basket is properly seated on the percolator's central tube.
- Ideri to ni aabo: Place the lid back on the percolator and twist or latch it securely to prevent steam escape and ensure proper percolation.
- Agbara Tan: Plug the percolator into a grounded power outlet. Flip the ON/OFF switch to the 'ON' position. The red "BOIL" indicator light will illuminate, indicating the heating process has begun.
- Ilana Pipọnti: Water will heat and rise through the central tube, showering over the coffee grounds. This process will continue until the coffee is brewed. The brewing time for a full 15L capacity is approximately 62 minutes.
- Atọka ti o ti ṣetan: Once brewing is complete, the red "BOIL" light will turn off, and the green "READY" light will illuminate, indicating the coffee is ready to serve and will be kept warm.
- Ṣiṣẹ: Place a cup under the dispensing tap and push the lever to dispense coffee. Release the lever to stop.
- Lẹhin Lilo: Turn the ON/OFF switch to 'OFF' and unplug the percolator from the power outlet. Allow the unit to cool completely before cleaning.
6. Itọju ati Cleaning
Regular cleaning ensures optimal performance and extends the life of your percolator.
- Ninu ojoojumọ:
- Ensure the percolator is unplugged and completely cool.
- Remove the lid, coffee basket, and central tube. Discard used coffee grounds.
- Wash the coffee basket, lid, and central tube with warm, soapy water. Rinse thoroughly.
- Wipe the interior of the percolator with a damp asọ lati yọ eyikeyi aloku kofi.
- Nu ode pẹlu ipolowoamp asọ. Ma ṣe lo awọn afọmọ abrasive tabi awọn paadi iyẹfun.
- Sofo ati ki o nu awọn drip atẹ.
- Gbẹ gbogbo awọn ẹya daradara ṣaaju iṣakojọpọ tabi titoju.
- Fifọ: Over time, mineral deposits (limescale) can build up, affecting performance.
- Descale the percolator regularly, depending on water hardness and frequency of use (e.g., monthly).
- Fill the percolator with a solution of equal parts white vinegar and water, or use a commercial descaling solution according to its instructions.
- Turn the percolator ON and allow the solution to heat, but do not let it boil dry. Turn OFF and unplug.
- Let the solution sit for 30-60 minutes, or longer for heavy buildup.
- Drain the solution through the tap.
- Rinse the percolator thoroughly by filling it with clean water and running several brewing cycles with water only, dispensing through the tap each time, until the vinegar smell is gone.
7. Laasigbotitusita
| Isoro | Owun to le Fa | Ojutu |
|---|---|---|
| Percolator kò tan. | Not plugged in; power switch OFF; no power at outlet; internal fuse tripped. | Ensure plug is fully inserted. Turn switch ON. Check outlet with another appliance. Contact qualified service personnel if fuse is suspected. |
| Kofi ti wa ni ko Pipọnti. | Insufficient water; coffee basket not properly seated; unit not heating. | Add water to appropriate level. Ensure coffee basket and central tube are correctly assembled. Check power connection and indicator lights. |
| Kofi dun alailagbara tabi lagbara ju. | Incorrect coffee-to-water ratio; coffee grind too fine/coarse; brewing cycle interrupted. | Adjust coffee quantity. Use coarse grind for percolators. Ensure full brewing cycle completes. |
| Leaking from tap. | Tap not fully closed; seal worn or damaged. | Ensure tap is pushed fully closed. If problem persists, contact service for replacement parts. |
| Slow brewing or no percolation. | Limescale buildup; central tube clogged. | Perform descaling procedure. Clean central tube thoroughly. |
8. Awọn pato
| Ẹya ara ẹrọ | Ẹ̀kúnrẹ́rẹ́ |
|---|---|
| Brand | Efon |
| Nọmba awoṣe | CN295 |
| Agbara | 15 liters |
| Agbara | 1.5 KW |
| Voltage | 230 Volts |
| Ohun elo | Aluminiomu |
| Àwọ̀ | Fadaka |
| Iwọn Nkan | 5.9 kilo |
| Àlẹmọ Iru | Atunlo |
| Awọn irinše to wa | Drip tray, Reusable filter |
| Ipo Isẹ | Ologbele-laifọwọyi |
| Ilu isenbale | China |
9. Atilẹyin ọja ati Support
For warranty information and technical support, please refer to the documentation provided with your purchase or contact Buffalo customer service. Keep your proof of purchase for warranty claims.
While specific warranty details are not provided in this manual, Buffalo products typically come with a manufacturer's warranty covering defects in materials and workmanship. Please visit the official Buffalo website or contact your retailer for detailed warranty terms and conditions.
For assistance with troubleshooting beyond this manual, spare parts, or service, please contact Buffalo customer support or an authorized service center.
Ask a question about this manual
Ask about setup, troubleshooting, compatibility, parts, safety, or missing instructions. Manuals+ will review the question and use this page’s manual context to help answer it.