1. Ifihan
This manual provides essential information for the safe and efficient operation of your Xerox AltaLink C8030 Multifunction Printer. Please read these instructions carefully before using the device and retain them for future reference. This device integrates printing, scanning, copying, and faxing capabilities to support various office tasks.
2. Alaye Aabo
Always follow basic safety precautions to reduce the risk of fire, electric shock, and injury. Ensure the device is connected to a grounded power outlet. Do not block ventilation openings. Keep the device away from water and excessive humidity. Refer to the safety labels on the product for specific warnings.
3. Ọja Ipariview
The Xerox AltaLink C8030 is a color multifunction printer designed for high-volume office environments. It features a 10-inch touchscreen for intuitive navigation and control. Key capabilities include:
- Print Speed: Up to 30 pages per minute (ppm) for both color and monochrome.
- Copy Resolution: 600 x 600 DPI.
- Memory: 8 GB RAM, 1 GB RAM, 250 GB HDD.
- Connectivity: NFC, Wireless, USB.
- Paper Supply: Multiple trays including 2 x 520-sheet trays, a 2,000-sheet high-capacity tandem tray, and a 100-sheet bypass tray.
- Features: Single Pass DADF, Data Security, Job Accounting, PostScript Kit, Network Scanning, Server Fax, iFax, Standard Output Tray, Office Finisher LX.
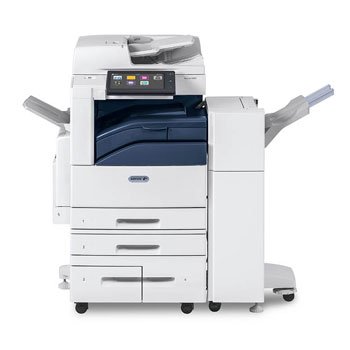
Aworan: Iwaju view of the Xerox AltaLink C8030 multifunction printer, showing its various paper trays and the integrated touchscreen control panel.
4. Eto
4.1 Ṣiṣii ati Gbe
- Fara yọọ itẹwe kuro ninu apoti rẹ.
- Gbe itẹwe sori iduro, ipele ipele pẹlu fentilesonu to peye.
- Ensure sufficient space around the printer for maintenance and paper loading.
4.2 Asopọ agbara
- So okun agbara pọ mọ itẹwe ati lẹhinna si iṣan itanna ti ilẹ.
- Tẹ bọtini agbara lati tan ẹrọ naa.
4.3 Iwe ikojọpọ
- Open the desired paper tray (e.g., Tray 1, Tray 2, or Bypass Tray).
- Ṣatunṣe awọn itọsọna iwe lati baamu iwọn iwe naa.
- Load the paper stack, ensuring it does not exceed the maximum fill line.
- Pa atẹ iwe naa ni aabo.
4.4 Nẹ́tíwọ́ọ̀kì àti Ìsopọ̀ USB
- Nẹtiwọọki: Connect an Ethernet cable to the printer's network port and to your network router/switch. Configure network settings via the touchscreen if necessary.
- Ailokun: Access the network settings on the touchscreen, select your Wi-Fi network, and enter the password.
- USB: Connect a USB cable from your computer to the printer's USB port for direct connection.
5. Awọn ilana Iṣiṣẹ
5.1 Titẹ sita
- Láti inú kọ̀ǹpútà tàbí ẹ̀rọ alágbèéká rẹ, ṣí ìwé tí o fẹ́ tẹ̀ jáde.
- Yan 'Tẹjade' lati inu akojọ aṣayan ohun elo.
- Choose the Xerox AltaLink C8030 as your printer.
- Adjust print settings (e.g., number of copies, color/monochrome, paper size) as needed.
- Tẹ 'Tẹjade'.
5.2 Ṣiṣayẹwo
- Place your document face-down on the scanner glass or face-up in the Automatic Document Feeder (ADF).
- On the printer's touchscreen, select the 'Scan' function.
- Choose your scan destination (e.g., email, network folder, USB drive).
- Configure scan settings (e.g., resolution, file format, color mode).
- Press 'Start' to begin scanning.
5.3 didaakọ
- Fi ìwé rẹ sí orí gilasi ẹ̀rọ ìwádìí tàbí sínú ADF.
- On the touchscreen, select the 'Copy' function.
- Enter the desired number of copies.
- Adjust copy settings (e.g., enlargement/reduction, 2-sided, color/monochrome).
- Press 'Start' to begin copying.
5.4 Faxing
- Fi ìwé rẹ sí orí gilasi ẹ̀rọ ìwádìí tàbí sínú ADF.
- On the touchscreen, select the 'Fax' function.
- Tẹ nọmba faksi olugba sii.
- Configure fax settings (e.g., resolution, delayed send).
- Press 'Start' to send the fax.
6. Itọju
6.1 Rirọpo Toner Katiriji
- Ṣii ideri iwaju ti itẹwe naa.
- Identify the empty toner cartridge.
- Grasp the handle and pull the cartridge out.
- Unpack the new toner cartridge and shake it gently.
- Insert the new cartridge until it clicks into place.
- Pa ideri iwaju.
6.2 Ninu gilasi Scanner
- Pa ẹrọ itẹwe naa kuro ki o yọọ okun agbara.
- Ṣii ideri scanner.
- Mu gilasi scanner nu pẹlu asọ, ti ko ni lint dampened pẹlu kan ìwọnba gilasi regede.
- Ensure the glass is dry before closing the cover and restoring power.
7. Laasigbotitusita
7.1 Iwe Jams
- Follow the on-screen instructions to locate and clear the paper jam.
- Open all accessible covers and trays to check for jammed paper.
- Gently pull the paper in the direction of the paper path.
7.2 Print Didara oran
- Check toner levels and replace cartridges if low.
- Ṣe ori titẹ sita tabi isọdọtun lati inu akojọ itọju itẹwe.
- Ensure you are using appropriate paper types for your print job.
7.3 Asopọmọra Isoro
- Verify all cables (Ethernet, USB) are securely connected.
- For wireless connections, check Wi-Fi signal strength and network settings.
- Restart the printer, router, and computer/device.
8. Awọn pato
| Ẹya ara ẹrọ | Sipesifikesonu |
|---|---|
| Brand | Xerox |
| Orukọ awoṣe | AltaLink C8030 |
| Imọ-ẹrọ titẹ sita | Lesa |
| Ijade itẹwe | Àwọ̀ |
| Iyara Titẹjade ti o pọju (Monochrome) | 30ppm |
| Iyara Daakọ Pupọ julọ (Dudu ati Funfun) | 30ppm |
| Asopọmọra Technology | NFC, Wireless |
| Iwọn Nkan | 349 iwon |
| Ọna Iṣakoso | Latọna jijin, Fọwọkan |
| Awọn ẹrọ ibaramu | PC |
| GTIN / UPC | 095205880151 |
9. Atilẹyin ọja ati Support
For warranty information, please refer to the documentation included with your product or visit the official Xerox website. For technical support, driver downloads, or service requests, please contact Xerox customer support through their official channels. Keep your product's serial number and purchase date readily available when contacting support.
Awọn orisun Ayelujara: Xerox Official Webojula