1. Ifihan
This manual provides essential information for the safe and efficient operation of your Casio XJ-F10X LED XGA Projector. Please read this manual thoroughly before using the projector and retain it for future reference. Understanding the instructions will ensure optimal performance and extend the lifespan of your device.
2. Awọn Ilana Aabo pataki
Ṣe akiyesi awọn iṣọra ailewu atẹle lati yago fun ibajẹ si pirojekito ati rii daju aabo olumulo:
- Ma ṣe dina awọn ṣiṣi atẹgun. Rii daju pe aaye to peye ni ayika pirojekito fun ṣiṣan afẹfẹ to dara.
- Do not expose the projector to rain or moisture to reduce the risk of fire or electric shock.
- Lo okùn agbára tí a pèsè pẹ̀lú ẹ̀rọ ìṣiṣẹ́ tàbí èyí tí a fọwọ́ sí nìkan.
- Avoid looking directly into the projector lens when the light source is active, as it can cause eye damage.
- Maṣe gbiyanju lati ṣiṣẹ ọja yi funrararẹ. Tọkasi gbogbo iṣẹ si oṣiṣẹ oṣiṣẹ ti o peye.
- Gbe awọn pirojekito lori kan idurosinsin, ipele dada lati se o lati ja bo.
3. Package Awọn akoonu
Jẹrisi pe gbogbo awọn ohun kan wa ninu package:
- Casio XJ-F10X Projector
- Okun agbara
- Iṣakoso latọna jijin (pẹlu awọn batiri)
- Okun VGA
- Afowoyi Olumulo (iwe-ipamọ yii)
4. Ọja Ipariview
Familiarize yourself with the various parts and controls of your Casio XJ-F10X projector.
4.1 Igbimọ iwaju

The front panel features the projection lens, which emits the image. Ventilation grilles are located on the side to ensure proper cooling during operation. A small infrared receiver for the remote control may also be present.
4.2 Ru Panel ati awọn isopọ

The rear panel houses all the necessary input and output ports for connecting external devices. These include:
- HDMI Type A x 2: For digital video and audio input (HDCP support).
- VGA (D-Sub 15-pin): For analog computer input.
- S-Fidio: Fun afọwọṣe fidio igbewọle.
- Fidio Apapo (RCA): For standard definition video input.
- Audio In (RCA L/R, 3.5mm mini jack): Fun titẹ sii ohun afọwọṣe.
- Audio Out (3.5mm mini jack): Fun pọ ita iwe awọn ọna šiše.
- RS-232: For projector control via a computer or control system.
- USB (Type A, Type B): Fun awọn imudojuiwọn iṣẹ tabi famuwia.
- Iwọle agbara: Fun sisopọ okun agbara AC.
4.3 Top Panel idari
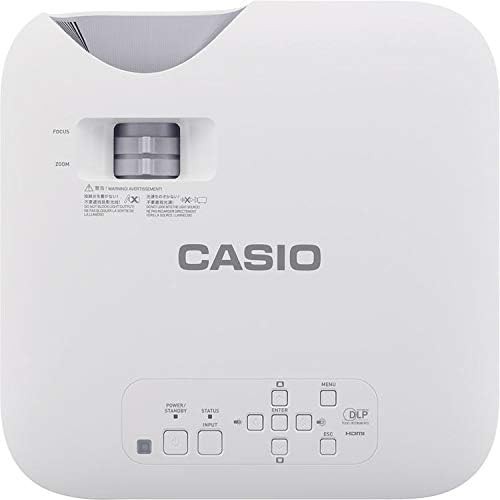
The top panel provides direct access to essential projector functions:
- Bọtini agbara: Yi pirojekito tan tabi pa.
- Bọtini titẹ sii: Selects the input source (HDMI, VGA, etc.).
- Bọtini Akojọ: Opens the on-screen display (OSD) menu.
- Awọn bọtini lilọ kiri (Soke/isalẹ/osi/ọtun): A lo lati lọ kiri nipasẹ awọn aṣayan akojọ aṣayan.
- Tẹ Bọtini: Jẹrisi awọn aṣayan ninu akojọ aṣayan.
- Bọtini ESC: Jade akojọ aṣayan lọwọlọwọ tabi pada si iboju ti tẹlẹ.
- Lever Sisun: Ṣe atunṣe iwọn aworan.
- Idojukọ Oruka: Sharpens the projected image.
5. Eto Itọsọna
5.1 Pirojekito Placement
Proper placement is crucial for optimal image quality.
- Ijinna: Position the projector at an appropriate distance from the screen to achieve the desired image size. Refer to the specifications for throw ratio details.
- Igun: Ensure the projector is perpendicular to the screen for a rectangular image. Use the keystone correction function if the image appears trapezoidal.
- Afẹfẹ: Maintain clear space around the projector's ventilation openings to prevent overheating.
5.2 Awọn ẹrọ Nsopọ
Follow these steps to connect your source devices:
- Ensure the projector and all source devices are powered off before making connections.
- Connect the appropriate video cable (HDMI, VGA, S-Video, or Composite) from your source device to the corresponding input port on the projector's rear panel.
- If using an analog video input (VGA, S-Video, Composite), connect an audio cable from your source device's audio output to the projector's Audio In port. HDMI carries both video and audio.
- Connect the power cord to the projector's power inlet and then to a grounded electrical outlet.
6. Awọn ilana Iṣiṣẹ
6.1 Titan ati Paa
- Agbara Tan: Press the Power button on the projector's top panel or the remote control. The projector will reach full brightness in approximately 5 seconds due to its Direct On/Off function.
- Agbara Pa: Press the Power button again. The projector will shut down immediately without a cool-down period.
6.2 Ipilẹ asọtẹlẹ
- Turn on the projector and your source device.
- Tẹ awọn Iṣawọle button on the projector or remote control repeatedly to select the correct input source (e.g., HDMI 1, VGA).
- Ṣatunṣe awọn Sun-un lever to achieve the desired image size on the screen.
- Ṣatunṣe awọn Idojukọ ring until the image appears sharp and clear.
- If the image is distorted (trapezoidal), use the keystone correction feature in the OSD menu to correct it.
7. Itọju
7.1 Ninu Pirojekito
- Lẹnsi: Gently wipe the lens with a soft, lint-free cloth specifically designed for optical surfaces. Do not use abrasive cleaners.
- Casing: Nu pirojekito naa nu casing pẹ̀lú aṣọ rírọ̀ tí ó gbẹ. Fún eruku líle, díẹ̀ dampen awọn asọ pẹlu omi ati ki o kan ìwọnba detergent, ki o si mu ese gbẹ.
- Afẹfẹ: Periodically check and clean the ventilation grilles to ensure they are free from dust and debris. Use a soft brush or compressed air.
7.2 Light Source Longevity
The Casio XJ-F10X utilizes a mercury-free LED hybrid light source, offering exceptional durability and a long operational life of up to 20,000 hours without requiring lamp replacement. This significantly reduces maintenance needs and costs.
8. Laasigbotitusita
Ti o ba pade awọn ọran pẹlu pirojekito rẹ, tọka si awọn iṣoro ti o wọpọ ati awọn ojutu wọnyi:
- Ko si Aworan:
- Rii daju pe pirojekito ti wa ni titan ati pe okun agbara ti sopọ ni aabo.
- Rí i dájú pé a yan orísun ìtẹ̀wọlé tó tọ́.
- Ṣayẹwo okun asopọ laarin pirojekito ati ẹrọ orisun.
- Rí i dájú pé ẹ̀rọ orísun náà ti ṣiṣẹ́, ó sì ń mú àmì jáde.
- Àwòrán Dídíẹ̀:
- Check the projector's brightness settings in the OSD menu.
- Ensure the room is sufficiently dark for projection.
- Ko si Ohun:
- If using an analog video input, ensure the audio cable is connected.
- Check the volume settings on both the projector and the source device.
- Ensure the correct audio input is selected if applicable.
- Aworan jẹ blurry:
- Ṣatunṣe oruka idojukọ lori lẹnsi pirojekito.
- Ensure the projector is placed at an appropriate distance from the screen.
- Aworan jẹ Trapezoidal:
- Use the keystone correction function in the OSD menu to adjust the image shape.
- Try to position the projector as perpendicular to the screen as possible.
9. Imọ ni pato
| Ẹya ara ẹrọ | Sipesifikesonu |
|---|---|
| Nọmba awoṣe | XJ-F10X |
| Ipinnu abinibi | XGA (1024 x 768) |
| Imọlẹ | 3,300 Lumens |
| Ipin Itansan | 20,000:1 |
| Ifihan Chip | 0.65" DLP Chip |
| Orisun Imọlẹ | LED arabara |
| Light Orisun Life | Titi di wakati 20,000 |
| Lẹnsi Iru | 1.5x Manual Zoom & Focus |
| Apakan Ipin | 4:3 abinibi |
| Awọn igbewọle | HDMI Type A x 2, S-Video, VGA, RS-232, Composite Video, RCA Audio In |
| Ọja Mefa | 11.8 x 11.8 x 3.8 inches |
| Iwọn Nkan | 10.78 iwon |
10. Atilẹyin ọja ati Onibara Support
The Casio XJ-F10X Projector is covered by a 3-year parts and labor warranty. The LED hybrid light source is covered by a 5-year or 10,000-hour warranty, whichever comes first. For technical support, service, or warranty claims, please contact Casio customer support through their official webaaye tabi alaye olubasọrọ ti a pese pẹlu iwe rira rẹ.
Please have your model number (XJ-F10X) and purchase date available when contacting support.