1. Ifihan
This manual provides detailed instructions for the installation, operation, maintenance, and troubleshooting of your FSP 400W Micro ATX Power Supply (Model FSP400-60GHS(85)-R1). This power supply unit is designed for compact small form factor PC systems, offering 400 watts of power output with 80 Plus Bronze certification for high efficiency. It is compatible with Intel and AMD CPU systems and standard PC configurations.
Please read this manual thoroughly before installation and operation to ensure proper usage and to prevent damage to the unit or other components.
2. Alaye Aabo
IKILO: Power supplies contain high voltage components. Do not open the power supply casing. Kò sí àwọn ẹ̀yà ara tí a lè lò nínú rẹ̀. Ṣíṣí casing yoo sọ atilẹyin ọja di ofo ati pe o le fa ewu mọnamọna ina.
- Rii daju pe ipese agbara ti ge asopọ lati inu iṣan agbara AC ṣaaju fifi sori ẹrọ tabi itọju.
- Fi ipese agbara sii ni agbegbe ti afẹfẹ ba wa daradara.
- Do not operate the power supply in high humidity or extreme temperature environments.
- Lo awọn okùn tí a pese pẹlu ipese agbara nikan.
- Rii daju pe gbogbo awọn kebulu ti sopọ ni aabo ṣaaju ṣiṣe agbara lori eto naa.
- This product is designed for use in personal computers. Do not use it for any other purpose.
3. Package Awọn akoonu
Daju pe gbogbo awọn nkan ti a ṣe akojọ rẹ si isalẹ wa ninu package rẹ:
- FSP 400W Micro ATX Power Supply (FSP400-60GHS(85)-R1)
- AC Agbara okun
- SFX to PS2 Bracket
- Itọsọna olumulo
- Mounting Screws (typically included with PC cases, but sometimes with PSUs)

Figure 3.1: Package Contents. Shows the power supply unit, user manual, various power cables, an AC power cord, and an SFX to PS2 adapter bracket.
4. Ọja Ipariview
The FSP400-60GHS(85)-R1 is a compact power supply designed for small form factor systems. Key features include an 80mm cooling fan with thermal sensing technology and an energy-saving 1-watt standby mode.
4.1 Ìṣètò Ti ara

olusin 4.1: Angled view of the FSP 400W Micro ATX Power Supply, highlighting the fan grille, power switch, and AC power input.

olusin 4.2: Ẹyìn view of the power supply, detailing the main power switch and the AC power input socket.

olusin 4.3: Top view of the power supply, showing the protective grille over the 80mm cooling fan.
4.2 o wu Connectors
The power supply includes various connectors to power your system components:
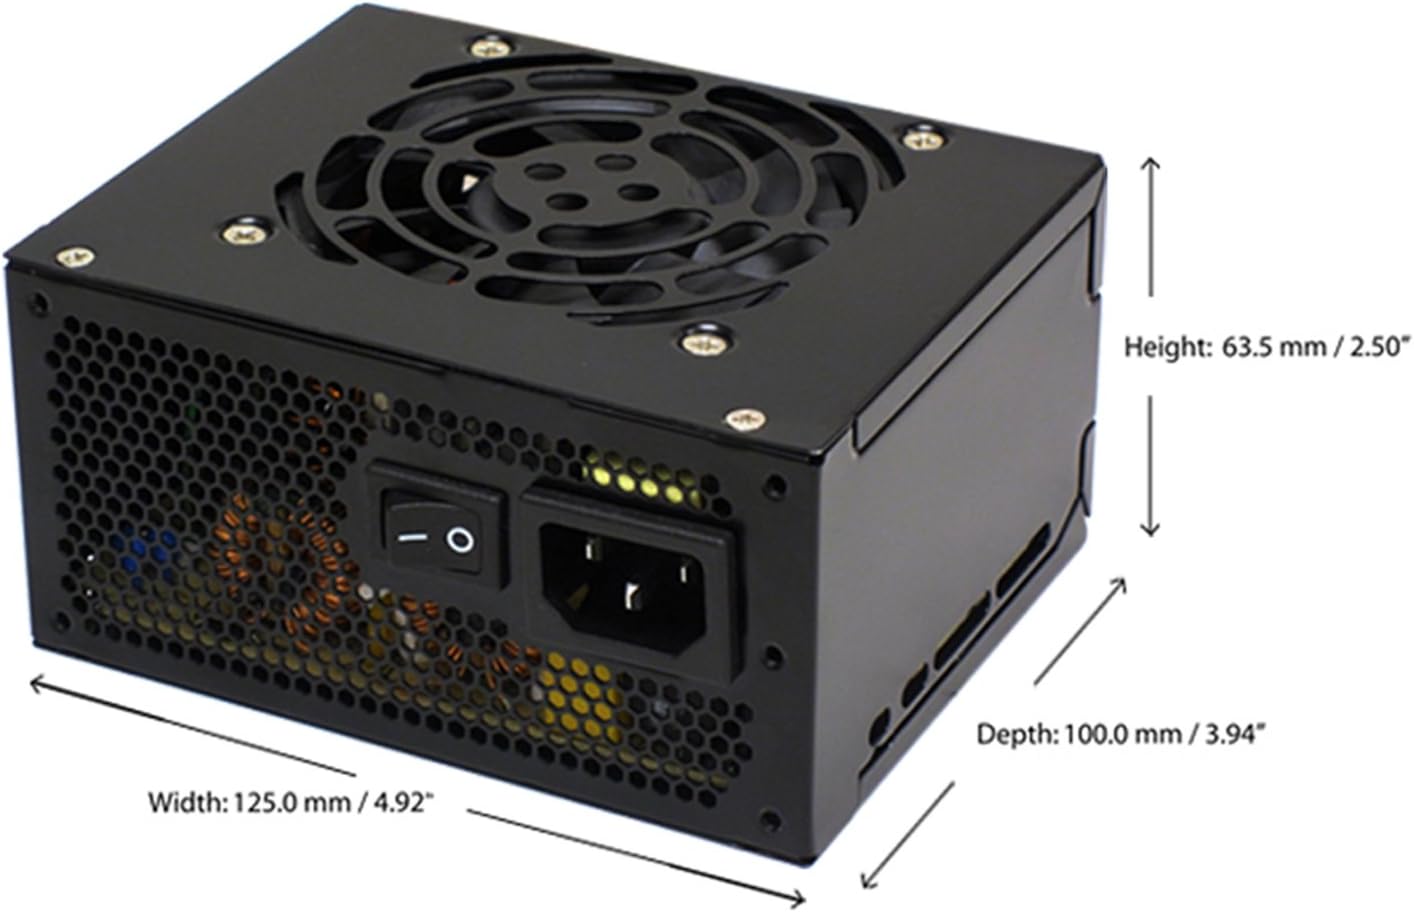
Figure 4.4: Diagram illustrating the types and quantities of output connectors available on the FSP400-60GHS(85)-R1 power supply.
- Main 24 Pin (1): For motherboard power.
- P4 | EPS 4+4 Pin (1): For CPU power.
- PCI-E 8 Pin (6+2) (1): Fun awọn kaadi eya aworan.
- Molex 4 Pin (3): For older peripherals and fans.
- Serial ATA 15 Pin (3): For SATA hard drives and SSDs.
- FDD 4 Pin (1): For floppy disk drives or other legacy devices.
5. Eto ati fifi sori
Before beginning installation, ensure your computer system is powered off and disconnected from the AC power outlet. It is recommended to wear an anti-static wrist strap to prevent electrostatic discharge (ESD) damage to components.
5.1 Fifi awọn Power Ipese
- Mura Ọran naa: Open your computer case. Identify the power supply mounting area.
- Gbigbe PSU:
- For SFX cases: Insert the FSP400-60GHS(85)-R1 directly into the SFX power supply bay and secure it with screws.
- For standard ATX cases: Attach the included SFX to PS2 bracket to the power supply. Then, mount the power supply with the bracket into the ATX power supply bay and secure it with screws.

Figure 5.1: The FSP 400W Micro ATX Power Supply shown with the SFX to PS2 adapter bracket installed, ready for mounting in a standard ATX case.

Figure 5.2: Illustration demonstrating how the SFX power supply fits into a PS2 (ATX) case using the provided adapter bracket.
5.2 Nsopọ Awọn okun
Connect the appropriate cables to your motherboard and components. Refer to your motherboard and component manuals for specific connection points.
- Agbara modaboudu: Connect the 24-pin ATX connector to the corresponding socket on your motherboard.
- Agbara Sipiyu: Connect the 4+4-pin EPS/ATX 12V connector to the CPU power socket on your motherboard.
- Agbára Káàdì Àwòrán: If your graphics card requires external power, connect the 6+2-pin PCI-E connector(s) to the graphics card.
- Awọn ẹrọ ipamọ: Connect SATA power connectors to your SATA hard drives, SSDs, and optical drives.
- Awọn agbeegbe: Use Molex 4-pin connectors for case fans or other legacy peripherals as needed.
- Iṣakoso USB: Route cables neatly to ensure proper airflow within the case.
Nígbà tí gbogbo àwọn ìsopọ̀ inú bá ti wà, ti àpótí kọ̀ǹpútà rẹ pa.
5.3 Ita Asopọ
- Connect the AC power cord to the power supply's AC inlet.
- Pulọọgi opin miiran ti okun agbara AC sinu iṣan ogiri ti o wa lori ilẹ tabi aabo aabo.
- Ensure the power switch on the back of the power supply is in the "OFF" (O) position before plugging it in.
6. Awọn ilana Iṣiṣẹ
6.1 Lílo Ètò Rẹ
- After all connections are secure, flip the power switch on the back of the power supply to the "ON" (I) position.
- Tẹ bọtini agbara lori ọran kọmputa rẹ lati bẹrẹ eto naa.
6.2 Thermal Control System
The FSP400-60GHS(85)-R1 features an 80mm cooling fan with thermal sensing technology. This system automatically adjusts the fan speed based on the internal temperature of the power supply, optimizing cooling performance while minimizing noise.
6.3 Energy Saver Standby Mode
This power supply is designed with an energy-saving 1-watt standby mode, reducing power consumption when the system is in a low-power state or turned off but still connected to AC power.
7. Itọju
Itọju to dara ṣe idaniloju gigun ati iṣẹ ti o dara julọ ti ipese agbara rẹ.
- Ninu: Periodically clean the exterior of the power supply and its fan grille to prevent dust buildup. Use a soft, dry cloth or compressed air. Ensure the power supply is disconnected from AC power before cleaning.
- Afẹfẹ: Ensure that the power supply's fan and ventilation openings are not obstructed. Good airflow is crucial for cooling.
- Iduroṣinṣin USB: Regularly check all power cables for any signs of wear, fraying, or damage. Replace damaged cables immediately.
Do not attempt to open the power supply unit for internal cleaning or repair. This will void the warranty and can be dangerous.
8. Laasigbotitusita
Ti o ba pade awọn ọran pẹlu ipese agbara rẹ, tọka si awọn iṣoro ti o wọpọ ati awọn ojutu wọnyi:
8.1 No Power to System
- Ṣayẹwo agbara AC: Rí i dájú pé okùn agbára AC ti so mọ́ ibi ìpèsè agbára àti ibi ìjáde ògiri tí ń ṣiṣẹ́ dáadáa.
- Agbara Yi pada: Verify that the power switch on the back of the power supply is in the "ON" (I) position.
- Internal Connections: Confirm that the 24-pin ATX and 4+4-pin EPS/ATX 12V connectors are firmly seated in the motherboard.
- Circuit kukuru: Disconnect all peripheral power cables (SATA, Molex, PCI-E) and attempt to power on. If the system powers on, a short circuit may exist in one of the connected components or cables. Reconnect them one by one to identify the faulty component.
8.2 System Instability or Random Shutdowns
- Apọju: Rí i dájú pé àwọn ohun tí ètò rẹ nílò kò ju agbára 400W ti ìpèsè agbára lọ.
- Afẹfẹ: Check for proper airflow within the case and ensure the power supply's fan is not obstructed. Overheating can cause instability.
- Awọn Isopọ USB: Re-check all power connections to ensure they are secure. Loose connections can lead to intermittent power delivery.
8.3 Ariwo afẹ́fẹ́ tó pọ̀ jù
- Igbekale Eruku: Clean the fan grille and fan blades with compressed air.
- Idilọwọ: Ensure no cables or foreign objects are interfering with the fan's rotation.
- Ayika Ṣiṣẹ: High ambient temperatures can cause the thermal control system to increase fan speed. Ensure adequate room ventilation.
If troubleshooting steps do not resolve the issue, contact FSP customer support or your retailer for assistance.
9. Awọn pato
Detailed technical specifications for the FSP400-60GHS(85)-R1 power supply:
| Orukọ awoṣe | FSP 400W Micro ATX Power Supply |
| Nọmba awoṣe | FSP400-60GHS(85)-R1 |
| Brand | FSP |
| Ijade Wattage | 400 Wattis |
| 80 Plus Certification | 80 Plus Idẹ |
| Fọọmù ifosiwewe | Micro ATX (SFX with PS2 bracket) |
| Ọna Itutu | Air (80mm fan with thermal control) |
| Agbara Ipese Design | Ti kii ṣe apọjuwọn |
| Iṣagbewọle Voltage | 100 - 265 Volts (AC) |
| Awọn iwọn (L x W x H) | 4.9 x 3.9 x 2.5 inches (125.0 x 100.0 x 63.5 mm) |
| Iwọn Nkan | 2.31 iwon |
| Awọn ẹrọ ibaramu | Personal Computer (AMD/Intel CPU systems) |
| Awọn asopọ | Main 24 Pin (1), P4 | EPS 4+4 Pin (1), PCI-E 8 Pin (6+2) (1), Molex 4 Pin (3), Serial ATA 15 Pin (3), FDD 4 Pin (1) |
| Ibamu Ayika | RoHS, Lead-Free, Green Product (G.P) |

Figure 9.1: Physical dimensions of the FSP 400W Micro ATX Power Supply.

Figure 9.2: Illustrative diagram showing typical cable lengths for the power supply connectors.
10. atilẹyin ọja Information
The FSP 400W Micro ATX Power Supply (FSP400-60GHS(85)-R1) is covered by a 3-odun olupese ká atilẹyin ọja. This warranty guarantees the quality and performance of the product for the specified period from the date of purchase.
The warranty covers defects in materials and workmanship under normal use. It does not cover damage resulting from improper installation, accidents, misuse, abuse, natural disasters, or unauthorized modifications or repairs. Opening the power supply casing yoo sọ atilẹyin ọja di ofo.
For warranty claims or service, please retain your proof of purchase and contact FSP customer support.
11. Onibara Support
If you require further assistance, have questions, or need to report an issue that cannot be resolved using the troubleshooting guide, please contact FSP customer support.
- FSP Webojula: Visit the official FSP website for product information, FAQs, and support resources.
- Ibi iwifunni: Refer to the FSP website or your product packaging for the most current customer service contact details (phone, email, or support portal).
When contacting support, please have your product model number (FSP400-60GHS(85)-R1) and proof of purchase readily available.