
Ọrọ Iṣaaju
This manual provides detailed instructions for the setup, operation, and maintenance of your Digoo DG-C3 Wireless Weather Station. This device integrates a hygrometer, thermometer, weather forecast station, and alarm clock functions, offering comprehensive environmental monitoring and timekeeping capabilities. Please read this manual thoroughly before using the product to ensure correct operation and to maximize its features.
Package Awọn akoonu
- Digoo DG-C3 Wireless Weather Station Unit
- Okun Agbara USB
- Afowoyi Olumulo (iwe-ipamọ yii)
Note: Batteries (3x AAA) are not included and must be purchased separately.
Ọja Pariview
Familiarize yourself with the various components of your Digoo DG-C3 weather station.
Ifihan Iwaju
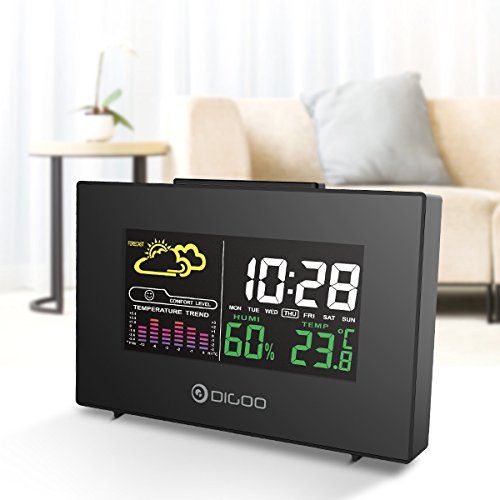
The front display features a color backlit screen showing the current time, day of the week, indoor humidity, indoor temperature, and a weather forecast icon. It also includes a comfort level indicator and a temperature trend graph.
- Aago ati Ọjọ: Digital display of current time and day.
- Àfojúsùn ojú ọjọ: Icons indicating predicted weather conditions (e.g., sunny, cloudy, rainy).
- Ipele itunu: Indicates indoor comfort based on temperature and humidity.
- Iyipada iwọn otutu: Bar graph showing recent temperature changes.
- Ọriniinitutu: Ogoruntage display of indoor humidity.
- Iwọn otutu: Digital display of indoor temperature (Celsius or Fahrenheit).
Pada nronu
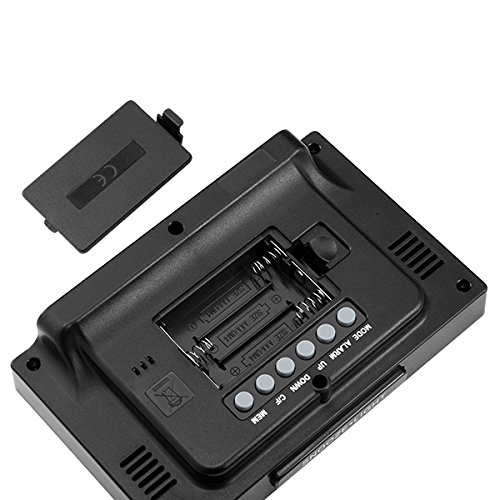
The back of the unit houses the battery compartment and various control buttons for setting the device.
- Abala Batiri: Holds 3x AAA batteries for power backup.
- Bọtini MODE: Used to switch between display modes and enter setting mode.
- Bọtini itaniji: A lo lati ṣeto ati mu/mu itaniji ṣiṣẹ.
- Bọtini UP: Used to increase values during settings or view maximum records.
- Bọtini isalẹ: Used to decrease values during settings or view minimum records.
- Bọtini C/°F: Ó máa ń yí padà láàrín àwọn ìwọ̀n otútù Celsius àti Fahrenheit.
- Bọtini MEM: Lo lati view memory records for temperature and humidity.
Oke igbimo
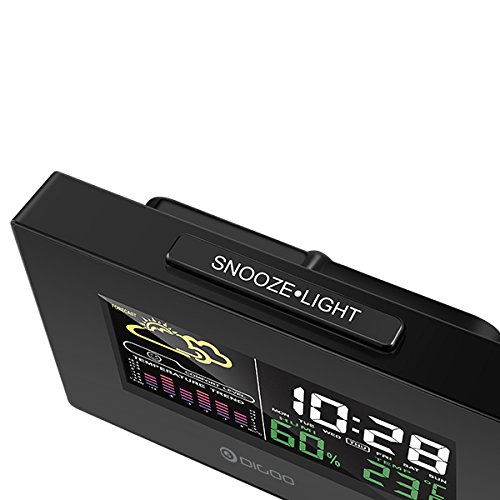
The top of the unit features a single button for snooze and backlight functions.
- SNOOZE·LIGHT Button: Press to activate the backlight or snooze the alarm.
Ṣeto
1. Agbara Lori
- Fifi sori batiri: Open the battery compartment cover on the back of the unit. Insert 3x AAA batteries, ensuring correct polarity (+/-). Close the cover. Batteries provide backup power and allow for portability.
- Asopọ Agbara USB: For continuous power and backlight, connect the provided USB cable to the USB port on the unit and to a compatible USB power adapter (not included) or a computer USB port.
- The display will light up and show default settings.
2. Initial Settings (Time, Date, Unit)
- Eto akoko:
- Tẹ mọlẹ MODE button for approximately 3 seconds to enter time setting mode. The hour digit will flash.
- Lo awọn UP or SILE awọn bọtini lati ṣatunṣe awọn wakati.
- Tẹ MODE again to confirm the hour and move to minute setting. The minute digit will flash.
- Lo awọn UP or SILE awọn bọtini lati ṣatunṣe iseju.
- Tẹ MODE again to confirm and move to 12/24 hour format selection.
- Lo awọn UP or SILE buttons to select 12-hour or 24-hour format.
- Tẹ MODE láti jẹ́rìísí àti láti ṣètò àkókò ìjáde.
- Eto Ọjọ:
- Lẹhin ti ṣeto akoko, tẹ MODE again to enter date setting mode. The year will flash.
- Lo awọn UP or SILE awọn bọtini lati ṣatunṣe odun.
- Tẹ MODE to confirm and move to month setting.
- Lo awọn UP or SILE awọn bọtini lati ṣatunṣe oṣu.
- Tẹ MODE to confirm and move to day setting.
- Lo awọn UP or SILE awọn bọtini lati ṣatunṣe awọn ọjọ.
- Tẹ MODE to confirm and exit date setting.
- Aṣayan Iwọn otutu:
- Tẹ awọn ° C / ° F button on the back of the unit to switch between Celsius (°C) and Fahrenheit (°F) temperature display.
Awọn ilana Iṣiṣẹ
1. Iṣẹ́ Aago Àkíyèsí
- Ṣiṣeto Itaniji:
- Tẹ awọn Itaniji bọ́tìnì lẹ́ẹ̀kan láti fi àkókò ìkìlọ̀ lọ́wọ́lọ́wọ́ hàn.
- Tẹ mọlẹ Itaniji button for approximately 3 seconds. The hour digit will flash.
- Lo awọn UP or SILE awọn bọtini lati ṣatunṣe aago itaniji.
- Tẹ Itaniji again to confirm the hour and move to minute setting. The minute digit will flash.
- Lo awọn UP or SILE awọn bọtini lati satunṣe iṣẹju itaniji.
- Tẹ Itaniji lati jẹrisi ati jade kuro ni eto itaniji.
- Muu ṣiṣẹ/Mu itaniji ṣiṣẹ:
- Nígbà tí o bá wà ní ipò ìfihàn àkókò déédéé, tẹ Itaniji button repeatedly to toggle the alarm ON or OFF. An alarm icon will appear on the display when the alarm is active.
- Iṣẹ́ lẹ́ẹ̀kọ̀ọ̀kan:
- Nigbati itaniji ba dun, tẹ bọtini naa SOOZE·LIGHT button on the top of the unit to activate the snooze function. The alarm will temporarily stop and sound again after a few minutes (typically 5-10 minutes).
- To stop the alarm completely, press any other button on the back panel.
2. Asọtẹlẹ oju ojo
The weather station provides a weather forecast based on internal atmospheric pressure changes. The forecast icons (e.g., sunny, cloudy, rainy) are predictions for the next 12-24 hours and may not always match local weather services, which use more comprehensive data.
- The forecast icon is displayed on the upper left of the screen.
- The device requires a period of stable operation (typically 24 hours) to calibrate and provide accurate forecasts.
3. Iwọn otutu ati Ọriniinitutu Ifihan
- The current indoor temperature and humidity are continuously displayed on the screen.
- Viewing Min/Max Records:
- Tẹ awọn MEM button once to display the maximum recorded temperature and humidity.
- Tẹ MEM again to display the minimum recorded temperature and humidity.
- Tẹ MEM a third time to return to current readings.
- To clear the min/max records, press and hold the MEM bọtini fun 3 aaya nigba ti viewgbigba awọn igbasilẹ.
4. Iṣakoso Backlight
- When powered by USB, the backlight will remain on.
- When powered by batteries only, press the SOOZE·LIGHT button to temporarily activate the backlight for a few seconds.
Itoju
- Ninu: Wipe the unit with a soft, dry cloth. Do not use abrasive cleaners or solvents. Avoid getting moisture into the unit.
- Rirọpo Batiri: When the display becomes dim or functions irregularly, replace the 3x AAA batteries in the back compartment. Ensure correct polarity.
- Ibi ipamọ: If not using the device for an extended period, remove the batteries to prevent leakage. Store in a cool, dry place.
Laasigbotitusita
| Isoro | Owun to le Fa | Ojutu |
|---|---|---|
| Ifihan ti ṣofo tabi baibai. | Low batteries or no power connection. | Replace batteries or connect the USB power cable. |
| Aago/ọjọ ti ko tọ. | Time/date not set correctly after power loss or initial setup. | Follow the "Initial Settings" section to reset time and date. |
| Àsọtẹ́lẹ̀ ojú ọjọ́ dà bí èyí tí kò péye. | Device needs calibration time; local conditions may differ from pressure-based forecast. | Allow 24 hours for calibration. Understand that the forecast is based on internal pressure changes. |
| Itaniji ko dun. | Alarm is not activated or volume is too low (if adjustable). | Ensure the alarm icon is displayed. Check alarm settings. |
Awọn pato
| Awoṣe: | DG-C3 |
| Asopọmọra: | USB (fun agbara) |
| Orisun Agbara: | 3x AAA Batteries (not included) or USB Power |
| Awọn ẹya pataki: | Hygrometer, Thermometer, Weather Forecast, Alarm Clock, Color Backlight, Portable |
| Ifihan: | Color Backlit LCD |
| Ẹka ìwọ̀ntúnwọ̀nsì: | A le yan °C / °F |
Atilẹyin ọja ati Support
Fun alaye atilẹyin ọja tabi atilẹyin imọ-ẹrọ, jọwọ tọka si iwe ti a pese ni akoko rira tabi kan si alagbata rẹ. Tọju iwe-ẹri rira rẹ bi ẹri rira.