
1. Ifihan
The EPEVER VS6048AU is a 60A common positive Pulse Width Modulation (PWM) solar charge controller designed for 12V, 24V, 36V, and 48V solar panel power systems. It incorporates advanced digital techniques to ensure efficient and reliable battery charging and load management. This controller is suitable for various applications, including solar home systems, traffic signals, solar street lights, and solar garden lamps.
Awọn ẹya pataki:
- 3-Stage ni oye PWM gbigba agbara: Olopobobo, Igbelaruge/Edogba, leefofo.
- Supports three battery charging options: Sealed, Gel, and Flooded.
- Integrated LCD display for dynamic monitoring of operating data and working conditions.
- Dual USB output ports (Max. 5VDC/2.4A) for charging electronic devices.
- User-friendly button settings for comfortable and convenient operation.
- Multiple load control modes for versatile application.
- Energy statistics function.
- Batiri otutu biinu iṣẹ.
- Extensive electronic protections for system safety.

Image 1.1: The EPEVER VS6048AU Solar Charge Controller shown in various application settings, including home power supply, street lighting, monitoring, and green energy solutions.
2. Alaye Aabo
Jọ̀wọ́ ka gbogbo ìtọ́ni àti ìkìlọ̀ dáadáa kí o tó fi sori ẹ̀rọ àti ṣiṣẹ́. Àìtẹ̀lé àwọn ìtọ́ni wọ̀nyí lè yọrí sí ìkọlù iná mànàmáná, iná, tàbí ìpalára ńlá.
- Ensure all wiring is correctly polarized and securely connected to prevent damage to the controller and other components.
- Always disconnect the solar panel and battery power before installing or adjusting the controller.
- Install the controller in a well-ventilated area, away from flammable gases, moisture, and direct sunlight.
- Use appropriate circuit breakers or fuses for the solar panel, battery, and load circuits.
- Do not disassemble or attempt to repair the controller yourself. Contact qualified personnel for service.
- Wear appropriate personal protective equipment, including eye protection, when working with batteries.
- Keep children away from the solar power system components.
Àwọn Ààbò Ẹ̀rọ Amóhùnmáwòrán: The VS6048AU controller includes comprehensive electronic protections:
- PV yiyipada polarity Idaabobo
- Batiri lori voltage aabo
- Batiri lori aabo idasile
- Batiri yiyipada polarity Idaabobo
- Idaabobo gbigbona batiri
- Fifuye apọju Idaabobo
- Fifuye kukuru Circuit Idaabobo
- Adarí overheating Idaabobo

Image 2.1: Visual representation of the electronic protections integrated into the controller and a basic solar power system connection diagram.
3. Ọja Ipariview
Familiarize yourself with the components and interface of your EPEVER VS6048AU solar charge controller.

Aworan 3.1: Iwaju view of the EPEVER VS6048AU controller with key components labeled.
- Ifihan LCD: Shows system status, parameters, and error codes.
- Bọtini MENU: Used to navigate through different display interfaces and enter/exit setting modes.
- Ṣeto Bọtini: Used to confirm selections, modify parameters, and clear data.
- USB Output Ports (5VDC/2.4A): For charging external electronic devices.
- Temp. Sensor Port (RTS Port): Connects to the optional remote temperature sensor for accurate battery temperature compensation.
- Àwọn Ibùdó PV: Connect to the solar panel array.
- Awọn ibudo batiri: Connect to the battery bank.
- Load Terminals: Connect to DC loads.
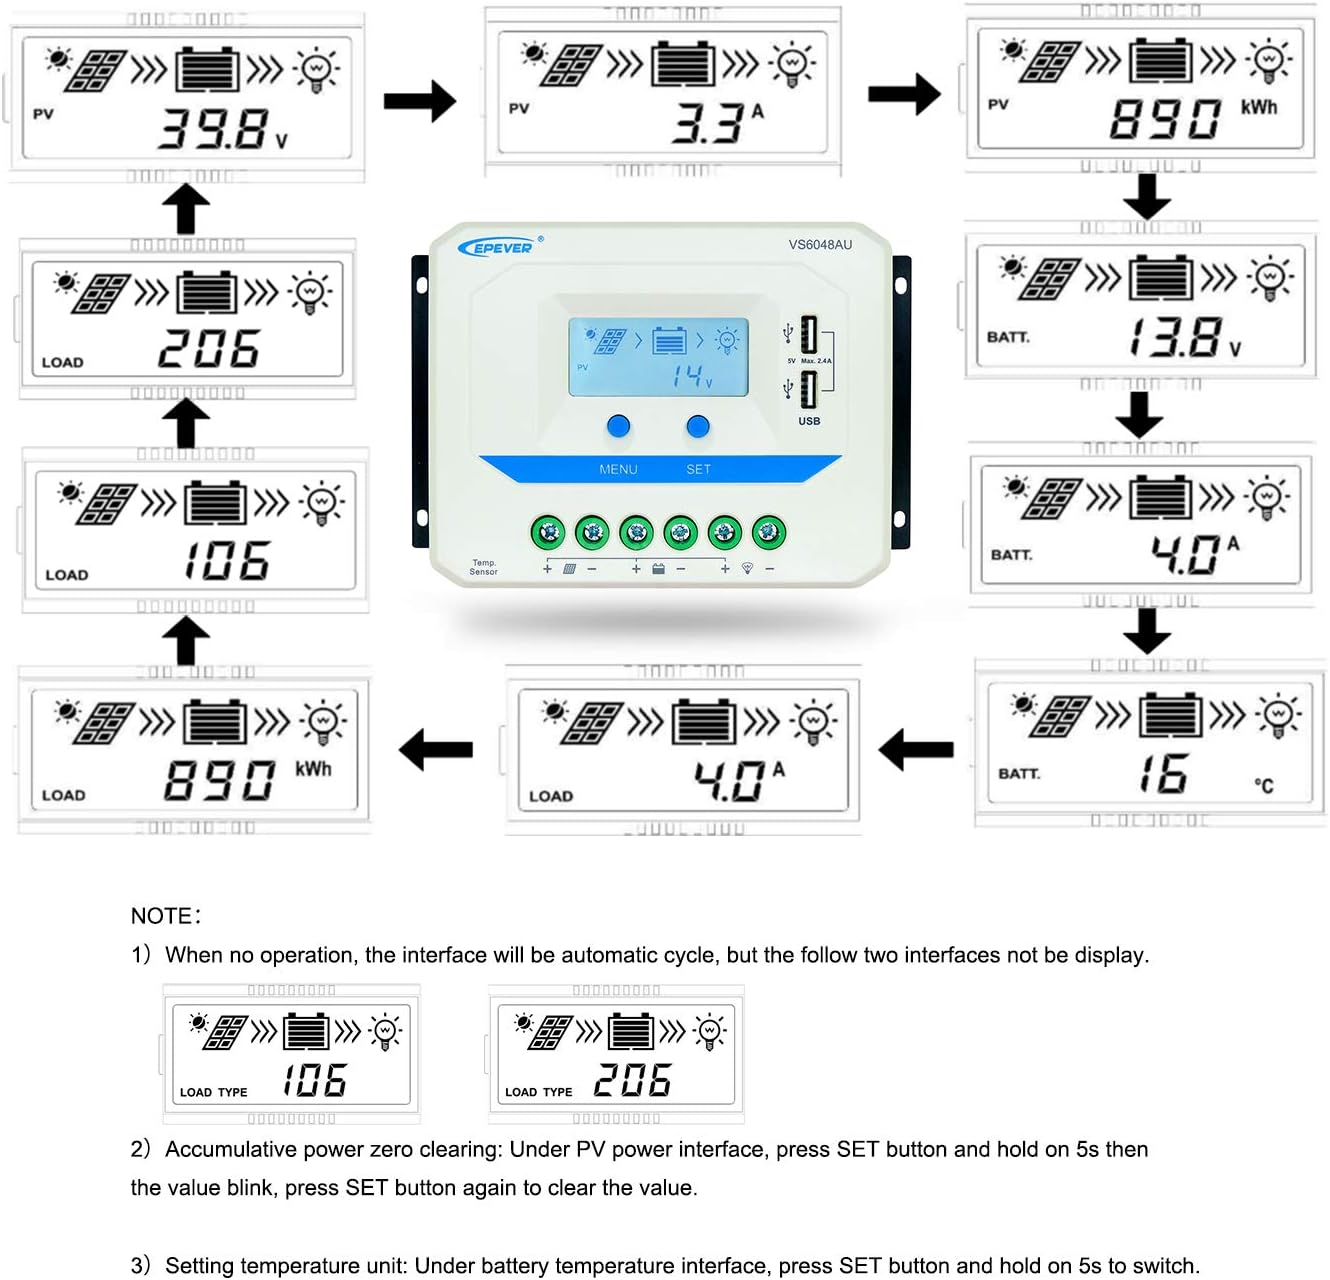
Image 3.2: Dimensions of the EPEVER VS6048AU Solar Charge Controller (approximately 21.4 cm x 12.87 cm x 7.22 cm).
LCD Display Status Description
The LCD display provides visual feedback on the system's operational status. Refer to the table below for icon meanings:

Image 3.3: Detailed description of the icons displayed on the VS6048AU LCD screen.
4. Eto ati fifi sori
Follow these steps for proper installation of your solar charge controller. Ensure all power sources are disconnected before making any connections.
Ilana onirin:
- So batiri pọ: Connect the battery to the controller's battery terminals. Ensure correct polarity (positive to positive, negative to negative). The controller will detect the battery voltage.
- So fifuye naa pọ: Connect the DC load to the controller's load terminals. Ensure correct polarity.
- Solar Panel: Connect the solar panel array to the controller's PV terminals. Ensure correct polarity.
Pataki: Always connect the battery first, then the solar panel, and finally the load. Disconnect in the reverse order: load, then solar panel, then battery.
Itọsọna Fidio fifi sori ẹrọ:
Video 4.1: An official EPEVER video demonstrating the connection process for the solar charge controller, including battery and load connections. This visual guide can assist with proper installation.
5. Awọn ilana Iṣiṣẹ
The EPEVER VS6048AU controller features an intuitive LCD display and button interface for monitoring and configuration.
LCD Display Navigation:
When no operation is performed, the LCD interface will automatically cycle through various display screens, showing real-time data such as PV voltage, current, battery voltage, and load status.
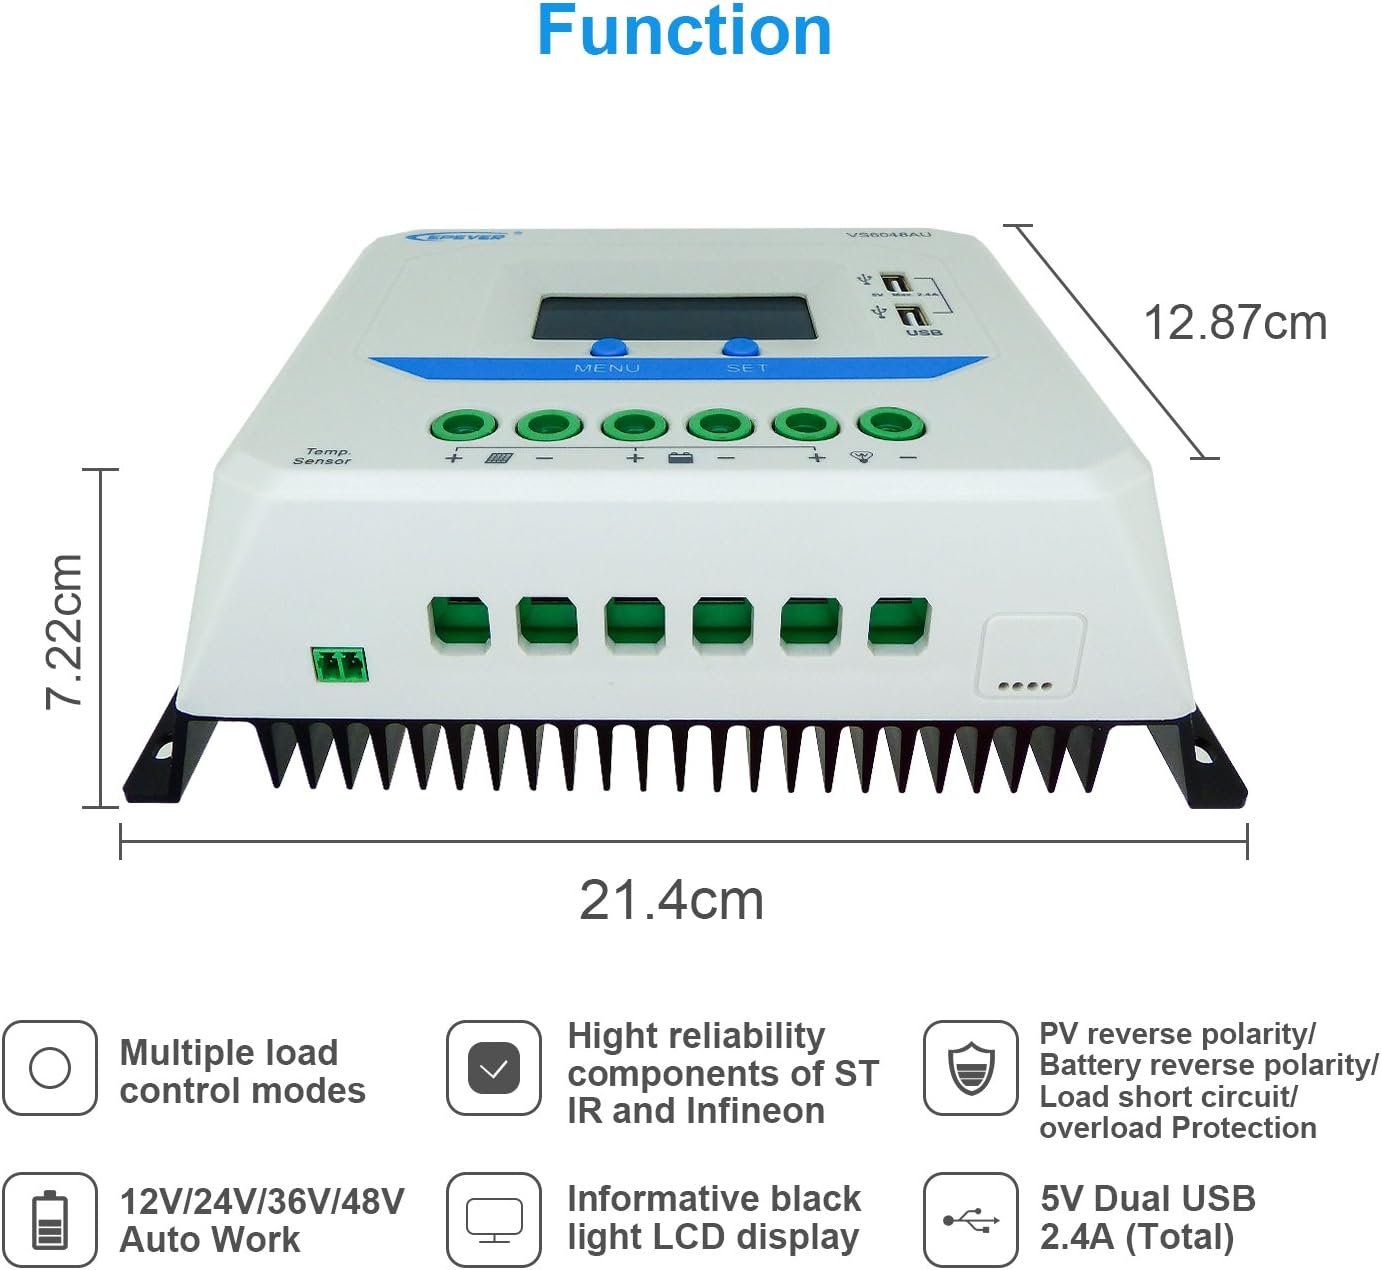
Image 5.1: Illustration of the automatic cycling interfaces on the VS6048AU LCD display.
- Tẹ awọn Akojọ button to manually cycle through the display interfaces.
- Tẹ mọlẹ Akojọ button to enter or exit the parameter setting mode.
- In parameter setting mode, use the SET button to adjust values or confirm selections.
Awọn iṣẹ pataki:
- Accumulative Power Clearing: Under the PV power interface, press and hold the SET button for 5 seconds until the value blinks, then press SET again to clear the accumulative power value.
- Eto Iwọn otutu: Under the battery temperature interface, press and hold the SET bọ́tìnì fún ìṣẹ́jú-àáyá márùn-ún láti yípadà láàárín Celsius (°C) àti Fahrenheit (°F).
Awọn ọna gbigba agbara:
The controller utilizes a 3-stage intelligent PWM charging algorithm:
- Gbigba agbara olopobobo: The battery is charged at maximum current until its voltage Gigun didn voltage.
- Boost/Equalize Charging: The battery is charged at a constant voltage. An Equalize charge is typically performed once a month to balance battery cells.
- Gbigba agbara leefofo: Batiri naa voltage is maintained at the Float voltage, and the charging current is reduced to a trickle to keep the battery fully charged.
The controller supports charging for Sealed, Gel, and Flooded battery types. Ensure the correct battery type is selected in the settings for optimal charging performance.
Ijade USB:
The dual USB ports provide a maximum output of 5VDC/2.4A for charging compatible electronic devices.
6. Itọju
Regular maintenance ensures the longevity and optimal performance of your EPEVER VS6048AU solar charge controller.
- Mimọ: Jẹ́ kí olùdarí náà mọ́ tónítóní, kí ó sì wà láìsí eruku àti ìdọ̀tí. Lo aṣọ gbígbẹ fún fífọ nǹkan mọ́.
- Awọn isopọ: Periodically check all wiring connections for tightness and corrosion. Loose connections can cause overheating and damage.
- Afẹfẹ: Ensure the installation area has adequate ventilation to prevent overheating of the controller.
- Ayewo: Inspect the controller and wiring for any signs of damage, such as frayed cables or cracked casing. Replace damaged components immediately.
- Ilera Batiri: Bojuto batiri voltage and performance regularly. Ensure the battery type setting in the controller matches your battery.
7. Laasigbotitusita
This section addresses common issues you might encounter with your solar charge controller.
| Isoro | Owun to le Fa | Ojutu |
|---|---|---|
| Ko si ifihan lori LCD | Batiri ko sopọ mọ tabi kekere voltage; polarity ìyípadà. | Check battery connections and polarity. Ensure battery voltage wa loke 9V. |
| Batiri ko ngba agbara | PV panels not connected; PV reverse polarity; insufficient sunlight; PV open circuit voltage kere ju. | Check PV connections and polarity. Ensure adequate sunlight. Verify PV open circuit voltage jẹ laarin awọn pato. |
| Fifuye ko ṣiṣẹ | Load disconnected; load short circuit; load overload; battery low voltage ge asopọ. | Check load connections. Remove short circuit. Reduce load. Recharge battery. |
| Adarí overheating | Poor ventilation; excessive ambient temperature; prolonged high current operation. | Ensure proper ventilation. Relocate controller to a cooler environment. Reduce load if possible. |
| Ijade USB ko ṣiṣẹ | Device not compatible; controller fault. | Try another USB device. If issue persists, contact support. |
8. Awọn pato
Detailed technical specifications for the EPEVER VS6048AU Solar Charge Controller.

Image 8.1: Comprehensive technical specifications table for the EPEVER VS-AU series, including the VS6048AU model.
| Paramita | Value (VS6048AU) |
|---|---|
| Awoṣe | VS6048AU |
| Iforukọ System Voltage | 12V/24V/36V/48V Auto Work |
| Input Batiri Voltage Ibiti | 9V ~ 64V |
| Ti won won idiyele / Dasile Lọwọlọwọ | 60A |
| O pọju. PV Ṣii Circuit Voltage | 96V |
| Batiri Iru | Sealed (Default) / Gel / Flooded |
| Igbega gbigba agbara Voltage | Sealed: 14.4V, Gel: 14.2V, Flooded: 14.6V |
| Ṣe deede Gbigba agbara Voltage | Sealed: 14.6V, Gel: No, Flooded: 14.8V |
| Leefofo Ngba agbara Voltage | Ididi / jeli / Ikun omi: 13.8V |
| Kekere Voltage Tun so Voltage | Ididi / jeli / Ikun omi: 12.6V |
| Kekere Voltage Ge asopọ Voltage | Ididi / jeli / Ikun omi: 11.1V |
| Ijẹ-ara-ẹni | ≤10mA (12V), ≤18mA (24V) |
| Biinu iwọn otutu | -3mV/°C/2V (77°F) |
| Ilẹ-ilẹ | Rere ti o wọpọ |
| Ijade USB | 5VDC/2.4A (Lapapọ) |
| Ìwò Dimension | 214x128.7x72.2 mm |
| Awọn ibudo | 3AWG (25mm²) |
| Apapọ iwuwo | 1.02 kg |
| Apade | IP30 |
| Ṣiṣẹ Ayika otutu | -25°C ~ +55°C |
| Ibiti ọriniinitutu | ≤95% (N.C.) |
9. Atilẹyin ọja ati Support
EPEVER products are designed for reliability and performance. For technical assistance or warranty inquiries, please refer to the following:
- Oluranlowo lati tun nkan se: EPEVER provides technical support through its local service centers. For assistance, please contact the authorized dealer or service center in your region.
- Alaye Atilẹyin ọja: Please refer to the warranty card included with your product or visit the official EPEVER webAaye fun alaye atilẹyin ọja ofin ati ipo.
- Free Solar System Design: EPEVER's service centers may offer free solar system design assistance to help you optimize your setup.