
Ọrọ Iṣaaju
The DIGOO DG-TH8380 is a multifunctional wireless weather station designed to monitor indoor and outdoor temperature and humidity. It features a large LCD touchscreen display with a soft eye-care white backlight, a weather forecast function, and supports up to three outdoor sensors. This manual provides detailed instructions for setup, operation, maintenance, and troubleshooting.

Image: The DIGOO DG-TH8380 main display unit and its accompanying wireless outdoor sensor. The main unit shows time, indoor temperature and humidity, outdoor temperature and humidity, and a weather forecast icon. The outdoor sensor displays its current temperature and channel.
Package Awọn akoonu
Daju pe gbogbo awọn nkan ti a ṣe akojọ rẹ si isalẹ wa ninu package rẹ:
- 1 x DIGOO DG-TH8380 Wireless Touch Screen Weather Station Clock (Main Unit)
- 1 x DIGOO DG-TH8380 Alailowaya ita gbangba sensọ
- 1 x DIGOO DG-TH8380 Full English User Manual
- 1 x USB Power Cable (Note: Charger and batteries are not included)
Awọn pato
| Ẹya ara ẹrọ | Apejuwe |
|---|---|
| Main Unit Mefa | 14.1cm x 9.4cm x 2.2cm (5.6" x 3.7" x 0.9") |
| Ifihan | LCD Touch Screen with Soft Eye-Care White Backlight |
| Ibiti Igba otutu Ile | 0°C ~ 50°C (32°F ~ 122°F) |
| Ibiti Igba otutu Ita gbangba | -40°C ~ +60°C (-40°F ~ 140°F) |
| Humidity Range (Indoor & Outdoor) | 20% RH ~ 90% RH |
| Ijinna Gbigbe Alailowaya | Títí dé 100 mítà (ẹsẹ̀ 328) ní ibi tí ó ṣí sílẹ̀ |
| Orisun Agbara (Ẹka Akọkọ) | 3 x AAA batteries or USB cable (batteries not included) |
| Power Source (Remote Sensor) | 2 x AAA batteries (batteries not included) |
| Iṣagbesori Aw | Desktop stand or Wall-mount |
| Pataki Awọn ẹya ara ẹrọ | Touchscreen, Weather Forecast, 12/24 Hour Time, Calendar, Max/Min Temperature/Humidity Record, Low Battery Indicator, Supports up to 3 outdoor sensors |

Aworan: An loriview showing the dimensions of the main unit (141mm x 95mm x 24mm) and various features including wall-mount capability, a table stand, battery power option, and the remote sensor.
Ṣeto
1. Ṣiṣe agbara Ẹka akọkọ
- Open the battery compartment on the back of the main unit.
- Fi awọn batiri 3 x AAA sii, ni idaniloju polarity ti o pe (+/-).
- Alternatively, connect the provided USB cable to the main unit and a USB power adapter (not included) for continuous power. Note: When powered by USB, the backlight will remain on. When battery-powered, the backlight activates for 20 seconds by pressing the top button.
- Pa abala batiri naa.
2. Lilo sensọ ita gbangba
- Ṣii yara batiri ni ẹhin sensọ ita ita.
- Fi awọn batiri 2 x AAA sii, ni idaniloju polarity ti o pe (+/-).
- Pa abala batiri naa.
3. Pairing the Sensor(s)
The main unit will automatically search for the outdoor sensor upon initial power-up. Ensure the sensor is within range. If pairing does not occur automatically or if adding additional sensors:
- Place the outdoor sensor near the main unit during the pairing process.
- On the outdoor sensor, select a channel (1, 2, or 3) using the channel switch inside the battery compartment.
- On the main unit, press the "CH" touch button to cycle through channels until the desired sensor channel is displayed. The main unit supports up to 3 outdoor sensors.
- Allow a few minutes for the sensor to transmit data to the main unit.
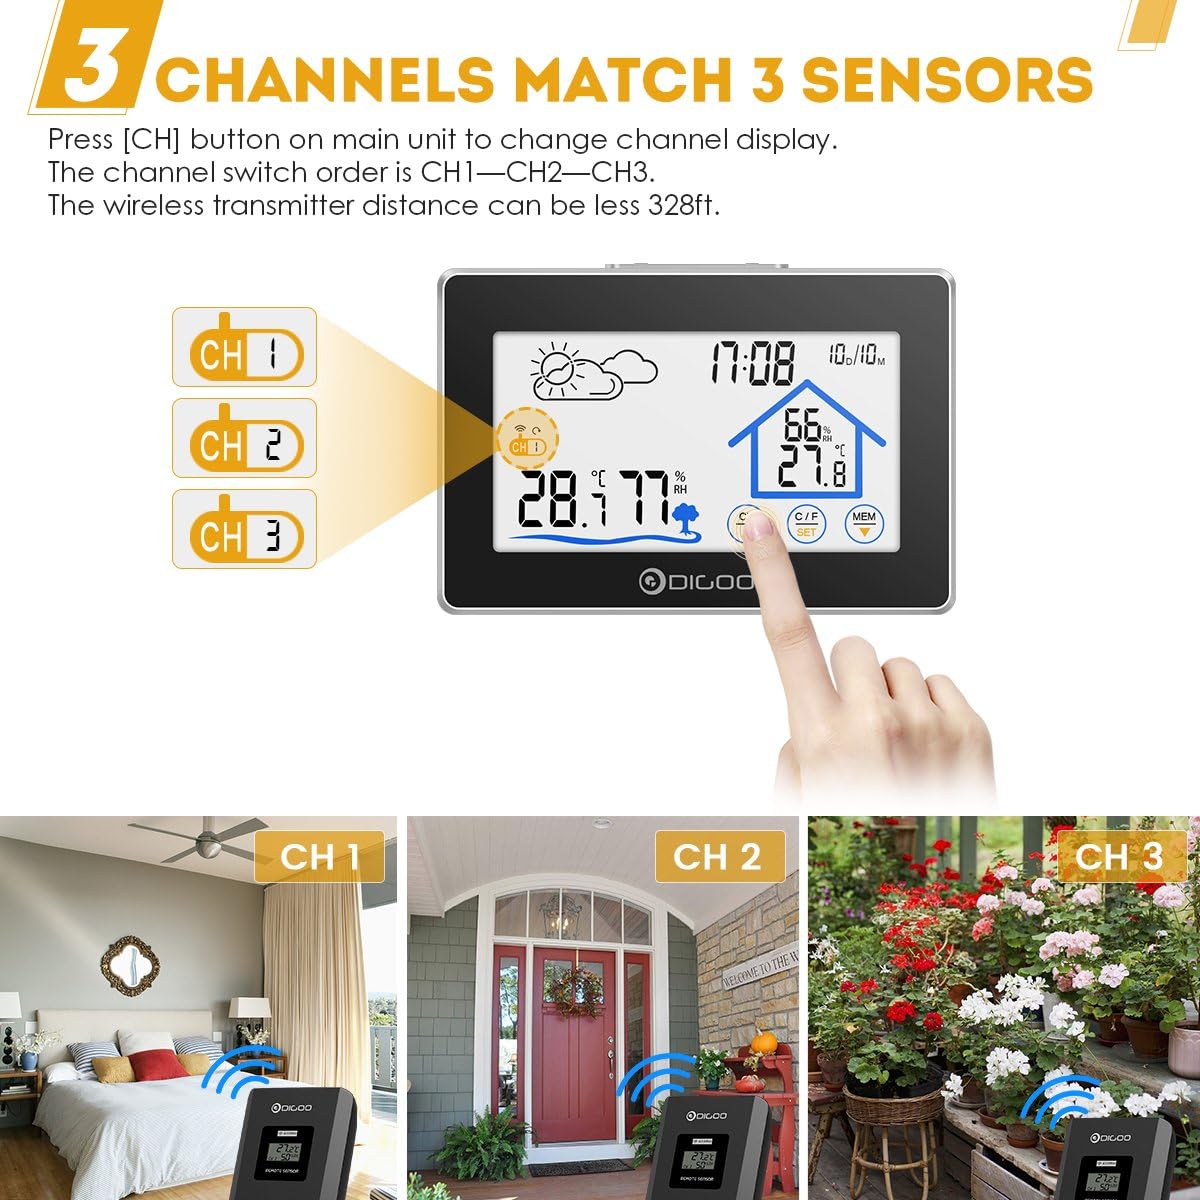
Image: The main unit display showing three channel indicators (CH 1, CH 2, CH 3) and a finger pressing the "CH" button to switch between them. This illustrates the multi-sensor capability.
4. Ifiweranṣẹ
- Ẹka akọkọ: Place the main unit on a flat surface using its integrated stand or mount it on a wall using the hanging hole on the back. Choose a location away from direct sunlight or heat sources for accurate indoor readings.
- Sensọ ita gbangba: Place the outdoor sensor in a shaded, dry location, protected from direct rain and sunlight, to ensure accurate outdoor temperature and humidity readings. Ensure it is within the 100-meter wireless transmission range of the main unit.
Awọn ilana Iṣiṣẹ
Ifihan Loriview

Aworan: A alaye view of the main unit's LCD screen with labels pointing to key display elements: Weather Icon, Channel Display, Outdoor Temperature & Humidity, Backlight Button, Time & Date, Indoor Temperature & Humidity, and Touch Switch Buttons.
- Aami oju-ọjọ: Ṣe afihan asọtẹlẹ oju-ọjọ lọwọlọwọ (Sunny, Kurukuru apakan, kurukuru, ojo).
- Aago ati Ọjọ: Shows current time (12/24 hour format) and calendar.
- Iwọn inu ile & Ọriniinitutu: Displays readings from the main unit's internal sensor.
- Iwọn otutu ita gbangba & Ọriniinitutu: Displays readings from the currently selected outdoor sensor.
- Ifihan ikanni: Indicates which outdoor sensor channel (CH1, CH2, or CH3) is currently being displayed.
Awọn iṣẹ Bọtini Fọwọkan
The DIGOO DG-TH8380 features sensitive touch buttons for easy operation:
- Bọ́tìnì CH (Ikanni): Touch to switch between outdoor sensor channels (CH1, CH2, CH3).
- °C/°F (Unit) Button: Touch to toggle temperature display between Celsius (°C) and Fahrenheit (°F).
- MEM (Memory) Button: Touch to display the maximum and minimum temperature and humidity records for both indoor and outdoor readings. Press again to cycle through current, maximum, and minimum values.
- Ṣeto Bọtini: Used for setting time and date. Press and hold to enter setting mode. Use UP/DOWN buttons to adjust values.
- Awọn bọtini oke/isalẹ: A lo lati ṣatunṣe awọn iye lakoko ipo eto.
- LIGHT Button (Top of Unit): Press to activate the backlight for 20 seconds (when battery-powered). When powered by USB, the backlight remains continuously on.
Eto Aago ati Ọjọ
- Tẹ mọlẹ SET touch button until the time display starts flashing.
- Lo awọn UP ati SILE touch buttons to adjust the hour.
- Tẹ SET again to confirm the hour and move to the minute setting.
- Tun ilana naa ṣe fun awọn iṣẹju, ọdun, oṣu, ati ọjọ.
- Tẹ SET ìgbà ìkẹyìn láti jáde kúrò ní ipò ìṣètò.

Image: The DIGOO DG-TH8380 main unit displaying its soft white backlight in a dimly lit room, illustrating its visibility at night.
Itoju
- Ninu: Wipe the main unit and sensor with a soft, dry cloth. Do not use abrasive cleaners or solvents.
- Rirọpo Batiri: Rọpo awọn batiri ninu ẹrọ akọkọ ati sensọ ita gbangba nigbati ifihan batiri kekere ba han lori ifihan. Rii daju pe o pe polarity.
- Ibi ipamọ: Tí o bá ń tọ́jú ẹ̀rọ náà fún ìgbà pípẹ́, yọ gbogbo bátìrì kúrò kí ó má baà jò.
- Idaabobo Ayika: Do not expose the outdoor sensor to direct water immersion or extreme weather conditions beyond its specified operating range.
Laasigbotitusita
| Isoro | Owun to le Fa | Ojutu |
|---|---|---|
| Ko si ifihan lori akọkọ kuro. | Batteries are dead or incorrectly inserted; USB cable not connected or faulty. | Check battery polarity and replace if necessary. Ensure USB cable is securely connected to a working power source. |
| A kò fi iwọn otutu/ọrinrin ita gbangba han tabi pe ko peye. | Sensor out of range; sensor batteries dead; incorrect channel selected; interference. | Move sensor closer to the main unit. Replace sensor batteries. Press "CH" button to select the correct channel. Avoid placing near large metal objects or strong electromagnetic sources. |
| Backlight not staying on (when battery powered). | Normal operation for battery mode. | The backlight is designed to turn off after 20 seconds to conserve battery. For continuous backlight, use USB power. |
| Weather forecast inaccurate. | Weather forecast is based on internal barometric pressure changes, not external data. | The weather station predicts weather for the next 12-24 hours based on atmospheric pressure trends. It may not always match local weather reports. Allow time for the unit to calibrate. |
Atilẹyin ọja ati Support
DIGOO products are designed for reliability and performance. For any issues encountered during use, please refer to the troubleshooting section first.
If further assistance is required, please contact the seller or manufacturer's customer service. Information regarding warranty coverage and support channels is typically provided at the point of purchase or on the official DIGOO webojula.
Note: The product description mentions "Wolifui US Based Customer Service, 5 Days a Week (Business Days)" for warranty/refund inquiries. Please refer to your purchase documentation for specific contact details.