
1. Ifihan
Thank you for choosing the Antec P101S Silent Performance Mid-Tower PC Case. This manual provides essential information for the proper installation, operation, and maintenance of your new computer case. Please read this manual thoroughly before beginning assembly to ensure optimal performance and longevity of your system.
The Antec P101S is engineered for quiet computing, featuring sound-dampening panels and efficient cooling solutions, making it ideal for users who prioritize a silent and high-performance computing environment.
2. Key Awọn ẹya ara ẹrọ
- Isẹ ipalọlọ: Equipped with sound-dampening top, front, and side panels for quiet computing.
- Extensive Drive Bays: Supports 11 drive bays, including 1 x 5.25" ODD bay, 8 x 3.5" HDD/2.5" SSD removable bays, and 2 x dedicated 2.5" SSD bays.
- Itutu agbaiye to ti ni ilọsiwaju: Includes 4 pre-installed 120/140mm cooling fans (3 front, 1 rear). Supports up to 4 fan mounts with a maximum of 360mm radiator support for enhanced cooling.
- Pẹpẹ I/O ti o rọrun: Features power/reset buttons, a fan speed controller (High/Stop/Low), Audio/Mic ports, 2 x USB 2.0, and 2 x USB 3.0 ports with white LED lighting.
- Ibamu Modaboudu gbooro: Supports E-ATX, ATX, Micro-ATX, and ITX motherboards.
- Ìyàtọ̀ Àwọn Ohun Èlò Tó Lágbára: Accommodates CPU coolers up to 180mm, graphics cards up to 450mm, and PSUs up to 290mm in length.
3. Package Awọn akoonu
Jọwọ rii daju pe gbogbo awọn ohun kan wa ninu apo rẹ:
- Antec P101S Mid-Tower PC Case
- 3 x 120mm Front Fans (Pre-installed)
- 1 x 140mm Rear Fan (Pre-installed)
- Àpótí Ẹ̀rọ (àwọn skru, àwọn okùn okùn, ìwé ìtọ́nisọ́nà fún olùlò)
4. Paati Paview
Familiarize yourself with the various parts of your Antec P101S case.

Figure 1: Front, Back, Left, and Right views of the Antec P101S case, illustrating its external design and panel layout.

olusin 2: inu ilohunsoke view of the Antec P101S, showing the spacious layout, drive bays, and fan mounts.

Figure 3: Close-up of the top I/O panel, highlighting the power, reset, fan speed controller, audio, USB 2.0, and USB 3.0 ports.
5. Eto ati fifi sori
Follow these steps to install your components into the Antec P101S case.
5.1 Ngbaradi Ọran naa
- Yọ Awọn Paneli ẹgbẹ kuro: Unscrew the thumbscrews on the rear of the side panels and slide them backward to remove.
- Wiwọle si inu: The interior is now accessible for component installation.
5.2 Fifi sori modaboudu
- Fi sori ẹrọ Awọn iduro: Ensure the correct motherboard standoffs are installed for your motherboard form factor (ATX, Micro-ATX, ITX, E-ATX).
- Ibùdó Modabọdu: Carefully align your motherboard with the standoffs and I/O shield opening.
- Modaboudu to ni aabo: Fasten the motherboard with the provided screws.
5.3 wakọ fifi sori
The P101S offers versatile drive mounting options.
5.3.1 3.5" HDD / 2.5" SSD Removable Bays

Figure 4: Illustration of the various drive bay locations within the Antec P101S case.
- Remove Drive Tray: Pull out an empty 3.5" drive tray from the drive cage.
- Fi Drive sori ẹrọ: For a 3.5" HDD, flex the tray and insert the drive. For a 2.5" SSD, secure it to the bottom of the tray with screws.
- Reinsert Tray: Slide the loaded tray back into the drive cage until it clicks into place.
5.3.2 Dedicated 2.5" SSD Bays
Two dedicated 2.5" SSD mounts are located behind the motherboard tray.
- SSD ti o ni aabo: Attach your 2.5" SSD to the dedicated mounting bracket using screws.
- Àká Òkè: Secure the bracket with the SSD to the chassis behind the motherboard tray.
5.3.3 5.25" ODD Bay
- Remove Front Bezel: Gently remove the 5.25" bay cover from the front bezel.
- Insert ODD: Slide your optical disc drive into the bay from the front until it aligns with the screw holes.
- Secure ODD: Fasten the ODD with screws.
5.4 Fifi Kaadi Aworan ati Kaadi Imugboroosi sori ẹrọ
- Yọ awọn ideri Iho PCIe kuro: Unscrew and remove the necessary PCIe slot covers from the rear of the case.
- Fi Kaadi sii: Carefully insert your graphics card or other expansion card into the appropriate PCIe slot on the motherboard.
- Kaadi to ni aabo: Fasten the card with screws.
5.5 Power Ipese Unit (PSU) fifi sori
- Ipo PSU: Slide the PSU into its designated compartment at the bottom rear of the case.
- PSU ti o ni aabo: Fasten the PSU to the rear of the chassis with screws.
5.6 USB Management
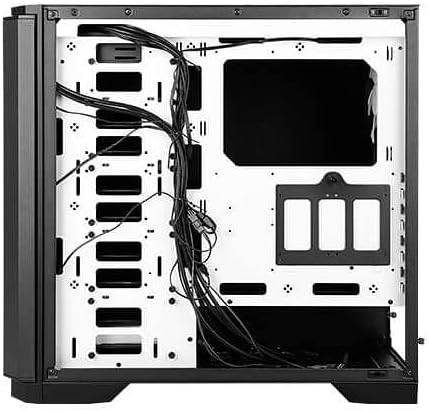
olusin 5: Ẹyìn view of the motherboard tray, showing cable routing channels and tie-down points for organized cable management.
Utilize the cable routing holes and tie-down points behind the motherboard tray to organize cables for improved airflow and aesthetics.
6. Ṣiṣẹ́ Àpò PC rẹ
6.1 Agbara Tan / Pa
Press the large power button on the top I/O panel to turn your system on or off.
6.2 Fan iyara Iṣakoso
Use the fan speed controller switch on the top I/O panel to adjust the speed of the pre-installed fans:
- Ga: Maximum fan speed for optimal cooling.
- Kekere: Reduced fan speed for quieter operation.
- Duro: Fans are turned off.
7. Itọju
7.1 Ninu eruku Ajọ
Regularly clean the dust filters located at the front, top, and bottom of the case to maintain optimal airflow and prevent dust buildup. The front filter is easily removable for cleaning.
7.2 Gbogbogbo Cleaning
Use a soft, dry cloth to clean the exterior of the case. For stubborn marks, a slightly damp A le lo aṣọ, lẹ́yìn náà a le gbẹ ẹ. Yẹra fún àwọn ohun ìfọṣọ tàbí àwọn ohun èlò ìfọṣọ.
8. Laasigbotitusita
- Eto Ko Titan: Double-check all power connections, including the 24-pin ATX, 8-pin CPU, and GPU power cables. Ensure the PSU switch is in the 'On' position.
- Awọn onijakidijagan Ko Yiyi: Verify that the fan speed controller on the I/O panel is not set to 'Stop'. Check fan connections to the motherboard or fan hub.
- Igbóná púpọ̀: Ensure all fans are spinning correctly and dust filters are clean. Verify proper component installation and thermal paste application.
- Awọn ibudo USB Ko Ṣiṣẹ: Check the internal USB header connections from the I/O panel to the motherboard.
9. Awọn pato
| Ẹya ara ẹrọ | Ẹ̀kúnrẹ́rẹ́ |
|---|---|
| Orukọ awoṣe | P101S Silent |
| Iru Irú | Aarin-Tower |
| Modaboudu Ibamu | E-ATX, ATX, Micro-ATX, ITX |
| Awọn iwọn (LxWxH) | 20.74 x 9.13 x 19.92 inches |
| Iwọn Nkan | 26.1 iwon |
| Ohun elo | Alloy Irin |
| Wakọ Bays | 1 x 5.25" ODD, 8 x 3.5" HDD/2.5" SSD, 2 x 2.5" SSD |
| Awọn onijakidijagan ti a ti fi sii tẹlẹ | 3 x 120mm Front, 1 x 140mm Rear |
| Radiator Support | Front: Up to 360mm, Rear: Up to 140mm |
| Max Sipiyu kula Iga | 180mm |
| Max GPU Ipari | 450mm |
| Iye ti o ga julọ ti PSU | 290mm |
| Iwaju Awọn Ibudo I / O | 2 x USB 2.0, 2 x USB 3.0, Audio/Mic, Power, Reset, Fan Speed Controller |
10. Atilẹyin ọja ati Support
Fun alaye atilẹyin ọja ati atilẹyin imọ-ẹrọ, jọwọ tọka si Antec osise website or contact your local Antec distributor. Keep your proof of purchase for warranty claims.
Antec Osise Webojula: www.antec.com