1. Ifihan
O ṣeun fun riraasing the DACOM GF7 TWS V4.2 Bluetooth Earbuds. This manual provides detailed instructions on how to set up, operate, and maintain your earbuds to ensure optimal performance and longevity. Please read this manual thoroughly before using the product and retain it for future reference.
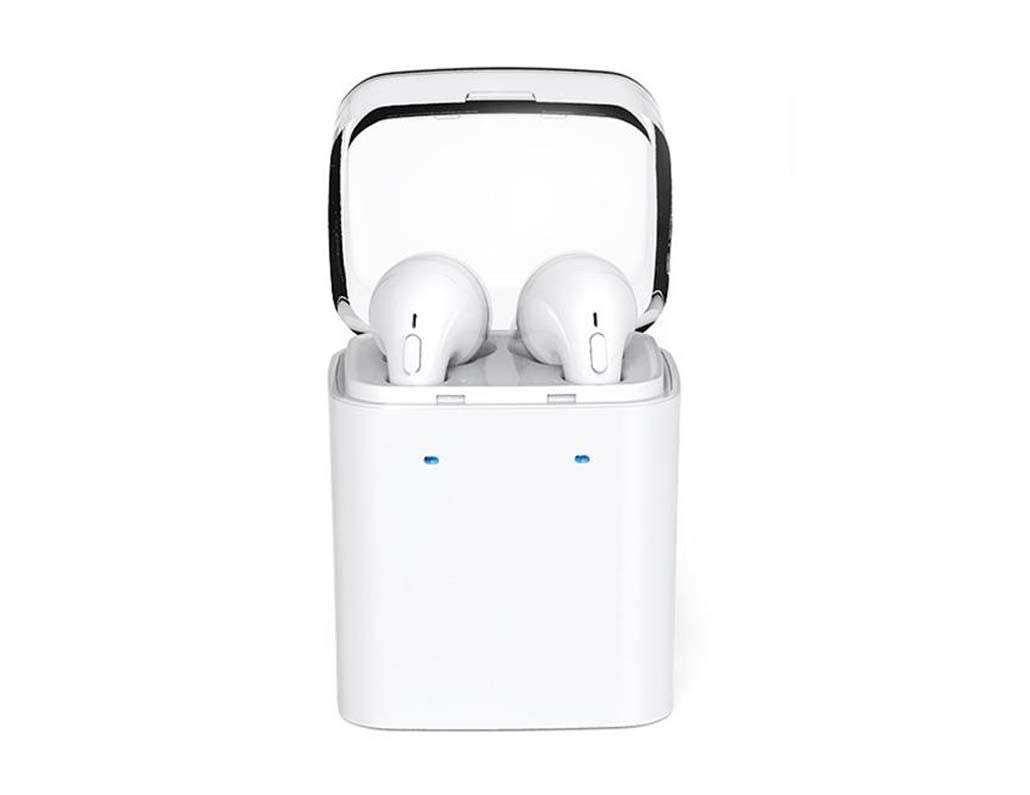
Image 1.1: DACOM GF7 TWS V4.2 Bluetooth Earbuds in their charging case.
2. Package Awọn akoonu
Jọwọ ṣayẹwo awọn akoonu package lori unboxing. Ti awọn ohun kan ba nsọnu tabi bajẹ, kan si alagbata rẹ.
- DACOM GF7 TWS V4.2 Bluetooth Earbuds (Left and Right)
- Ọran Gbigba agbara to šee gbe
- Okun Ngba agbara USB
- Awọn iṣu Eti (oriṣiriṣi titobi)
- Afowoyi Olumulo (iwe-ipamọ yii)
3. Ọja Ipariview
Familiarize yourself with the components of your DACOM GF7 TWS V4.2 Earbuds and charging case.

Image 3.1: Detailed diagram showing the Multifunction Button (MFB), Indicator Light, Microphone (Mic), Air Gate, DC5V Charge Jack Cover, Headphone Charging Indicator Light, USB Charging Input Port, and the Charging Indicator Light of the bottom on the DACOM GF7 TWS V4.2 Earbuds and Charging Case.
- Bọtini iṣẹ lọpọlọpọ (MFB): Used for power, playback, call management, and voice assistant activation.
- Imọlẹ Atọka: Displays pairing status, charging status, and power status.
- Mi: Built-in microphone for calls and voice commands.
- Ẹnu-ọna afẹfẹ: Acoustic vent for sound performance.
- DC5V Charge Jack Cover: Protects the charging port on the earbuds.
- Headphone Charging Indicator Light: Shows charging status of individual earbuds within the case.
- USB Charging Input Port: For charging the portable charging case.
- Charging Indicator Light of the bottom: Shows charging status of the case.
4. Eto
4.1. Gbigba agbara fun awọn agbekọri ati apoti gbigba agbara
- Gbigba agbara si ọran naa: Connect the USB charging cable to the USB Charging Input Port on the charging case and the other end to a 5V USB power adapter (not included). The Charging Indicator Light at the bottom of the case will illuminate to indicate charging. Once fully charged, the indicator light may change color or turn off.
- Ngba agbara si Earbuds: Place the earbuds into their respective slots in the charging case. Ensure the earbuds are properly seated. The Headphone Charging Indicator Light on the case will show the charging status of the earbuds. The earbuds' indicator lights will also show charging status (e.g., red while charging, off when fully charged).
- For first-time use, fully charge both the earbuds and the charging case.
4.2. Sisopọ Bluetooth
- Agbara Tan: Take both earbuds out of the charging case. They will automatically power on and attempt to pair with each other. You will hear an audible prompt indicating they are connected to each other.
- Ipo sisopọ: Once the earbuds are paired with each other, one earbud's indicator light will flash red and blue alternately, indicating it is in pairing mode and ready to connect to your device.
- Sopọ si Ẹrọ: On your smartphone or Bluetooth-enabled device, go to the Bluetooth settings and search for available devices. Select "DACOM GF7 TWS" (or similar name) from the list.
- Isopọ Aṣeyọri: Once connected, the earbud's indicator light will stop flashing, and you will hear a confirmation sound.
- Isopọpọ aladaaṣe: After initial pairing, the earbuds will automatically connect to the last paired device when taken out of the charging case, provided Bluetooth is enabled on your device.
5. Awọn ilana Iṣiṣẹ
The DACOM GF7 TWS V4.2 Earbuds feature a Multifunction Button (MFB) for various controls.
5.1. Agbara Tan / Paa
- Agbara Tan: Take the earbuds out of the charging case. They will power on automatically. Alternatively, press and hold the MFB on both earbuds for approximately 3 seconds until you hear a power-on prompt.
- Agbara Pa: Place the earbuds back into the charging case. They will power off automatically. Alternatively, press and hold the MFB on both earbuds for approximately 5 seconds until you hear a power-off prompt.
5.2. Sisisẹsẹhin Orin
- Ṣiṣẹ/Daduro: Single press the MFB on either earbud.
- Orin t’okan: Double press the MFB on the right earbud.
- Tẹlẹ Orin: Double press the MFB on the left earbud.
5.3. Iṣakoso ipe
- Idahun/Ipe Ipari: Single press the MFB on either earbud.
- Kọ Ipe: Press and hold the MFB on either earbud for approximately 2 seconds.
5.4. Oluranlọwọ ohun
- Mu Oluranlọwọ Ohun ṣiṣẹ: Triple press the MFB on either earbud to activate your device's voice assistant (e.g., Siri, Google Assistant).
5.5. Ariwo Ifagile
- The DACOM GF7 TWS V4.2 features active noise cancellation. Specific activation methods may vary. Refer to the product's quick start guide or manufacturer's website for precise instructions if not detailed here. Typically, a long press or specific tap sequence on an MFB or dedicated button activates/deactivates ANC.
6. Itọju
Itọju to dara ṣe idaniloju gigun ati iṣẹ ti awọn agbekọri rẹ.
- Ninu: Mọ awọn afikọti nigbagbogbo ati apoti gbigba agbara pẹlu asọ ti o gbẹ, asọ ti ko ni lint. Maṣe lo awọn kẹmika lile tabi awọn ohun elo abrasive.
- Italolobo Eti: Yọọ kuro ati nu awọn imọran eti lorekore pẹlu ipolowoamp aṣọ àti ọṣẹ díẹ̀, lẹ́yìn náà, fi omi wẹ̀ kí o sì gbẹ dáadáa kí o tó tún so mọ́ ọn.
- Ibi ipamọ: Nigbati ko ba si ni lilo, tọju awọn afikọti sinu apoti gbigba agbara wọn lati daabobo wọn lati eruku ati ibajẹ.
- Yago fun Ọrinrin: Keep the earbuds and charging case away from water, excessive humidity, and extreme temperatures.
7. Laasigbotitusita
If you encounter issues with your earbuds, refer to the following common problems and solutions.
| Isoro | Ojutu |
|---|---|
| Earbuds not pairing with each other. |
|
| Earbuds not connecting to device. |
|
| Ko si ohun lati agbekọri. |
|
| Charging case or earbuds not charging. |
|
8. Awọn pato
| Orukọ Brand | DACOM |
| Orukọ awoṣe | GF7 TWS |
| Nọmba awoṣe | 7TWS |
| Àwọ̀ | Funfun |
| Agbekọri Fọọmù ifosiwewe | Ninu Eti |
| Ariwo Iṣakoso | Ti nṣiṣe lọwọ Noise Ifagile |
| Asopọmọra Technology | Ailokun (Bluetooth) |
| Imọ-ẹrọ Ibaraẹnisọrọ Alailowaya | Bluetooth V4.2 (inferred from title) |
| Awọn irinše to wa | Awọn iṣu Eti |
| Pataki Awọn ẹya ara ẹrọ | Noise Cancellation, Microphone Included |
| Ọna Iṣakoso | Fọwọkan |
| Awọn ẹrọ ibaramu | Gbogbo awọn ẹrọ |
| Ohun elo | PU Metal Eraser (likely referring to ear tip material or casing finish) |
9. Alaye Aabo
Please read and follow these safety guidelines to prevent injury or damage to your device.
- Má ṣe tú ọjà náà ká, má ṣe tún un ṣe, tàbí ṣe àtúnṣe rẹ̀. Èyí lè fa iná, ìkọlù iná mànàmáná, tàbí ìbàjẹ́ pátápátá sí ọjà náà.
- Keep the product away from extreme temperatures (hot or cold), direct sunlight, and sources of heat.
- Yago fun fifi ọja han si omi tabi awọn olomi miiran.
- Ma ṣe lo ọja ni iwọn giga fun awọn akoko ti o gbooro sii lati ṣe idiwọ ibajẹ igbọran.
- Lo awọn kebulu gbigba agbara ti a pese tabi niyanju nikan ati awọn oluyipada.
- Jeki kuro ni arọwọto awọn ọmọde ati awọn ohun ọsin. Awọn ẹya kekere le fa eewu gbigbọn.
- Be aware of your surroundings when using the earbuds, especially in traffic or other potentially dangerous situations.
10. Atilẹyin ọja ati Support
DACOM products are designed and manufactured to the highest quality standards. For detailed warranty information, please refer to the warranty card included with your purchase or visit the official DACOM webojula.
For technical support, troubleshooting assistance, or to inquire about replacement parts, please contact DACOM customer service through their official webaaye tabi alaye olubasọrọ ti a pese ninu apoti ọja rẹ.
- Atilẹyin Ayelujara: Visit the official DACOM webAaye fun awọn FAQ, awọn nkan atilẹyin, ati awọn fọọmu olubasọrọ.
- Imeeli Atilẹyin: Refer to your product packaging for customer service email addresses.