
1. Ifihan
The PROEL MQ6 is a compact 6-channel mixer designed for various sound reinforcement applications. It offers a high input density, essential features, and superior audio quality in a durable, ultra-rugged case. This manual provides detailed instructions for the proper setup, operation, and maintenance of your MQ6 mixer.
2. Alaye Aabo
- Ibi ti ina elekitiriki ti nwa: Lo oluyipada agbara pàtó kan. Rii daju pe voltage ibaamu ti agbegbe rẹ ipese agbara.
- Ọrinrin: Do not expose the unit to rain or moisture. Avoid placing liquids near the mixer.
- Afẹfẹ: Rii daju pe fentilesonu to peye. Ma ṣe dina awọn ṣiṣi atẹgun.
- Ooru: Jeki ẹyọ kuro lati awọn orisun ooru gẹgẹbi awọn imooru, awọn iforukọsilẹ ooru, awọn adiro, tabi awọn ohun elo miiran ti o nmu ooru jade.
- Ṣiṣẹ: Maṣe gbiyanju lati ṣiṣẹ ọja yi funrararẹ. Tọkasi gbogbo iṣẹ si oṣiṣẹ oṣiṣẹ ti o peye.
- Awọn kebulu: Protect power cords from being walked on or pinched, particularly at plugs, convenience receptacles, and the point where they exit from the apparatus.
- Ninu: Mọ pẹlu asọ gbigbẹ nikan.
3. Ọja Ipariview
The PROEL MQ6 is a 6-channel compact mixer featuring 2 mono MIC/LINE inputs, 2 stereo LINE inputs, 3-band EQ on mono channels, 2-band EQ on stereo channels, and electronically balanced main outputs.

olusin 3.1: Top view of the PROEL MQ6 Compact 6-Channel Mixer, showing all controls and inputs.

olusin 3.2: Angled view of the PROEL MQ6 mixer, highlighting the compact design and control layout.
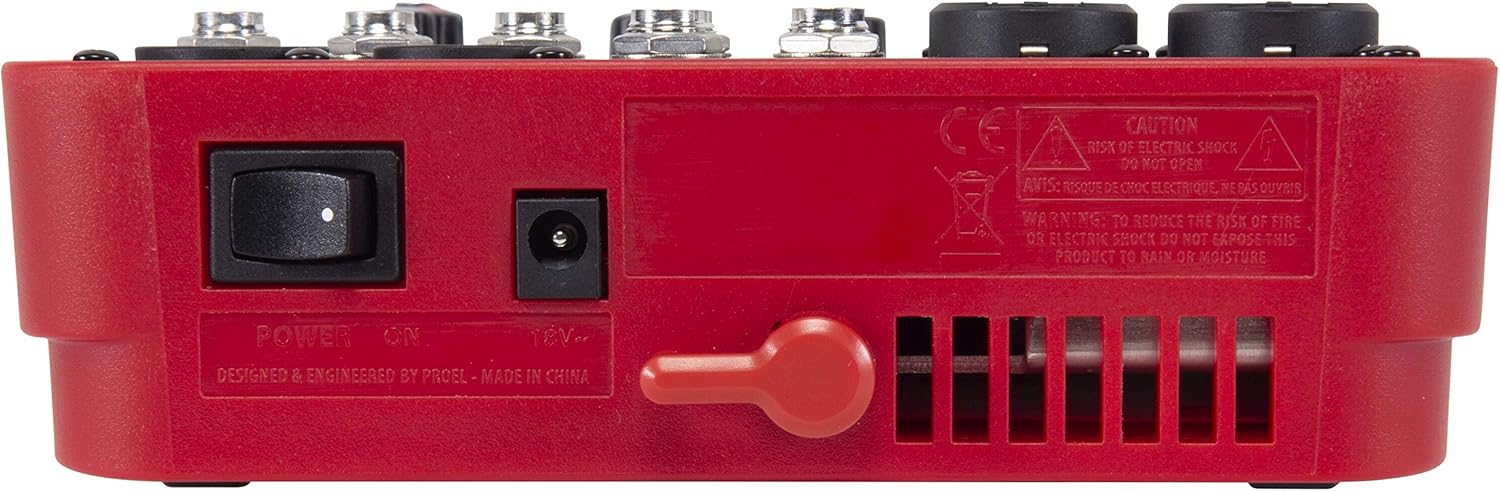
olusin 3.3: Ẹyìn view of the PROEL MQ6 mixer, showing the power switch and DC input.
Awọn ẹya ara ẹrọ ọja:
- 2 Mono MIC/LINE inputs with XLR/TRS combo jacks.
- 2 Stereo LINE inputs (3/4, 5/6) with TRS jacks.
- 3-Band EQ on mono channels for precise tone shaping.
- 2-Band EQ on stereo channels.
- Low-noise, high-headroom microphone preamps.
- Electronically balanced XLR MAIN MIX outputs.
- Phantom Power (+48V) for condenser microphones.
- Headphone output with dedicated level control.
PROEL MQ Series Overview Fidio
Yi fidio pese ohun loriview of the PROEL MQ Series compact mixers. Please note that some features shown, such as digital effects, compressors, and USB connectivity, are available on other models within the MQ series (e.g., MQ6FX, MQ12USB, MQ16USB) and not on the MQ6 model specifically.
4. Eto
4.1 Unpacking ati ayewo
Carefully unpack the mixer and check for any signs of damage. Ensure all components listed in the packaging are present. If any items are missing or damaged, contact your dealer immediately.
4.2 Asopọ agbara
- Rii daju pe iyipada agbara alapọpo wa ni ipo PA.
- Connect the provided power adapter to the DC input jack on the rear of the mixer.
- Pulọọgi ohun ti nmu badọgba agbara sinu iṣan agbara AC to dara.
4.3 Inpu Awọn isopọ
The MQ6 features two types of input channels:
- Mono MIC/LINE Inputs (Channels 1-2): Use XLR cables for microphones or 1/4" TRS cables for line-level instruments (e.g., keyboards, guitars with preamps).
- Stereo LINE Inputs (Channels 3/4, 5/6): Use 1/4" TRS cables for stereo line-level sources. If connecting a mono source, use the L/MONO input.
4.4 o wu Awọn isopọ
- MAIN MIX Outputs: So awọn agbohunsoke akọkọ tabi agbara rẹ pọ amplifier to the XLR MAIN MIX L and R outputs. These outputs are electronically balanced.
- Àgbéjáde FÓÒNÙ: Connect your headphones to the 1/4" PHONES jack for monitoring.
5. Awọn ilana Iṣiṣẹ
5.1 Titan / Pa a
- Before powering on, ensure all channel GAIN and MIX level knobs are set to their minimum position.
- Turn on the mixer using the power switch on the rear panel.
- When powering off, first turn down all output levels, then switch off the mixer.
5.2 Awọn iṣakoso ikanni (Awọn ikanni Mono 1-2)
- MIC/LINE Input: Combo jack for XLR microphones or 1/4" TRS line-level sources.
- LO CUT (75 Hz): Engages a high-pass filter at 75 Hz to remove unwanted low-frequency rumble.
- Anfani: Adjusts the input sensitivity for the connected microphone or line source. Set this to achieve a strong signal without clipping (indicated by the PEAK LED).
- HI (12 kHz): Adjusts the high-frequency (treble) content of the channel.
- KẸ́RẸ́ (80 Hz): Adjusts the low-frequency (bass) content of the channel.
- PEAK LED: Illuminates when the input signal is too high, indicating potential clipping. Reduce the GAIN if this LED lights up frequently.
- Ipele Ipele: Controls the channel's contribution to the main mix.
5.3 Channel Controls (Stereo Channels 3/4, 5/6)
- L/MONO, R LINE Inputs: 1/4" TRS jacks for stereo line-level sources. Use L/MONO for mono sources.
- HI (12 kHz): Adjusts the high-frequency (treble) content of the channel.
- KẸ́RẸ́ (80 Hz): Adjusts the low-frequency (bass) content of the channel.
- Ipele Ipele: Controls the channel's contribution to the main mix.
5.4 Main Mix Section
- PHANTOM POWER ON/OFF: Activates +48V phantom power for condenser microphones connected to the XLR inputs. Ensure condenser microphones are connected before activating phantom power.
- Ipele Mita: Displays the output level of the main mix. Aim for levels around 0 dB to avoid clipping.
- MIX Level Knob: Ṣe iṣakoso iwọn didun iṣelọpọ gbogbogbo ti apopọ akọkọ.
- PHONES Level Knob: Ṣe atunṣe iwọn didun fun iṣẹjade agbekọri.
6. Itọju
- Ninu: Use a soft, dry cloth to clean the mixer's surface. Do not use abrasive cleaners, solvents, or waxes.
- Ibi ipamọ: When not in use for extended periods, store the mixer in a dry, dust-free environment.
- Itọju USB: Regularly inspect all cables for damage. Replace frayed or damaged cables to prevent electrical hazards and ensure optimal performance.
- Afẹfẹ: Ensure the ventilation slots are clear of dust and debris to prevent overheating.
7. Laasigbotitusita
| Isoro | Owun to le Fa | Ojutu |
|---|---|---|
| Ko si ohun jade |
|
|
| Ohun ti o daru |
|
|
| Ko si ifihan gbohungbohun |
|
|
| Hum tabi ariwo |
|
|
8. Awọn pato
| Ẹya ara ẹrọ | Ẹ̀kúnrẹ́rẹ́ |
|---|---|
| Brand | PROEL |
| Awoṣe | MQ6 |
| Nọmba ti awọn ikanni | 6 |
| Awọn igbewọle Audio | 2 x MIC/LINE (XLR/TRS Combo), 2 x Stereo LINE (TRS) |
| Asopọmọra Technology | XLR, TRS |
| EQ (Mono Channels) | 3-Band (HI, LOW, LO CUT) |
| EQ (Stereo Channels) | 2-Band (HI, LOW) |
| Phantom Agbara | + 48V |
| Awọn abajade akọkọ | XLR (Electronically Balanced) |
| Agbekọri Ijade | 1/4" TRS |
9. Atilẹyin ọja
PROEL offers its customers a minimum of 24 (twenty-four) months warranty from the date of purchase for sound systems products. Please retain your proof of purchase for warranty claims. For detailed warranty terms and conditions, please refer to the official PROEL webaaye tabi kan si atilẹyin alabara wọn.
10. Atilẹyin
For technical assistance, product inquiries, or service requests, please visit the official PROEL website or contact your authorized PROEL dealer. You may also find additional resources and FAQs on their support pages.