1. Ifihan
This manual provides detailed instructions for the installation, operation, and maintenance of your ASRock B365 PRO4 ATX Motherboard. Please read this manual thoroughly before proceeding with installation to ensure correct setup and to prevent damage to the components.
The ASRock B365 PRO4 motherboard supports 9th and 8th Generation Intel Core Processors, offering a robust platform for personal computing. It features a Digi Power Design with an 8 Power Phase Design, ensuring stable power delivery to the CPU.
2. Alaye Aabo
- Nigbagbogbo ge asopọ ipese agbara ṣaaju fifi sori ẹrọ tabi yiyọ awọn paati eyikeyi kuro.
- Wọ okun ọwọ-atako-aimi lati ṣe idiwọ isọjade elekitirotatiki (ESD) ibajẹ si awọn paati ifura.
- Mu modaboudu nipasẹ awọn egbegbe rẹ lati yago fun fifọwọkan awọn paati ifura.
- Rii daju pe fentilesonu to dara laarin ọran PC rẹ lati ṣe idiwọ igbona.
- Pa modaboudu kuro lati ọrinrin ati awọn iwọn otutu to gaju.
3. Eto ati fifi sori
3.1 Package Awọn akoonu
Jẹrisi pe gbogbo awọn ohun kan wa ninu package:
- ASRock B365 PRO4 Motherboard
- Awọn ọna fifi sori Itọsọna
- CD atilẹyin
- I / O Shield
- 2 x SATA Data Cables
- 3 x Skru fun M.2 Sockets
- 1 x Standoff fun M.2 Socket

Image: ASRock B365 PRO4 Motherboard and its included accessories, including the quick installation guide, support CD, I/O shield, SATA cables, and M.2 screws/standoff.
3.2 Ifilelẹ modaboudu
Mọ ara rẹ pẹlu awọn eroja pataki ati awọn asopọ lori modaboudu.

Aworan: Oke-isalẹ view of the ASRock B365 PRO4 Motherboard, highlighting the CPU socket, RAM slots, PCIe slots, and M.2 slots.

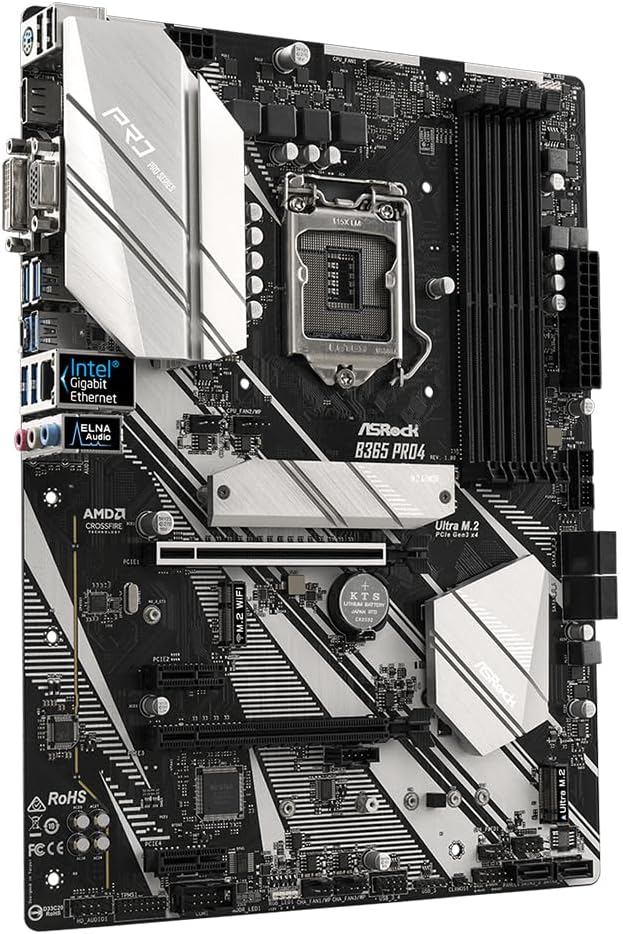
Aworan: Angled view of the ASRock B365 PRO4 Motherboard, showing the heatsinks and various connectors.
3.3 CPU Installation (LGA1151)
- Ṣii lefa iho Sipiyu ki o gbe awo fifuye naa.
- Farabalẹ ṣe deede Sipiyu pẹlu iho, aridaju onigun mẹta goolu lori Sipiyu baamu onigun mẹta lori iho naa.
- Fi rọra gbe Sipiyu sinu iho lai fi agbara mu.
- Pa awo fifuye naa ki o ni aabo pẹlu lefa.
3.4 Memory (Àgbo) fifi sori
The motherboard features 4 DDR4 DIMM slots, supporting dual-channel memory up to 64GB.
- Ṣii awọn agekuru ni awọn mejeji opin ti DIMM Iho.
- Parapọ ogbontarigi lori Ramu module pẹlu awọn bọtini ni DIMM Iho.
- Insert the RAM module firmly until the clips snap into place.
3.5 Fifi sori ẹrọ Ibi ipamọ
The motherboard supports 6 SATA3 ports and 2 Ultra M.2 ports.
- Awọn awakọ SATA: Connect SATA data cables to the SATA ports on the motherboard and to your storage devices (HDDs/SSDs). Connect power cables from your power supply to the devices.
- M.2 SSDs: Locate the M.2 slots. Insert the M.2 SSD into the slot at an angle, then gently push it down and secure it with the provided screw and standoff.
3.6 Fifi sori kaadi Imugboroosi (PCIe)
The motherboard has 2 PCI-Express 3.0 x16 slots and 2 PCI-Express 3.0 x1 slots.
- Select an appropriate PCIe slot for your expansion card (e.g., graphics card).
- Yọ akọmọ irin ti o baamu kuro ninu apoti PC rẹ.
- Align the card with the slot and press firmly until it is seated correctly.
- Fi skru so kaadi naa mọ apoti PC naa.
3.7 Connecting Peripherals to the I/O Panel
Awọn ru I/O nronu pese orisirisi ebute oko fun a pọ ita awọn ẹrọ.
Aworan: Isunmọ view of the ASRock B365 PRO4 Motherboard's rear I/O panel, showing ports for PS/2, USB 2.0, USB 3.1 Gen 1, VGA, DVI-D, HDMI, LAN, and audio jacks.
- Awọn ibudo USB: Connect USB devices (keyboard, mouse, external drives) to the available USB 2.0 (5 ports) and USB 3.1 Gen 1 (8 ports, including 1 Type-C rear) ports.
- Awọn abajade fidio: Connect your monitor to the VGA, DVI-D, or HDMI port.
- Ibudo LAN: So okun Ethernet kan pọ fun iraye si nẹtiwọọki.
- Awọn Jacks Audio: Connect speakers, headphones, or microphones to the audio jacks.
- PS/2 Ibudo: Connect a PS/2 keyboard or mouse.
4. Awọn ilana Iṣiṣẹ
4.1 First Boot ati BIOS Oṣo
- After assembling all components, connect the power supply and monitor.
- Agbara lori eto rẹ. Tẹ Del or F2 lakoko ibẹrẹ lati tẹ BIOS/UEFI setup IwUlO.
- Configure boot order, system time, and other necessary settings. Save changes and exit.
- Install your operating system from a bootable USB drive or optical media.
4.2 Driver fifi sori
After installing the operating system, install the necessary drivers from the provided Support CD or download the latest versions from the ASRock webAaye ayelujara. Awọn awakọ pataki pẹlu:
- Chipset Awakọ
- Àwọn Awakọ̀ Ohùn (Realtek ALC892)
- LAN Drivers (Intel I219V Gigabit Ethernet)
- Awakọ Awọn aworan (fun awọn eya ti a ṣepọ tabi GPU ọtọtọ)
5. Itọju
- Yiyọ eruku kuro: Máa fọ eruku láti inú mótábódì àti àwọn afẹ́fẹ́ inú àpótí déédéé nípa lílo afẹ́fẹ́ tí a fi ìfúnpọ̀ mú. Rí i dájú pé ẹ̀rọ náà ti pa àti pé ó ti yọ ìsopọ̀ kúrò kí o tó sọ ọ́ di mímọ́.
- Awọn imudojuiwọn BIOS: Ṣayẹwo ASRock website periodically for BIOS updates. Updates can improve system stability and compatibility. Follow the instructions carefully when updating the BIOS.
- Iṣakoso USB: Rii daju pe awọn kebulu ti wa ni ipa ọna daradara lati mu iṣan-afẹfẹ dara si ati ṣe idiwọ kikọlu.
6. Laasigbotitusita
- Ko si Agbara:
- Check all power connections, including the 24-pin ATX and 8-pin 12V CPU power connectors.
- Rii daju pe iyipada ipese agbara wa ni ipo ON.
- Ko si Ifihan:
- Verify that the monitor is connected to the correct video output (either integrated graphics or discrete GPU).
- Tun awọn eya kaadi ati Ramu modulu.
- Aisedeede/iparun eto:
- Check RAM modules for proper seating.
- Rí i dájú pé a fi ẹ̀rọ itutu CPU sori ẹrọ daradara ati pe o n fara kan ara rẹ daradara.
- Ṣe imudojuiwọn awọn awakọ ati BIOS si awọn ẹya tuntun.
- A ko ri M.2 SSD:
- Rí i dájú pé M.2 SSD wà ní ipò tó tọ́ àti ní ààbò.
- Check BIOS settings to ensure M.2 slots are enabled and configured correctly (SATA vs. PCIe mode).
7. Awọn pato
| Ẹya ara ẹrọ | Ẹ̀kúnrẹ́rẹ́ |
|---|---|
| Sipiyu Socket | LGA 1151 |
| Awọn isise ibaramu | 9th/8th Generation Intel Core Processors (up to 95W) |
| Chipset | Intel B365 |
| Iranti | 4 x DDR4 DIMM slots, Dual Channel, Non-ECC, Buffered, Max 64GB (2666/2400/2133 MHz) |
| Imugboroosi Iho | 2 x PCIe 3.0 x16, 2 x PCIe 3.0 x1 |
| Multi-Graphics Support | AMD Quad CrossFireX and CrossFire Technology |
| Ibi ipamọ | 6 x SATA3 ports (RAID 0, 1, 5, 10), 2 x Ultra M.2 ports (PCIe Gen3 x4 & SATA3) |
| Ohun | Realtek ALC892 7.1-ikanni HD Audio |
| LAN | Intel I219V Gigabit Ethernet |
| Awọn ibudo USB | 8 x USB 3.1 Gen1 (1 Type-C rear, 5 rear, 2 via header), 5 x USB 2.0 (2 rear, 3 via header) |
| Awọn abajade fidio | 1 x VGA, 1 x DVI-D, 1 x HDMI |
| Fọọmù ifosiwewe | ATX (12.0 x 9.0 inch / 30.5 x 22.9 cm) |
8. Atilẹyin ọja ati Support
8.1 atilẹyin ọja Alaye
The ASRock B365 PRO4 Motherboard comes with a 1-odun lopin atilẹyin ọja. This warranty covers defects in materials and workmanship under normal use. For specific terms and conditions, please refer to the warranty card included with your product or visit the official ASRock webojula.
Note: Damage caused by improper installation, misuse, unauthorized modifications, or natural disasters is not covered under warranty.
8.2 Imọ Support
For technical assistance, driver downloads, BIOS updates, or further troubleshooting, please visit the official ASRock support webojula:
You may also contact ASRock customer service directly through their webaaye fun atilẹyin ti ara ẹni.