1. Ifihan
This manual provides detailed instructions for the installation, operation, and maintenance of your COMAP Smart Home Wireless Programmable Thermostat. This system is designed to optimize the control of electric heating systems equipped with a pilot wire, enhancing comfort while contributing to energy efficiency. The thermostat can be managed locally or remotely via a dedicated application available on Play Store and Apple Store, and is compatible with Google Assistant and Amazon Alexa voice assistants.
2. Alaye Aabo
- Always disconnect power to the heating system before installing or servicing the heating module.
- Fifi sori yẹ ki o ṣe nipasẹ oṣiṣẹ ina mọnamọna ti o ko ba ni idaniloju nipa wiwọ itanna.
- Use only AAA non-rechargeable batteries for the thermostat. Do not mix old and new batteries, or different types of batteries.
- Jeki ẹrọ naa kuro ninu omi ati awọn iwọn otutu to gaju.
- Do not attempt to open or repair the device yourself. Refer to qualified personnel.
3. Package Awọn akoonu
Jẹrisi pe gbogbo awọn paati wọnyi wa ninu package rẹ:
- 1 x COMAP Smart Home Thermostat
- 1 x Heating Module
- 1 x Gateway
- 1 x Okun USB
- 1 x Okun Ethernet RJ45
- 3 x AAA Batteries (non-rechargeable)
- 4 x Screws/Wall Plugs for mounting
- 1 x Installation Guide (separate document)

Aworan 3.1: Pariview of the COMAP Smart Home Thermostat and Heating Module.
4. Eto ati fifi sori
4.1. Thermostat Setup
- Fi awọn batiri sii: Open the battery compartment on the back of the thermostat and insert the 3 AAA non-rechargeable batteries, ensuring correct polarity.
- Iṣagbesori: Choose a central location in the room, away from direct sunlight, drafts, or heat sources. Mount the thermostat on the wall using the provided screws and wall plugs.

Image 4.1: The COMAP Smart Home Thermostat installed on a wall.
4.2. Gateway Connection
- Asopọ agbara: Connect the gateway to a power source using the provided USB cable (5V DC 200mA).
- Isopọ Ayelujara: Connect the gateway to your internet router using the provided RJ45 Ethernet cable. Ensure your internet connection is active.
4.3. Heating Module Installation
The heating module connects to your electric radiator's pilot wire. Refer to the separate installation guide for detailed wiring diagrams specific to your heating system. It is recommended to consult a qualified electrician for this step.
4.4. App Download ati Sisopọ
- Ṣe igbasilẹ Ohun elo: Download the COMAP Smart Home application from the Apple App Store or Google Play Store.
- Se akanti fun ra re: Follow the in-app instructions to create a new user account.
- Awọn Ẹrọ Papọ: Follow the in-app instructions to pair your thermostat, heating module, and gateway with your account. This typically involves a discovery process and confirmation on the devices.
5. Awọn ilana Iṣiṣẹ
5.1. Manual Temperature Adjustment
On the thermostat display, use the touch controls (up/down arrows) to manually adjust the desired temperature. The thermostat will maintain this temperature until the next programmed event or until it is manually changed again.
5.2. App Control and Programming
The COMAP Smart Home application provides comprehensive control over your heating system:
- Isakoṣo latọna jijin: Adjust temperature, switch modes (Comfort, Eco, Frost Protection, Off) from anywhere using your smartphone, tablet, or PC.
- Eto Ọsẹ: Create customized heating schedules for each day of the week to match your lifestyle.
- Heating History: Access historical data on heating periods and temperatures to optimize your energy consumption.
- Iṣakoso Agbegbe Pupọ: If you have multiple heating modules, the app allows for independent control of different zones.

Image 5.1: Controlling the thermostat via the COMAP Smart Home web application on a laptop.

Image 5.2: Adjusting heating settings using the COMAP Smart Home mobile application.
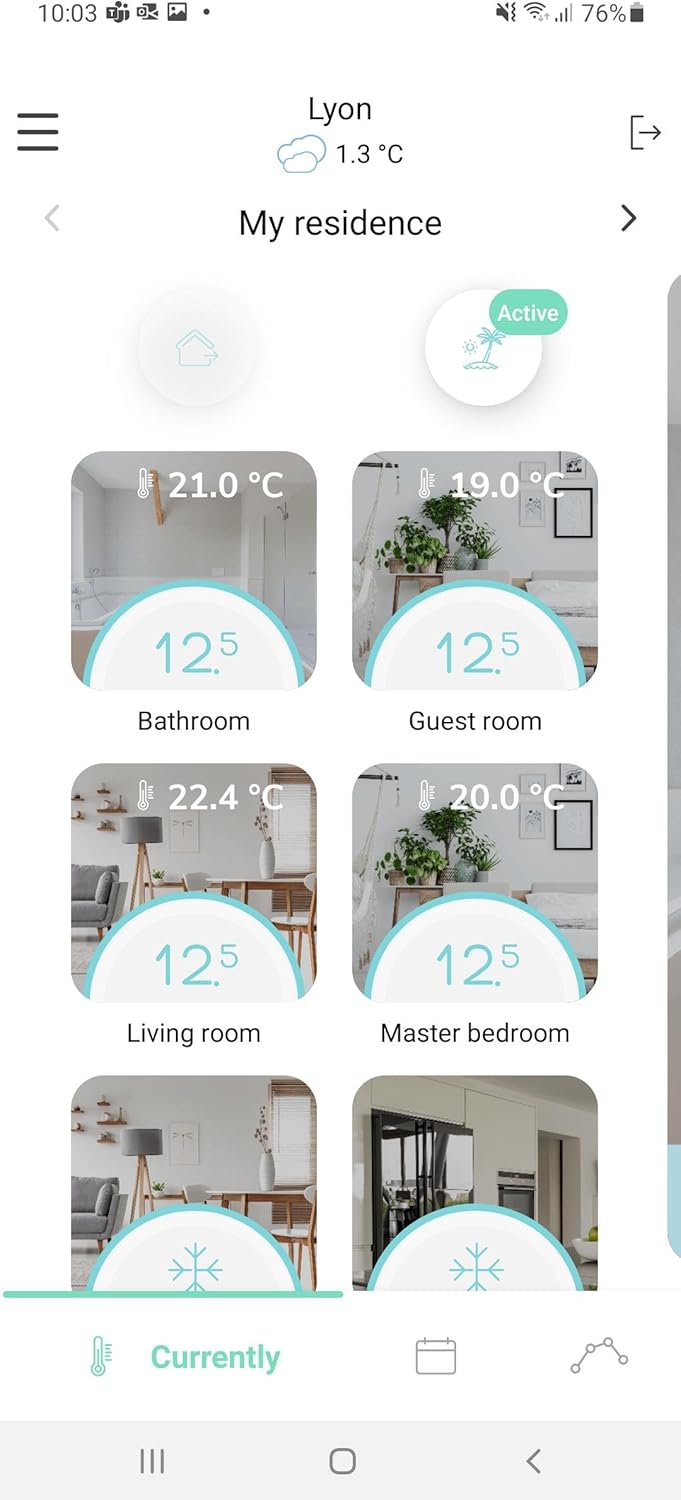
Image 5.3: The COMAP Smart Home app interface showing temperature control for multiple zones.
5.3. Voice Iranlọwọ Integration
The COMAP Smart Home system is compatible with Google Assistant and Amazon Alexa. To enable voice control, link your COMAP Smart Home account within the respective voice assistant application (Google Home or Amazon Alexa app) and follow the setup instructions.
6. Itọju
- Rirọpo Batiri: Replace the AAA batteries in the thermostat approximately every 2 years, or when the low battery indicator appears on the display or in the app. Always use new, non-rechargeable AAA batteries.
- Ninu: Clean the thermostat and other components with a soft, dry cloth. Do not use abrasive cleaners or solvents.
- Awọn imudojuiwọn famuwia: Ensure your system's firmware is up to date through the COMAP Smart Home application for optimal performance and new features.
7. Laasigbotitusita
7.1. No Display on Thermostat
- Check if the AAA batteries are correctly inserted and not depleted. Replace if necessary.
7.2. No Connection to App/Gateway
- Ensure the gateway is powered on and connected to your internet router via the RJ45 cable.
- Verify your internet connection is active.
- Check if the thermostat and heating module are within the wireless range of the gateway (up to 20m in open field, but can be affected by building structure).
- Restart the gateway and your internet router.
- Re-pair the devices through the app if the connection is lost persistently.
7.3. Incorrect Temperature Readings
- Ensure the thermostat is not placed near heat sources (e.g., direct sunlight, lamps, appliances) or cold drafts.
- Allow some time for the thermostat to stabilize after initial setup or significant temperature changes.
7.4. Heating Not Responding to Commands
- Verify the heating module is correctly wired to the electric radiator's pilot wire.
- Check the connection status of the heating module in the app.
- Ensure the main power to the heating system is on.
8. Awọn pato
| Ẹya ara ẹrọ | Sipesifikesonu |
|---|---|
| Nọmba awoṣe | QTW12-EW-CO-EU (L151015001) |
| Power Supply (Thermostat) | 3 x AAA Batteries (non-rechargeable) |
| Thermostat Consumption (Standby) | Ọdun 10µA |
| Thermostat Consumption (Active) | 40 mA |
| Gateway Consumption (Active) | 100mA |
| Heating Module Consumption | 1/2 Wattis |
| Apapọ batiri Life | ọdun meji 2 |
| Ifihan | Low consumption LED |
| Redio Interface | 868 MHz (6LoWPAN protocols) |
| Gateway Asopọ | USB 5V DC 200mA, RJ45 Ethernet |
| Alailowaya Ibiti | Max 20m in open field (indicative) |
| Iwọn Iwọn | 0°C si 50°C |
| Ifamọ | +/- 0.05°C |
| Setpoint otutu Ibiti | 4°C si 28°C |
| Imudara iwọn otutu | 0.5°C |
| Awọn sensọ | Wide-field presence sensor, Humidity sensor |
| Awọn iwọn (L x W x H) | 10.7 x 10.7 x 2.6 cm |
| Iwọn | 460 giramu |
| Ohun elo | Ṣiṣu |
| Àwọ̀ | Funfun |
9. Atilẹyin ọja ati Support
For warranty information, technical support, or service inquiries, please refer to the official COMAP website or contact COMAP customer service directly. Keep your purchase receipt as proof of purchase for warranty claims.


