1. Ifihan
The AIYIMA GE5654 (TUBE-A3 Pro) is a compact and versatile tube preamplifier designed to enhance your home audio system. It features Bluetooth 5.0 connectivity and AUX input, along with independent treble and bass adjustments, allowing for a personalized audio experience. This device functions as a preamplifier and requires connection to a power amplifier tabi agbara agbohunsoke.
- Didara Ohun Imudara: Utilizes GE5654 vacuum tubes for a warm and sweet audio output, with adjustable bass and treble controls.
- Dual Audio Inputs: Supports both Bluetooth 5.0 and AUX (3.5mm) audio input modes, switchable via a dedicated button.
- Replaceable Tubes: Designed for easy tube replacement, compatible with 6J1/6J2/6K4/GE5654/6AK5/6Ж1n tubes.
- Optimized Circuitry: Features a power circuit separate from the audio circuit to minimize interference and ensure clear sound.
- Akiyesi pataki: Eyi jẹ iṣaajuamplifier, kii ṣe agbara amplifier. It must be connected to powered speakers or a separate power amplifier. It is not suitable for direct connection to passive speakers without an amplifier, nor for use with record players or phonographs without an appropriate phono preamp.
2. Ọja Ipariview
2.1. Awọn iṣakoso nronu iwaju

Aworan: Iwaju view of the AIYIMA GE5654 (TUBE-A3 Pro) showing the power switch, working indicator, bass control, treble control, and volume control knobs.
- Agbara Yi pada: Ó máa ń tan/pa ẹ̀rọ náà.
- Atọka Iṣẹ: Ṣe itanna nigbati ẹrọ naa ba wa ni titan.
- Iṣakoso Bass: Ṣe atunṣe iṣelọpọ ohun-igbohunsafẹfẹ kekere.
- Iṣakoso Treble: Ṣe atunṣe iṣẹjade ohun igbohunsafẹfẹ giga-giga.
- Iṣakoso iwọn didun: Adjusts the overall audio output level.
2.2. Ru Panel Awọn isopọ
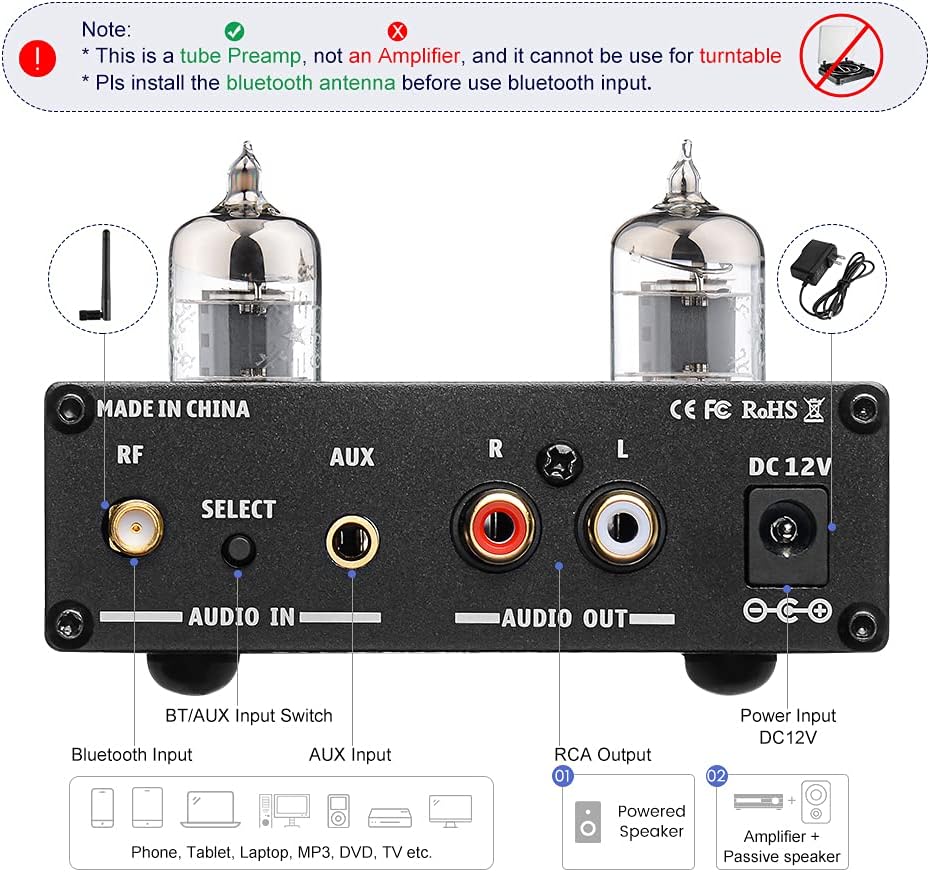
Aworan: Ẹyin view of the AIYIMA GE5654 (TUBE-A3 Pro) showing the Bluetooth antenna connector, input selector, AUX input, RCA audio outputs, and DC 12V power input.
- RF (Ẹ̀rọ Bluetooth): Asopọ fun eriali Bluetooth.
- Select (Audio Input Switch): Bọtini lati yipada laarin Bluetooth ati awọn ọna titẹ sii AUX.
- Iṣawọle AUX: 3.5mm stereo input for wired audio sources.
- Audio Out (RCA L/R): RCA stereo outputs to connect to a power amplifier tabi agbara agbohunsoke.
- DC 12V: Power input jack for the DC12V/1A power adapter.
2.3. Awọn Iwọn ọja

Aworan: Oke-isalẹ view of the AIYIMA GE5654 (TUBE-A3 Pro) with dimensions: 118mm (4.65in) length, 95mm (3.74in) width, 30mm (1.18in) height.
3. Awọn ilana iṣeto
- Ṣii silẹ ati Ṣayẹwo: Fara yọ awọn ṣaajuamplifier and all accessories from the packaging. Ensure all components are present and undamaged.
- Fi Antenna Bluetooth sori ẹrọ: Screw the provided Bluetooth antenna into the 'RF' connector on the rear panel. Ensure it is securely tightened for optimal signal reception.
- So Oju-iwe So pọ: Connect the RCA 'Audio Out' ports (L/R) on the rear panel of the preamplifier to the input ports of your power amplifier or powered speakers using appropriate RCA cables.
- Connect Audio Input (Choose One):
- Input Bluetooth: Rii daju pe o ti ṣaajuamplifier is in Bluetooth mode (indicated by a purple light, or red and blue flashing for search status). On your audio source device (e.g., smartphone, tablet), search for and connect to 'AIYIMA A3 Pro'.
- Iṣawọle AUX: Connect your audio source (e.g., CD player, computer) to the 'AUX' 3.5mm input jack on the rear panel using a 3.5mm audio cable. Press the 'Select' button to switch to AUX input mode (indicated by a red light).
- So agbara: Connect the DC12V/1A power adapter to the 'DC 12V' input jack on the rear panel, then plug the adapter into a wall outlet. Caution: Do not use a power supply exceeding 12V.
- Agbara Tan: Flip the 'Power' switch on the front panel to the ON position. The working indicator will light up.
Fidio Afihan Eto
Video: This video demonstrates the connection of the AIYIMA GE5654 (TUBE-A3 Pro) preamplifier to an AIYIMA A07 power amplifier and speakers, showcasing both AUX and Bluetooth input modes and the treble/bass adjustment.
4. Awọn ilana Iṣiṣẹ
- Titan/Apapa: Use the 'Power' switch on the front panel to turn the unit on or off.
- Yan Igbewọle: Press the 'Select' button on the rear panel to toggle between AUX and Bluetooth input modes. The working indicator light color will change to reflect the active input (Red for AUX, Purple for Bluetooth).
- Ṣatunṣe Iwọn didun: Rotate the 'Volume' knob on the front panel to increase or decrease the audio output level.
- Ṣàtúnṣe Ohùn: Use the 'Bass' and 'Treble' control knobs on the front panel to fine-tune the low and high frequencies according to your preference.

Image: The AIYIMA GE5654 (TUBE-A3 Pro) connected to a smartphone via Bluetooth and outputting to a speaker, demonstrating a typical usage scenario.
5. Tube Replacement
The GE5654 (TUBE-A3 Pro) preamplifier allows for easy replacement of its vacuum tubes, offering flexibility for sound customization. Compatible tube models include 6J1, 6J2, 6K4, GE5654, 6AK5, and 6Ж1n.
- Paa ati Ge asopọ: Before attempting to replace tubes, ensure the preamplifier is powered off and disconnected from the main power supply. Allow the unit to cool down completely.
- Gently Remove Old Tubes: Carefully grasp the existing tube and pull it straight upwards from its socket. Avoid twisting or bending the tube pins.
- Insert New Tubes: Align the pins of the new tube with the holes in the socket. Gently push the tube straight down until it is firmly seated. Do not force it.
- Jẹrisi Ibujoko: Ensure both tubes are properly seated in their sockets before reconnecting power.

Image: A hand demonstrating the process of replacing a vacuum tube on the AIYIMA GE5654 (TUBE-A3 Pro) preamplifier.
6. Itọju
- Jeki ẹyọ naa di mimọ nipa fifẹ rẹ pẹlu asọ ti o gbẹ.
- Yẹra fun lilo awọn kẹmika lile tabi awọn afọmọ abrasive.
- Rii daju pe fentilesonu to dara ni ayika ẹyọ naa lati ṣe idiwọ igbona.
- Protect the unit from moisture, direct sunlight, and extreme temperatures.
7. Laasigbotitusita
- Ko si Ohun:
- Check if the power adapter is correctly connected and the unit is powered on.
- Verify all audio cables are securely connected to the correct input and output ports.
- Ensure the correct input mode (Bluetooth or AUX) is selected.
- Confirm the volume knob is not set to minimum and the connected power amplifier/powered speakers are also powered on and at an audible volume.
- Check if the vacuum tubes are properly seated in their sockets.
- Ohun Yiyi:
- Reduce the volume level on both the preamplifier àti orísun ohùn rẹ.
- Ensure your audio source is providing a clean signal. A noisy source will be amplified nipasẹ awọn ṣaajuamplifier.
- Adjust bass and treble controls to a neutral position or to your preference.
- Verify that the power supply is DC12V/1A and not exceeding 12V.
- Awọn oran Asopọ Bluetooth:
- Ensure the Bluetooth antenna is securely installed.
- Jẹrisi ṣaajuamplifier is in Bluetooth input mode (purple indicator light).
- Make sure your audio source device's Bluetooth is enabled and within range.
- Gbiyanju yiyo ati tun so pọ ẹrọ naa.
- Ẹka Ko Ṣiṣẹ Tan-an:
- Check the power adapter and wall outlet.
- Ensure the power switch is fully in the ON position.
8. Awọn pato
| Ẹya ara ẹrọ | Sipesifikesonu |
|---|---|
| Orukọ Brand | AIYIMA |
| Awoṣe | AIYIMA GE5654 (TUBE-A3 Pro) |
| Awọn Iwọn Nkan (L x W x H) | 4.69 x 3.74 x 1.22 inches (118 x 95 x 30 mm) |
| Iwọn Nkan | 520 giramu |
| Voltage | 12 Volts (DC) |
| O pọju Ipese Voltage | 12 Volts (DC) |
| Ipese ti o kere ju Voltage | 12 Volts (DC) |
| Nọmba ti awọn ikanni | 2 |
| Iṣagbesori Iru | Oke Oke |
| UPC | 749789527314 |
| Olupese | YIMA TECH |
9. Atilẹyin ọja ati Support
For warranty information and technical support, please refer to the documentation included with your purchase or contact AIYIMA customer service directly. Keep your purchase receipt for warranty claims.