Ọrọ Iṣaaju
The Perel EDIN305N is a 230V 16A 3600W DIN-rail mount digital weekly timer designed for indoor use. This device allows for precise, programmable control of electrical circuits, enabling automatic switching ON and OFF of connected appliances or lighting systems over a weekly cycle. It features a clear digital display and multiple programming options to suit various scheduling needs.
Awọn iṣọra Aabo
IKILO: Electrical installation should only be performed by a qualified electrician. Incorrect wiring can lead to electric shock, fire, or damage to the device and connected equipment. Always disconnect power at the main circuit breaker before installation or maintenance.
- Ensure the power supply matches the device's specifications (230V~50Hz).
- Má ṣe ju agbára ẹrù tó pọ̀ jù lọ lọ ti 16A / 3600W.
- This device is designed for indoor use only. Avoid exposure to moisture, dust, or extreme temperatures.
- Ma ṣe gbiyanju lati ṣii tabi tun ẹrọ naa funrararẹ. Tọkasi gbogbo iṣẹ si oṣiṣẹ oṣiṣẹ.
- Jeki kuro ni arọwọto awọn ọmọde.
Ọja Pariview
The Perel EDIN305N digital timer consists of a main body with a digital display, control buttons, and terminal blocks for electrical connections. A transparent cover protects the display and buttons.
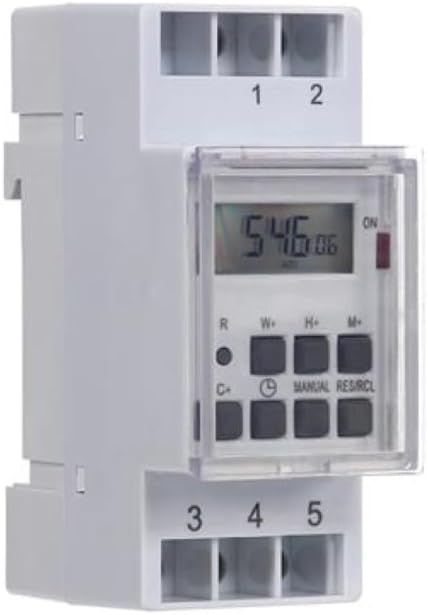
Nọmba 1: Iwaju view of the Perel EDIN305N Digital Weekly Timer. The image displays the LCD screen, control buttons (R, W+, H+, M+, C+, Clock, Manual, RES/RCL), and numbered terminal blocks (1, 2 at the top, 3, 4, 5 at the bottom).
Awọn bọtini Iṣakoso:
- R: Reset button (recessed).
- W+: Weekday setting.
- H+: Eto wakati.
- M+: Minute setting.
- C+: Clear program.
- Aami aago: Used to set current time and day, and to exit programming mode.
- Afọwọṣe: Manual override for ON/AUTO/OFF modes.
- RES/RCL: Reset/Recall program.
Awọn bulọọki Ipari:
- Ọdun 1, Ọdun 2: Power supply input (N, L).
- 3, 4, 5: Output terminals for controlled circuit (Common, Normally Open, Normally Closed).
Imọ ni pato
| Paramita | Iye |
|---|---|
| Nọmba awoṣe | EDIN305N |
| Voltage | 230V ~ 50Hz |
| O pọju. Lọwọlọwọ | 16A |
| O pọju. Agbara | 3600W |
| Nọmba ti Eto | 7 (Àwọn ètò ON/OFF) |
| Iṣagbesori Iru | DIN-Rail |
| Awọn iwọn (L x W x H) | 2.36 x 3.54 x 1.57 inches (60 x 90 x 40 mm) |
| Iwọn | 0.12 kg (4.2 iwon) |
| Ohun elo | Ṣiṣu |
| Àwọ̀ | Funfun |
| Awọn batiri ti a beere | No (internal battery for memory backup) |
Fifi sori ẹrọ
1. Iṣagbesori
The Perel EDIN305N is designed for DIN-rail mounting. Securely attach the timer to a standard 35mm DIN-rail within an electrical enclosure. Ensure sufficient space for wiring and ventilation.
2. Awọn gbigbe
PATAKI: Ensure power is disconnected at the main circuit breaker before proceeding with wiring. Follow local electrical codes and regulations.
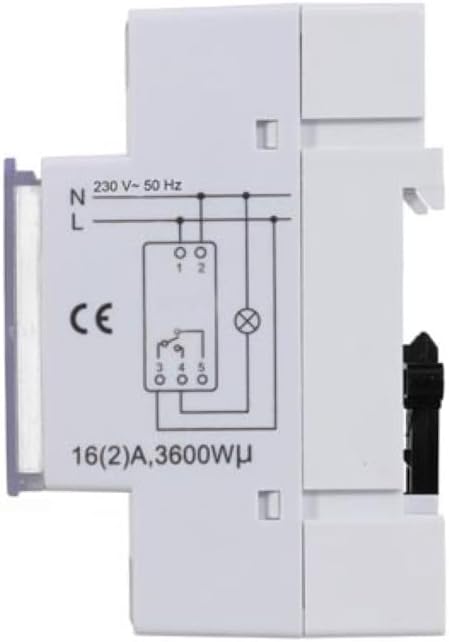
Nọmba 2: Apa view of the Perel EDIN305N Digital Weekly Timer showing the electrical wiring diagram. It illustrates connections for Neutral (N), Live (L), and the output contacts (1, 2, 3, 4, 5) for controlling a load.
Refer to the wiring diagram (Figure 2) and the terminal block labels on the device:
- Connect the Neutral (N) wire of your 230V AC supply to terminal 1.
- Connect the Live (L) wire of your 230V AC supply to terminal 2.
- For the controlled circuit:
- Terminal 3: Common contact for the relay output.
- Terminal 4: Normally Open (NO) contact. The circuit connected here will be ON when the timer is active.
- Terminal 5: Normally Closed (NC) contact. The circuit connected here will be OFF when the timer is active.
- Connect the load (e.g., light, appliance) between the Live (L) supply and either terminal 4 (for NO operation) or terminal 5 (for NC operation), with terminal 3 connected to the Live (L) supply. Alternatively, connect the load between terminal 4 or 5 and the Neutral (N) supply, with terminal 3 connected to the Live (L) supply. Consult a qualified electrician for specific load wiring configurations.
Ni ibẹrẹ Oṣo ati isẹ
1. Power On and Reset
After wiring and restoring power, the display will illuminate. If the display is blank or shows erratic characters, press the recessed R (Reset) button using a pointed non-metallic object (e.g., a pen tip). This will clear all settings and restore default values.
2. Ṣiṣeto Akoko ati Ọjọ lọwọlọwọ
- Tẹ mọlẹ Aami aago bọtini.
- Nigba dani awọn Aami aago bọtini, tẹ W+ to set the current day of the week (1=Monday, 7=Sunday).
- Nigba dani awọn Aami aago bọtini, tẹ H+ to set the current hour (0-23).
- Nigba dani awọn Aami aago bọtini, tẹ M+ to set the current minute (0-59).
- Tu silẹ Aami aago button. The time and day are now set.
3. Ṣíṣeto Àwọn Ìrìn Àkókò TÍTÓN/PÁ
Aago naa n ṣe atilẹyin fun awọn eto ON/OFF to 7. Eto kọọkan ni akoko ON ati akoko PA.
- Tẹ awọn Aami aago bọ́tìnì lẹ́ẹ̀kan láti wọ ipò ètò ìṣiṣẹ́. Ìfihàn náà yóò fi "1 ON" hàn.
- Tẹ W+ to select the day(s) for this program. You can choose a single day, a block of days (e.g., Mon-Fri), or all days.
- Tẹ H+ to set the ON hour for program 1.
- Tẹ M+ to set the ON minute for program 1.
- Tẹ awọn Aami aago button again. The display will show "1 OFF".
- Repeat steps 2-4 to set the OFF day(s), hour, and minute for program 1.
- To set additional programs (2-7), press the Aami aago button to cycle through "2 ON", "2 OFF", etc., and repeat the setting process.
- Lẹhin ti ṣeto gbogbo awọn eto ti o fẹ, tẹ bọtini naa Afọwọṣe bọtini lati jade kuro ni ipo siseto ki o pada si ifihan akoko lọwọlọwọ.
4. Yiyọ Afowoyi
Tẹ awọn Afọwọṣe button repeatedly to cycle through the operating modes:
- LATI: The output is continuously ON, overriding all programs.
- LATIO: The timer operates according to the programmed ON/OFF cycles.
- PA: The output is continuously OFF, overriding all programs.
Rí i dájú pé a ti ṣètò aago náà sí AUTO fún iṣẹ́ tí a ṣe ètò rẹ̀.
5. Clearing Programs
To clear a specific program:
- Enter programming mode by pressing the Aami aago button until the desired program number (e.g., "3 ON") is displayed.
- Tẹ awọn C+ button. This will clear both the ON and OFF times for that specific program.
- Tun ṣe fun awọn eto miiran bi o ṣe nilo.
- Tẹ Afọwọṣe lati jade kuro ni ipo siseto.
To clear all programs and reset the device, use the recessed R (Reset) button.
Itoju
- Nu ẹrọ naa pẹlu asọ ti o tutu, ti o gbẹ. Ma ṣe lo abrasive ose tabi epo.
- Ensure the transparent cover is closed to protect the display and buttons from dust and splashes.
- Regularly check electrical connections for tightness, especially in high-vibration environments.
Laasigbotitusita
| Isoro | Owun to le Fa | Ojutu |
|---|---|---|
| Ifihan jẹ òfo. | Kò sí ìpèsè agbára; bátìrì inú ti dínkù. | Check power connections (terminals 1 & 2). Ensure main power is ON. If power is present, press the R (Reset) button. The internal battery recharges when connected to power. |
| Àkókò aago kò máa yípadà/pa gẹ́gẹ́ bí a ti ṣètò rẹ̀. | Incorrect program settings; timer in manual ON/OFF mode. | Verify program settings (time, day, ON/OFF). Ensure the timer is in AUTO mode nipa titẹ awọn Afọwọṣe bọtini. |
| Connected appliance not receiving power. | Incorrect wiring; appliance fault; timer fault. | Check wiring according to Figure 2. Test the appliance directly. If wiring and appliance are fine, the timer may be faulty. |
| Buttons unresponsive or display erratic. | Software glitch; low internal battery. | Tẹ ibi ti o wa ni isalẹ R (Reset) button. Ensure the timer has been connected to power for at least 24 hours to fully charge the internal battery. |
Idasonu
Do not dispose of this product with general household waste. This electronic device contains materials that can be recycled. Please dispose of it at a designated collection point for electrical and electronic equipment waste, in accordance with local regulations.
Atilẹyin ọja ati Support
Perel products are manufactured to high quality standards. For warranty information, technical support, or service inquiries, please refer to the documentation provided with your purchase or contact your local Perel distributor or retailer. Please have your model number (EDIN305N) and purchase details ready when contacting support.


