BESDER ZX-X2-W/200W
BESDER Smart Home Security FULL HD 1080P IP WiFi Camera User Manual
Model: ZX-X2-W/200W
Ọrọ Iṣaaju
Thank you for choosing the BESDER Smart Home Security Camera. This manual provides detailed instructions for setting up, operating, and maintaining your camera. Please read this manual carefully before use to ensure proper functionality and safety.
This camera offers Full HD 1080P resolution, Pan/Tilt functionality, Two-Way Audio, and IR Night Vision for comprehensive home surveillance. It supports both wired and WiFi connections, mobile monitoring via iOS and Android apps, and cloud services.
Package Awọn akoonu
Jọ̀wọ́ ṣàyẹ̀wò ohun tó wà nínú àpò náà nígbà tí o bá ṣí i. Tí àwọn nǹkan kan bá sọnù tàbí tí wọ́n bá bàjẹ́, jọ̀wọ́ pe olùrànlọ́wọ́ oníbàárà.
- 1 x BESDER IP Camera 1080P
- 1 x Itọsọna olumulo
- 1 x DC 5V Power Ipese
- 1 x Small Bracket
- Iṣagbesori skru ati Wall Plugs
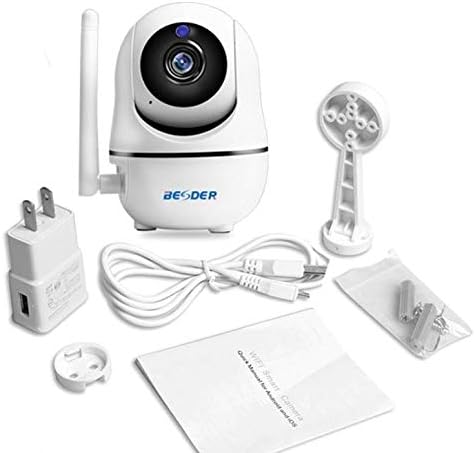
Nọmba 1: Package contents of the BESDER Smart Home Security Camera, showing the camera unit, power adapter, USB cable, mounting bracket, screws, and the user manual.
Ọja Pariview
Familiarize yourself with the various components of your BESDER Smart Home Security Camera.
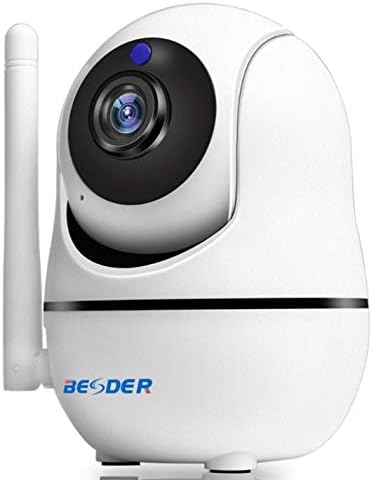
Nọmba 2: Iwaju view of the BESDER Smart Home Security Camera, highlighting the camera lens, infrared LEDs for night vision, and the status indicator light.

Nọmba 3: Ẹyìn view of the BESDER Smart Home Security Camera, detailing the memory card slot (for microSD up to 128GB), reset button, built-in speaker, DC 5V power input, and the Ethernet network port for wired connection.
Awọn eroja pataki:
- Lẹnsi kamẹra: Ya fidio footage.
- Awọn LED IR: Provide infrared illumination for night vision.
- Imọlẹ Atọka Ipo: Indicates camera status (e.g., power on, network connection).
- Gbohungbohun: For audio input and two-way audio communication.
- Agbọrọsọ: For audio output and two-way audio communication.
- Iho kaadi iranti: Supports microSD cards up to 128GB for local storage.
- Bọtini atunto: A lo lati mu awọn eto ile-iṣẹ pada.
- Input agbara DC 5V: Sopọ si ohun ti nmu badọgba agbara ti a pese.
- Ibudo Nẹtiwọọki (RJ45): Fun asopọ Ethernet ti a fi waya ṣe.
Ṣeto
1. Agbara Lori
- Connect the DC 5V power adapter to the camera's power input port.
- Pulọọgi ohun ti nmu badọgba agbara sinu iṣan ogiri kan.
- The camera will power on, and the status indicator light will illuminate. Wait for the camera to complete its self-test (it may pan and tilt).
2. Network Connection (Wired or Wireless)
The camera supports both wired (Ethernet) and wireless (Wi-Fi) connections.
Asopọ onirin:
- Connect one end of an Ethernet cable (not included) to the camera's network port.
- So awọn miiran opin ti awọn àjọlò USB si rẹ olulana tabi nẹtiwọki yipada.
- The camera will automatically connect to the network.
Wireless (Wi-Fi) Connection:
- Download the recommended mobile application (e.g., XMEYE or iCsee) from your device's app store (iOS or Android).
- Forukọsilẹ iroyin ati ki o wọle.
- Follow the in-app instructions to add your camera. This typically involves scanning a QR code on the camera or using a Wi-Fi configuration method (e.g., AP mode, SmartLink).
- Ensure your mobile device is connected to the 2.4GHz Wi-Fi network you intend to connect the camera to.
- Enter your Wi-Fi password when prompted by the app.
- The camera will attempt to connect to your Wi-Fi network. Once connected, the status indicator light will change (refer to app or camera manual for specific light indications).
3. Fifi kaadi MicroSD sori (aṣayan)
- Ensure the camera is powered off before inserting or removing the microSD card.
- Locate the microSD card slot (refer to Figure 3).
- Rọra fi kaadi microSD sii sinu iho pẹlu awọn olubasọrọ goolu ti nkọju si isalẹ titi ti o fi tẹ sinu aaye.
- Power on the camera. You may need to format the SD card via the mobile app settings for optimal performance.
Awọn ilana Iṣiṣẹ
1. Mobile Monitoring (iOS/Android)
- Open the XMEYE or iCsee app on your smartphone.
- Select your camera from the device list to view kikọ sii ifiwe.
- Use the on-screen controls to pan (horizontal rotation) and tilt (vertical rotation) the camera lens.
- Access playback of recorded footage stored on the microSD card or cloud service.
2. Audio-Ona Meji
- Lakoko viewing the live feed in the app, tap the microphone icon to speak through the camera's speaker.
- Fọwọ ba aami agbọrọsọ lati tẹtisi ohun lati gbohungbohun kamẹra.
3. Ìran Alẹ́ IR
- The camera automatically switches to IR night vision mode in low-light conditions.
- The IR LEDs will illuminate, providing clear black and white video up to 15 meters.
4. Wiwa Iṣipopada ati Awọn itaniji
- Mu wiwa išipopada ṣiṣẹ ni awọn eto app.
- Configure sensitivity levels and detection zones as needed.
- When motion is detected, the camera can send push notifications to your phone and/or record footage.
5. Cloud Service
- The camera supports cloud storage services (subscription may be required).
- Refer to the mobile app for details on activating and managing cloud storage.
Itoju
- Ninu: Lo asọ ti o rọ, ti o gbẹ lati nu lẹnsi kamẹra ati ara. Maṣe lo awọn olutọpa olomi tabi awọn aerosols.
- Awọn imudojuiwọn famuwia: Regularly check for firmware updates via the mobile app to ensure optimal performance and security.
- Ibi: Ensure the camera is placed in a location where it is protected from direct water exposure and extreme temperatures.
- Iṣakoso Kaadi SD: Periodically check the status of your microSD card. If it becomes full, older recordings may be overwritten, or recording may stop.
Laasigbotitusita
| Isoro | Owun to le Fa | Ojutu |
|---|---|---|
| Kamẹra aisinipo/Ko le sopọ si Wi-Fi | Incorrect Wi-Fi password; Camera too far from router; Router issues; 5GHz Wi-Fi network. |
|
| No image/Black screen | Power issue; Network issue; Lens obstruction. |
|
| Ohun afetigbọ ọna meji ko ṣiṣẹ | A ti pa gbohungbohun/agbọrọsọ ninu app; Iwọn didun kere ju; Idaduro nẹtiwọọki. |
|
| Motion detection not triggering | A ti pa wíwá ìṣípo mọ́; Ìmọ̀lára kéré jù; Agbègbè ìwádìí tí kò tọ́. |
|
| Kaadi SD ko gbasilẹ | SD card full/corrupted; Incorrect format; SD card not inserted properly. |
|
Awọn pato
| Ẹya ara ẹrọ | Ẹ̀kúnrẹ́rẹ́ |
|---|---|
| Orukọ awoṣe | BESDER Smart Home Security |
| Olupese Reference | ZX-X2-W/200W |
| Ipinnu fidio | Full HD 1080P (1920x1080) |
| Sensọ | 1/2.8'' F22 CMOS sensor (for 1080P) |
| Fidio funmorawon | H.264, supports dual stream, 0.1 – 6 Mpbs |
| Lẹnsi | 3.6 mm G7 (default) |
| IR Night Iran ijinna | Max 15 meters (6 IR LEDs) |
| Asopọmọra | Wi-Fi (2.4GHz), Wired Ethernet |
| Ibi ipamọ | MicroSD card up to 128GB (not included), Cloud Service |
| Ohun | Ohun afetigbọ ọna meji (gbohungbohun ti a ṣe sinu ati agbọrọsọ) |
| Abojuto Mobile | iOS, Android (APP: XMEYE or iCsee) |
| Ibi ti ina elekitiriki ti nwa | DC 5V 2A |
| Awọn iwọn otutu ṣiṣẹ | -5 to 60°C (23 - 140°F) |
| Awọn iwọn | 6.39 x 4.33 x 3.11 cm (iwọn ti o sunmọ apo) |
Atilẹyin ọja ati Support
For warranty information and technical support, please refer to the contact details provided with your purchase or visit the official BESDER webojula. Tọju iwe-ẹri rira rẹ bi ẹri rira.
Olupese: BESDER