1. Ifihan
Thank you for choosing the CREATE SILKAIR CONNECT 3-in-1 Mobile Air Conditioner. This versatile appliance is designed to provide cooling, dehumidification, and fan functions for your living space. With its Wi-Fi connectivity, you can conveniently control the unit via a mobile application. Please read this manual thoroughly before operation to ensure safe and efficient use.
Awoṣe: 64274_145198
Brand: ṢẸDA
2. Alaye Aabo
Nigbagbogbo tẹle awọn iṣọra aabo ipilẹ nigba lilo awọn ohun elo itanna lati dinku eewu ina, mọnamọna, ati ipalara.
- Rii daju pe ipese agbara ibaamu voltage pato lori awọn Rating aami.
- Ma ṣe ṣiṣẹ ẹyọ naa pẹlu okun ti o bajẹ tabi pulọọgi.
- Jeki ẹrọ kuro ni awọn orisun ooru ati oorun taara.
- Ma ṣe dina awọn ẹnu-ọna afẹfẹ tabi awọn ita.
- Yọọ kuro nigbagbogbo ṣaaju ṣiṣe mimọ tabi itọju.
- Ohun èlò yìí ń lo ìfọ́jú R290. Má ṣe gún ìyípo ìfọ́jú náà.
- Ṣe abojuto awọn ọmọde ati rii daju pe wọn ko ṣere pẹlu ohun elo naa.
3. Package Awọn akoonu
Carefully unpack your air conditioner and check that all items are present and in good condition.
- CREATE SILKAIR CONNECT Mobile Air Conditioner Unit
- eefi Hose
- Window Sealing Kit (Adjustable window slider, hose adapter)
- Isakoṣo latọna jijin
- Itọsọna olumulo

Figure 1: The CREATE SILKAIR CONNECT Mobile Air Conditioner unit shown alongside a smartphone displaying its control application interface.
4. Ọja Ipariview
4.1 Iṣakoso igbimo

Figure 2: Close-up of the top-mounted control panel, featuring an LED display and touch-sensitive buttons for various functions such as power, mode selection, fan speed, and timer.
4.2 Components and Dimensions
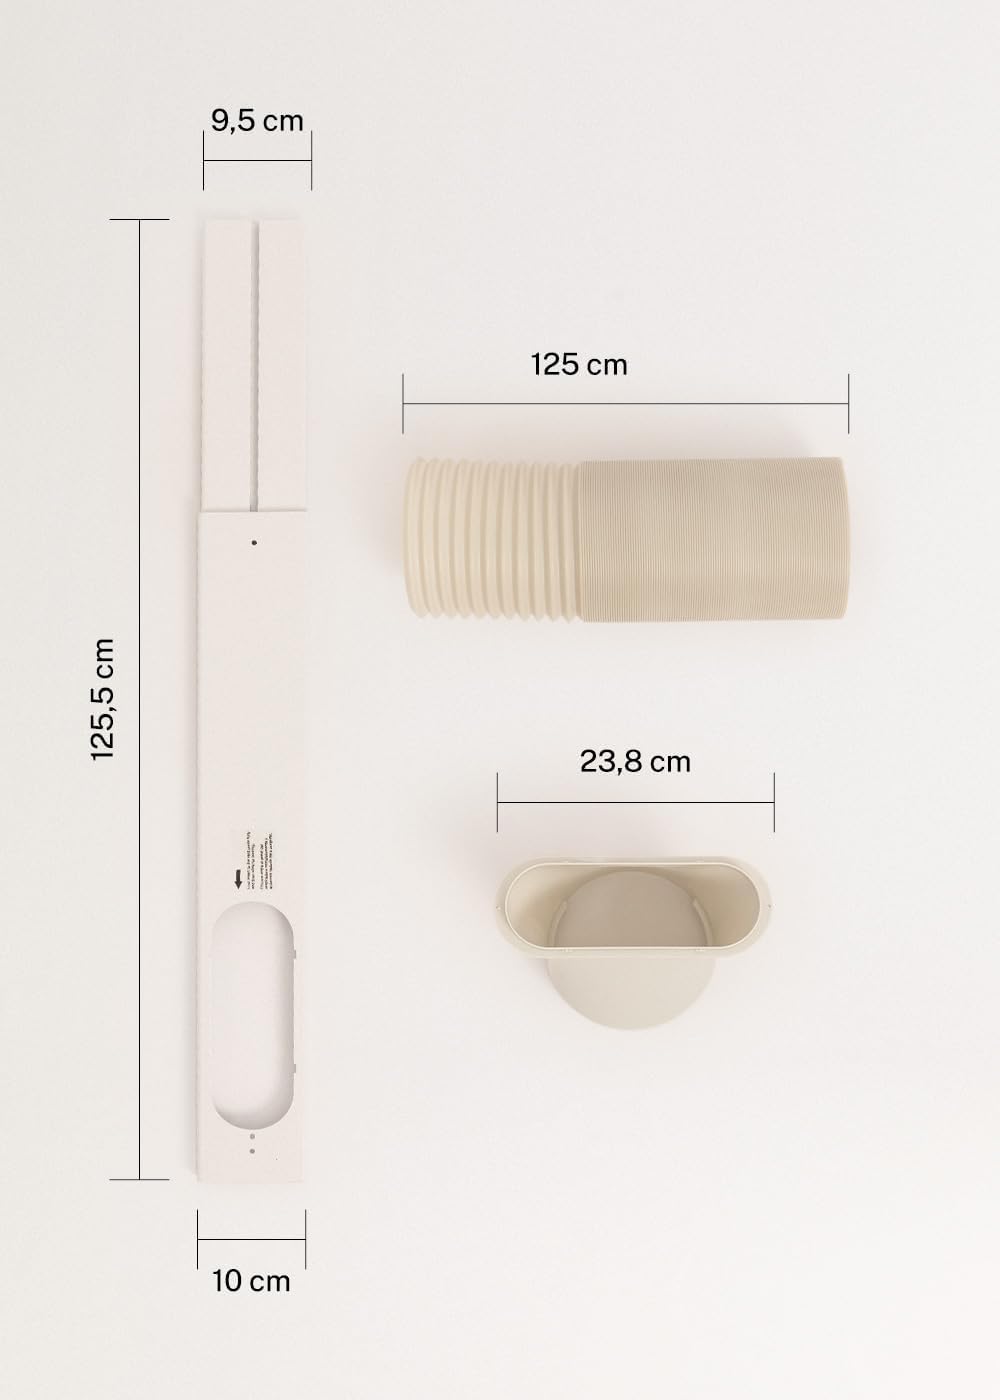
Figure 3: Detailed diagram illustrating the dimensions of the window sealing plate (125.5 cm length, 10 cm width, 9.5 cm adjustable width) and the exhaust hose (125 cm length) with its adapter (23.8 cm diameter).
5. Eto ati fifi sori
Proper installation is crucial for the efficient operation of your mobile air conditioner.
5.1 Gbigbe Unit
- Gbe ẹyọ naa sori alapin, dada iduroṣinṣin.
- Ensure there is at least 30 cm of space around the unit for proper airflow.
- Gbe ẹrọ naa si nitosi ferese tabi iho fun okun eefin.
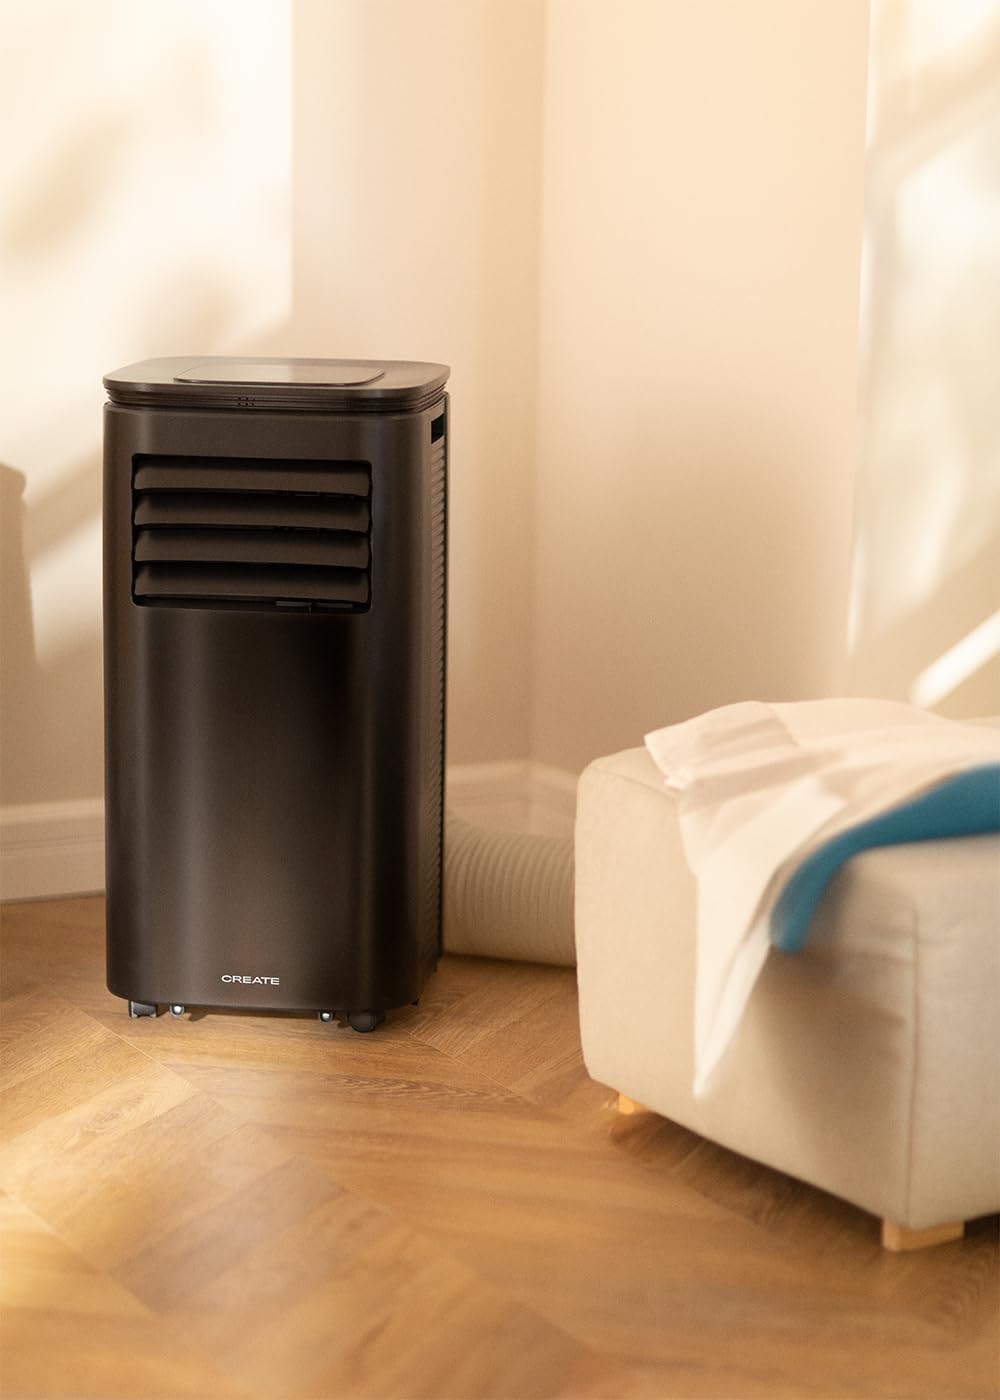
Figure 4: The air conditioner unit positioned in a room, demonstrating the typical setup with the exhaust hose directed towards a window for heat expulsion.
5.2 Installing the Exhaust Hose and Window Kit
- So ohun ti nmu badọgba okun pọ si opin kan ti okun eefin.
- So opin keji ti okun eefin naa pọ mọ ibudo afẹfẹ ti o wa ni ẹhin ẹrọ naa.
- Install the adjustable window sealing kit in your window opening. Extend it to fit the window frame.
- Insert the hose adapter into the opening of the window sealing kit.

Figure 5: Illustrates the secure connection of the flexible exhaust hose to the designated port at the rear of the air conditioning unit.
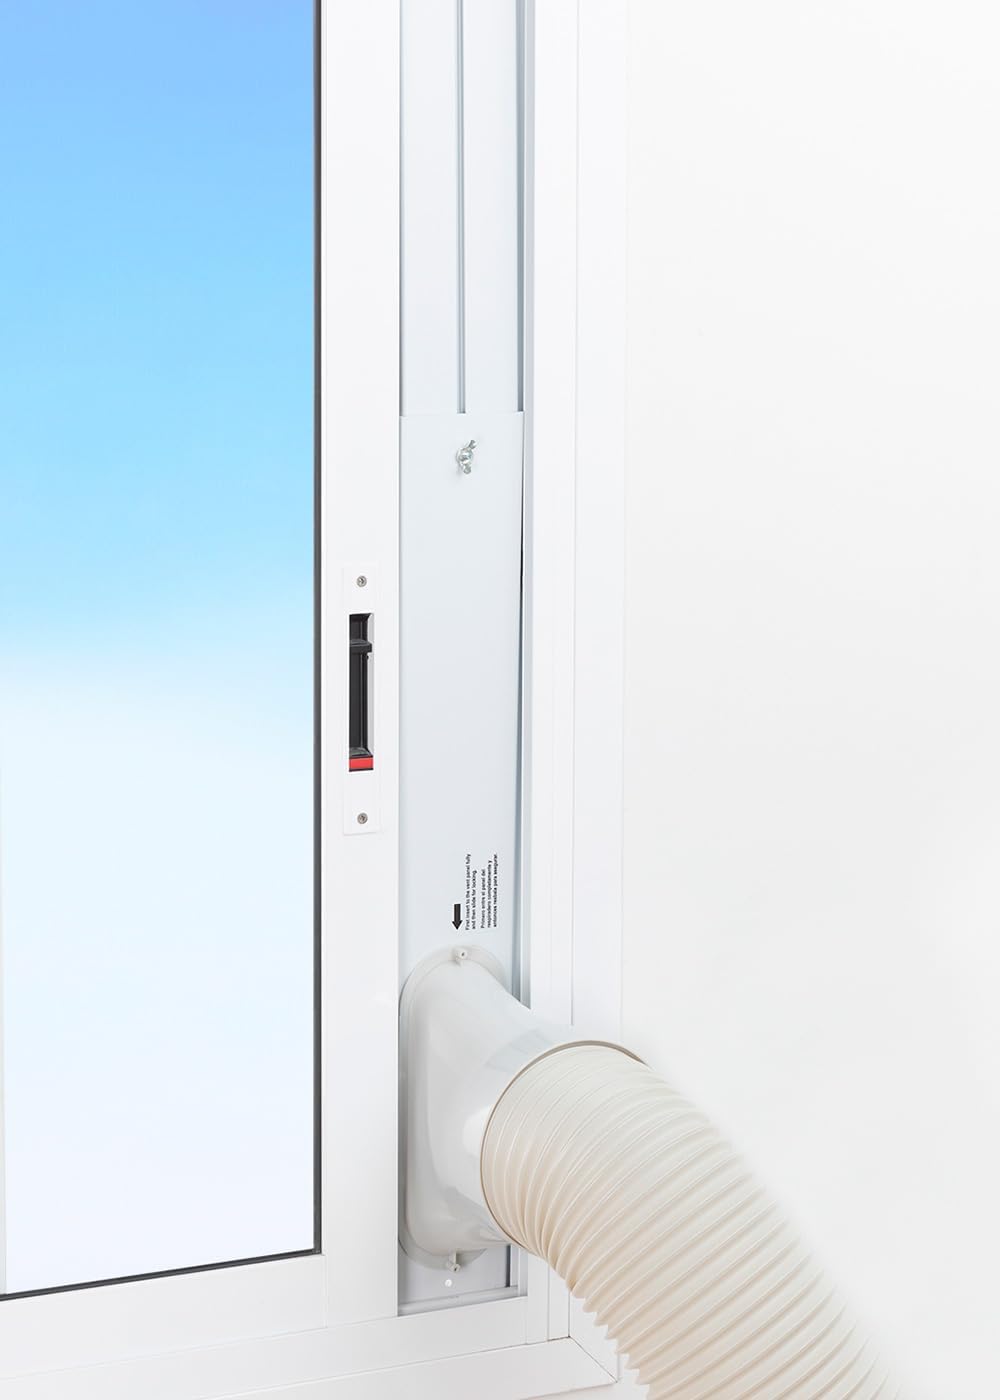
Figure 6: The window sealing kit is shown properly installed in a window frame, with the exhaust hose securely fitted into the kit's opening to vent hot air outside.
6. Awọn ilana Iṣiṣẹ
6.1 Lilo Ibi iwaju alabujuto
The control panel on top of the unit allows direct operation.
- Bọtini agbara: Tẹ lati tan-an tabi PA kuro.
- Bọtini Ipo: Cycle through Cooling, Fan, and Dehumidifier modes.
- Bọtini Iyara Fan: Adjust fan speed (Low, High).
- Awọn bọtini iwọn otutu (+/-): Adjust desired temperature in Cooling mode.
- Bọtini Aago: Set the auto-on or auto-off timer (up to 24 hours).
- Bọtini Ipo oorun: Mu ipo iṣẹ idakẹjẹ ṣiṣẹ fun lilo alẹ.
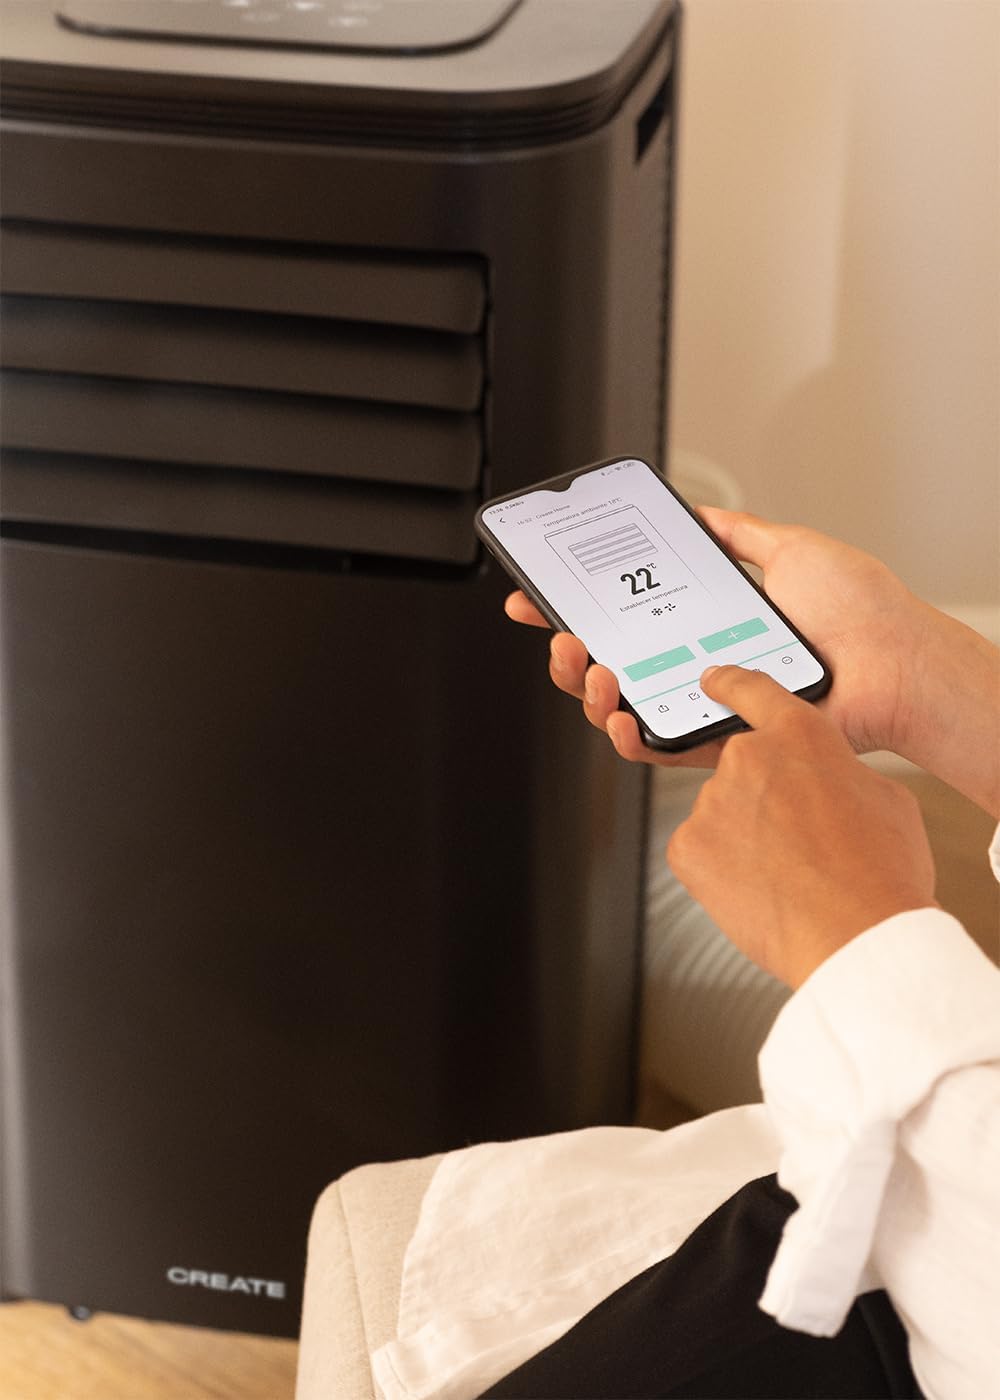
Figure 7: A user's hand interacting with the touch-sensitive control panel located on the top surface of the air conditioner, demonstrating direct manual operation.
6.2 Lilo isakoṣo latọna jijin
The remote control provides convenient operation from a distance.

Figure 8: A hand holding the dedicated remote control for the air conditioner, illustrating its use for convenient operation from a distance.
6.3 Wi-Fi ati Iṣakoso Ohun elo
Download the CREATE Home app from your smartphone's app store. Follow the in-app instructions to connect your air conditioner to your home Wi-Fi network. Once connected, you can control all functions of the unit from your smartphone, including mode selection, temperature adjustment, fan speed, and timer settings.
Figure 9: A user interacting with the mobile application on a smartphone to remotely control the air conditioner, showcasing the Wi-Fi connectivity feature.
7. Itọju
Itọju deedee n ṣe idaniloju iṣẹ ṣiṣe to dara julọ ati pe o fa igbesi aye ẹrọ rẹ gun.
7.1 Ninu Ajọ Afẹfẹ
Ajọ afẹfẹ yẹ ki o di mimọ ni gbogbo ọsẹ meji tabi diẹ sii nigbagbogbo da lori lilo ati didara afẹfẹ.
- Pa ẹyọ kuro ki o yọọ kuro lati inu iṣan agbara.
- Locate the air filter panel on the back of the unit.
- rọra yọ àlẹmọ kuro.
- Clean the filter with warm, soapy water or a vacuum cleaner. Rinse thoroughly and allow it to air dry completely before reinserting.

Figure 10: Demonstrates the process of removing the air filter from the rear of the air conditioner unit for cleaning or replacement.
7.2 Sisọ Omi
In Dehumidifier mode or high humidity conditions, the internal water tank may fill up. The unit will stop operating when the tank is full. Drain the water from the drainage port at the bottom rear of the unit.
8. Laasigbotitusita
| Isoro | Owun to le Fa | Ojutu |
|---|---|---|
| Ẹka ko ni tan-an | No power; Power cord not plugged in; Water tank full. | Ṣàyẹ̀wò ibi tí agbára ń jáde; So okùn agbára pọ̀ mọ́ ọn; Fa omi kúrò nínú ojò. |
| Unit ko itutu fe ni | Àlẹ̀mọ́ afẹ́fẹ́ dọ̀tí; Pọ́ọ̀pù èéfín kò fi sí i dáadáa; Yàrá náà tóbi jù; Àwọn ìlẹ̀kùn/fèrèsé ṣí sílẹ̀. | Clean air filter; Ensure hose is sealed; Use in recommended room size (14-25 m²); Close doors/windows. |
| Ariwo nla | Kuro ko lori kan Building dada; Idiwo ni àìpẹ. | Place on flat surface; Check for obstructions. |
| Awọn oran asopọ Wi-Fi | Incorrect Wi-Fi password; Router too far; App issues. | Verify password; Move unit closer to router; Restart app/unit. |
9. Awọn pato
| Ẹya ara ẹrọ | Sipesifikesonu |
|---|---|
| Nọmba awoṣe | 64274_145198 |
| Agbara Itutu | 9000 BTU / 2270 Watt |
| Agbara Dehumidification | 24 lita / ọjọ |
| Fife ategun | Titi di 350 m³/h |
| Niyanju Yara Iwon | 14-25 m² |
| Ariwo Ipele | 65 dB |
| Firiji | R290 (ECO-friendly) |
| Voltage | 240 folti |
| Wattage | 2600 Watt |
| Awọn iwọn (L x W x H) | 35.5 x 36.5 x 71.3 cm |
| Ohun elo | ABS |
| Agbara Agbara Kilasi | A |

Figure 11: The energy efficiency label for the CREATE SILKAIR CONNECT, indicating an A-class energy rating, 2.6 kW cooling capacity, and a noise level of 65 dB. More details can be found at eprel.ec.europa.eu/qr/1580267.
10. Atilẹyin ọja ati Support
For warranty information and technical support, please refer to the warranty card included with your product or visit the official CREATE webojula. Tọju iwe-ẹri rira rẹ bi ẹri rira.
Olupese: ṢẸDA
Olubasọrọ: Refer to CREATE's official support channels.