
Roxicosly CR1001EM
Roxicosly Loud Alarm Clock with Bed Shaker Instruction Manual
Àwòṣe: CR1001EM
1. Ọja Ipariview
The Roxicosly Loud Alarm Clock with Bed Shaker is designed to provide effective wake-up solutions for heavy sleepers, individuals who are hard of hearing, deaf, or teenagers. It features dual alarms, a large 7.5-inch LED display, a convenient USB charging port, adjustable dimmer settings, a snooze function, and battery backup for power outages. This manual provides detailed instructions for setup, operation, maintenance, and troubleshooting to ensure optimal performance of your device.
2. Alaye Aabo
- Ensure the alarm clock is connected to a stable power source (100-240V AC).
- Ma ṣe fi ẹrọ naa han si omi tabi ọrinrin pupọ.
- Avoid placing the alarm clock in direct sunlight or near heat sources.
- Use only the specified AAA 1.5V batteries for backup (not included).
- Keep out of reach of small children to prevent accidental ingestion of small parts or batteries.
- Ma ṣe gbiyanju lati tunto tabi tun ẹrọ naa funrararẹ. Kan si oṣiṣẹ iṣẹ ti o peye.
3. Package Awọn akoonu
- Roxicosly Loud Alarm Clock (Model: CR1001EM)
- Wired Bed Shaker
- Adapter agbara
- Afowoyi Olumulo (iwe-ipamọ yii)

Image: The Roxicosly Loud Alarm Clock with its bed shaker and a smartphone connected for charging.
4. Awọn ẹya Ọja
- Three Wake-up Modes: Choose between a loud buzzer, a powerful bed shaker, or a combination of both to ensure you wake up.
- Iwọn ti o le ṣatunṣe: The alarm sound volume can be adjusted to 4 levels to suit individual preferences.
- Awọn itaniji Meji: Set two independent alarms for different schedules, ideal for couples or varying routines.
- Large Snooze Button: Provides an extra 9 minutes of sleep with a simple touch.
- 7.5-inch LED Ifihan: Ultra-clear display for easy time viewing lati kan ijinna.
- 5-Level Brightness Dimmer: Adjust screen brightness to your comfort level for day or night.
- Batiri Afẹyinti: Two AAA batteries (not included) preserve time and alarm settings during power outages.
- Ibudo Ṣaja USB: A 5V/1A USB port allows convenient and safe charging of smartphones or other devices.
- 12/24H Format & DST: Easily switch between 12-hour and 24-hour time formats, and activate Daylight Saving Time (DST) function.
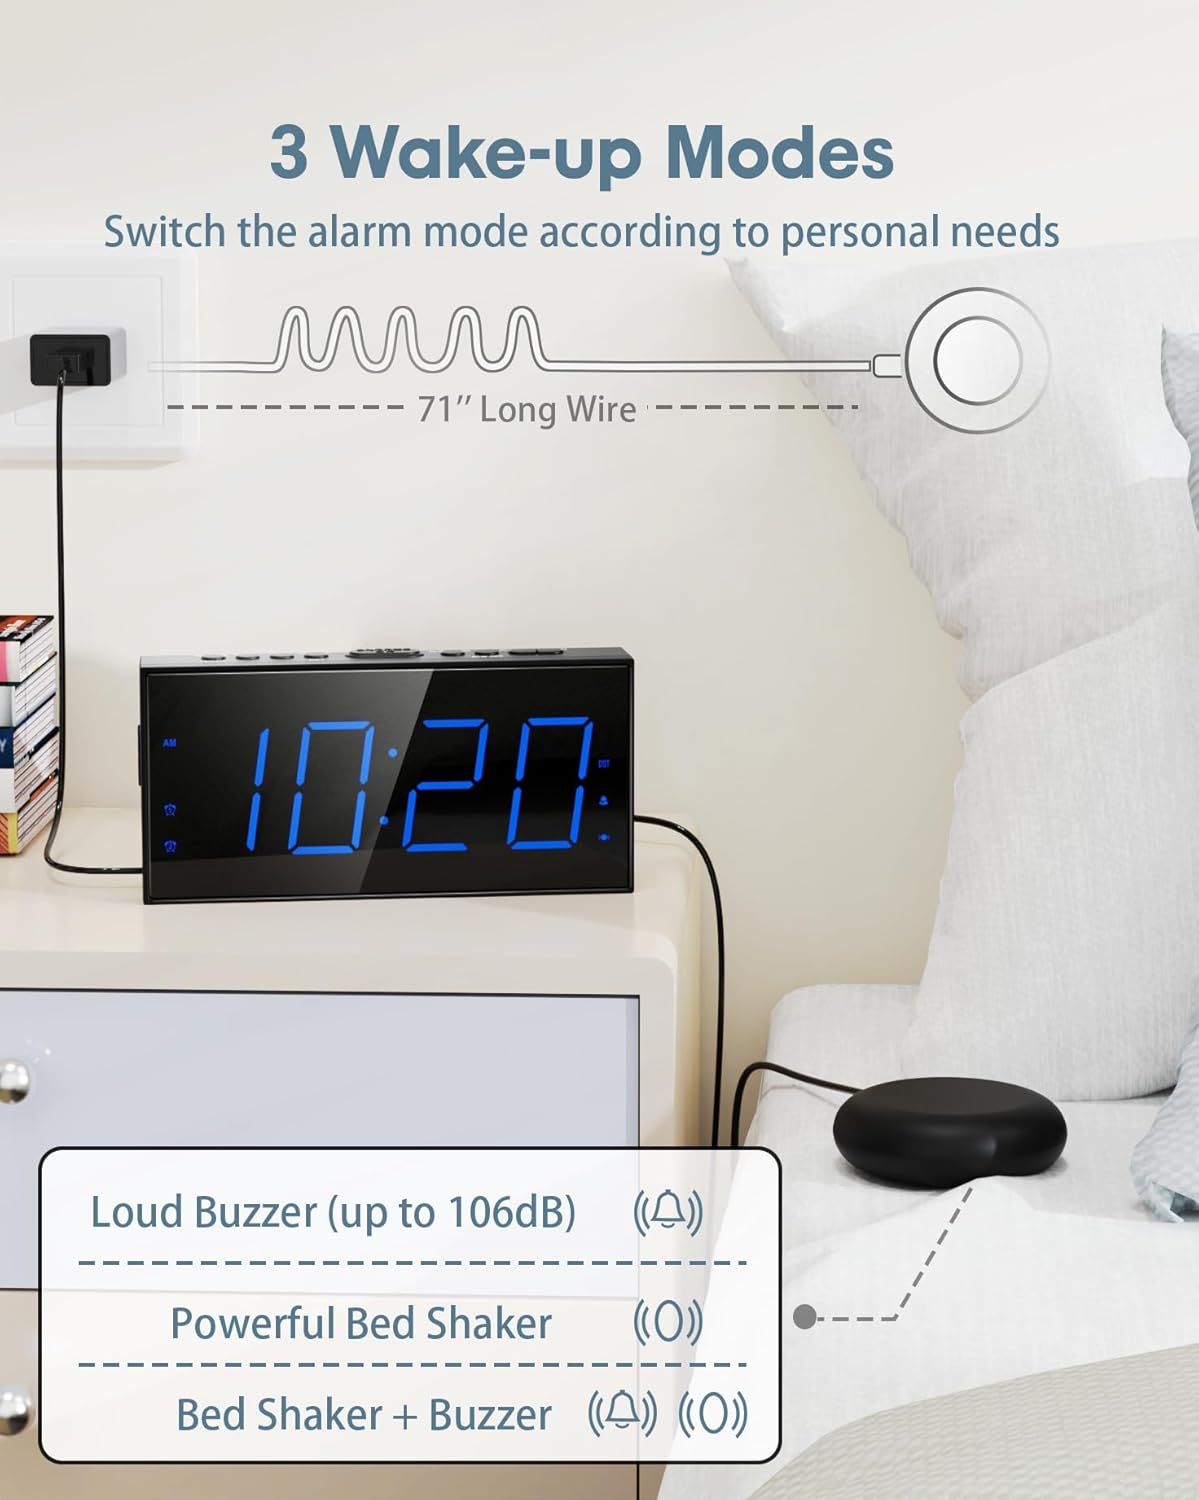
Image: Illustration of the three available wake-up modes: loud buzzer, powerful bed shaker, or a combination of both. The bed shaker has a 71-inch long wire.

Image: The alarm clock displaying dual alarm settings (AM 9:36 and PM 3:20) and indicating 5-level adjustable volume, up to 106dB.
5. Eto
- So agbara: Plug the power adapter into the DC 5V port on the back of the alarm clock and then into a standard electrical outlet.
- Fi sori ẹrọ Afẹyinti Batiri: Open the battery compartment on the back of the clock. Insert two AAA 1.5V batteries (not included), ensuring correct polarity. These batteries will maintain time and alarm settings during a power outage.
- So Ibùsùn Shaker pọ̀: Plug the wired bed shaker into the dedicated "VIB" port on the back of the alarm clock. Place the shaker under your mattress or pillow for optimal vibration.
- Ṣeto Akoko:
- Press and hold the "SET TIME" button. The hour digits will begin to flash.
- Lo awọn bọtini "HOUR" ati "MIN" lati ṣatunṣe akoko naa.
- Press "SET TIME" again to confirm and exit time setting mode.
- Ọna kika 12/24H: Press the "12/24H" button to switch between 12-hour and 24-hour time display.
- Akoko Ifipamọ Oju-ọjọ (DST): Press and hold the "DST" button to activate or deactivate the DST function.

Image: The back of the alarm clock showing the battery compartment for two AAA batteries (not included) and illustrating the 12/24H and DST time format options.
6. Awọn ilana Iṣiṣẹ
6.1. Awọn eto itaniji
- Ṣètò Ìkìlọ̀ 1/2:
- Press and hold "ALARM1" or "ALARM2" button. The hour digits will flash.
- Use "HOUR" and "MIN" buttons to set the desired alarm time.
- Press "ALARM1" or "ALARM2" again to confirm and activate the alarm. An alarm icon will appear on the display.
- Iṣẹ́ lẹ́ẹ̀kọ̀ọ̀kan: When the alarm sounds, lightly touch the large "SNOOZE/OK" button on top to temporarily silence the alarm for 9 minutes.
- Idaduro Itaniji: Press "ALARM PAUSE" to turn off the alarm for 24 hours. The alarm will reactivate the next day at the set time.
- Paa Itaniji: Press "ALARM OFF" to permanently deactivate the alarm. The alarm icon will disappear from the display.
- Ṣàtúnṣe Ìwọ̀n Ariwo: Use the "VOL+" and "VOL-" buttons on the side of the clock to adjust the buzzer volume (4 levels).
- Change Wake Mode: Press the "BUZZ/VIB" button on the side to cycle through the wake modes: Buzzer Only, Vibrator Only, or Buzzer & Vibrator. The corresponding icon will display.
Video: An official product video demonstrating the loud alarm and bed shaker features of the Roxicosly alarm clock, highlighting its effectiveness for heavy sleepers.
6.2. Ifihan Eto
- Ṣatunṣe Imọlẹ: Press the "DIMMER" button on top to cycle through 5 levels of display brightness.

Image: The alarm clock illustrating its 7.5-inch large LED display and the five adjustable brightness levels for optimal visibility.
7. USB Ngba agbara Port
The alarm clock is equipped with a 5V/1A USB charging port on the back. This allows you to conveniently charge your smartphone or other small electronic devices while the alarm clock is plugged into AC power.

Image: A person sleeping next to the alarm clock, which is charging a smartphone via its integrated USB port, highlighting the 9-minute snooze function.
8. Itọju ati Itọju
- Clean the alarm clock with a soft, dry cloth. Do not use abrasive cleaners or solvents.
- Ensure the bed shaker cable is not tangled or damaged.
- If storing the device for an extended period, remove the AAA backup batteries to prevent leakage.
9. Laasigbotitusita
| Isoro | Owun to le Fa | Ojutu |
|---|---|---|
| Alarm not sounding/vibrating | Alarm not activated; incorrect wake mode; bed shaker unplugged. | Ensure alarm is set and active. Check wake mode (Buzzer/Vibrator). Verify bed shaker is securely plugged in. |
| Ifihan naa ṣofo lakoko agbara outage | Àfikún batiri kò fi sori ẹrọ tabi ti pari. | Install fresh AAA batteries. Note: Display will be blank during power outage, but alarm settings are retained. |
| Time/settings reset after power loss | Ko si batiri ti o ti fipamọ tabi awọn batiri ti ku. | Ensure two fresh AAA batteries are installed in the battery compartment. |
| Bed shaker stopped working (as reported in some reviews) | Shaker cable damage; internal malfunction. | Check the shaker cable for visible damage. Ensure it is fully inserted into the VIB port. If the issue persists, contact customer support. |
| Display went dark (as reported in some reviews) | Power issue; internal component failure. | Ensure the power adapter is securely connected and the outlet is functional. If the issue persists, contact customer support. |
10. Awọn pato
| Ẹya ara ẹrọ | Ẹ̀kúnrẹ́rẹ́ |
|---|---|
| Brand | Roxicosly |
| Nọmba awoṣe | CR1001EM |
| Ifihan Iru | LED oni-nọmba |
| Iwọn Ifihan | 7.5 inches |
| Ọja Mefa | 6.82"W x 3.39"H |
| Orisun agbara | AC Powered (100-240V) |
| Batiri Afẹyinti | Awọn batiri 2 x AAA 1.5V (ko si ninu wọn) |
| USB Ṣaja o wu | 5V/1A |
| Bed Shaker Cable Length | 71 inches |
| Ohun elo | Ṣíṣípààkì (Acrylonitrile Butadiene Styrene) |
| Iwọn Nkan | 7 iwon |
11. Atilẹyin ọja ati Support
This Roxicosly product comes with a manufacturer's warranty. For any product-related inquiries, technical support, or warranty claims, please contact the seller, Wismco, directly through the Amazon platform or refer to the official user manual PDF available on the product page for detailed contact information.
O tun le rii iwe afọwọkọ olumulo osise PDF Nibi.
Ask a question about this manual
Ask about setup, troubleshooting, compatibility, parts, safety, or missing instructions. Manuals+ will review the question and use this page’s manual context to help answer it.