Kamẹra myFirst 3
myFirst Camera 3 Instruction Manual
Model: Camera 3
1. Ifihan
The myFirst Camera 3 is a durable and user-friendly digital camera designed specifically for children aged 3-12. It allows young photographers to capture high-quality 16MP photos and 1080HD videos, fostering creativity and exploration. This manual provides essential information for setting up, operating, maintaining, and troubleshooting your myFirst Camera 3.
2. Ohun ti o wa ninu Apoti
Please check the contents of your myFirst Camera 3 package. If any items are missing or damaged, please contact customer support.
- 1x myFirst Camera 3
- 1x Adjustable Neck Lanyard
- 1x 4GB microSD Card (pre-installed or separate)
- 1x Micro USB Ngba agbara USB
- 2x Mobile Phone Adapter (Type B & Type C)
- 1x Designated Pouch (Detachable)
- 2x Decorative Stickers
- 1x Itọsọna olumulo

Image: All items included in the myFirst Camera 3 package.
3. Eto
3.1. Ngba agbara si Kamẹra
Before first use, fully charge the camera. Connect the Micro USB charging cable to the camera's charging port and the other end to a USB power source (e.g., computer, wall adapter). The charging indicator light will show the charging status. A full charge provides hours of use thanks to the 1000mAh battery.
3.2. Fifi kaadi MicroSD sii
The camera comes with a 4GB microSD card, capable of storing up to 5000 photos. The camera supports microSD cards up to 32GB. Locate the microSD card slot, typically on the side or bottom of the camera, and gently insert the card until it clicks into place. Ensure the card is inserted in the correct orientation.
3.3. Attaching the Neck Lanyard
Attach the adjustable neck lanyard to the designated loops on the camera's silicone case. This helps prevent accidental drops and makes the camera easy for children to carry.
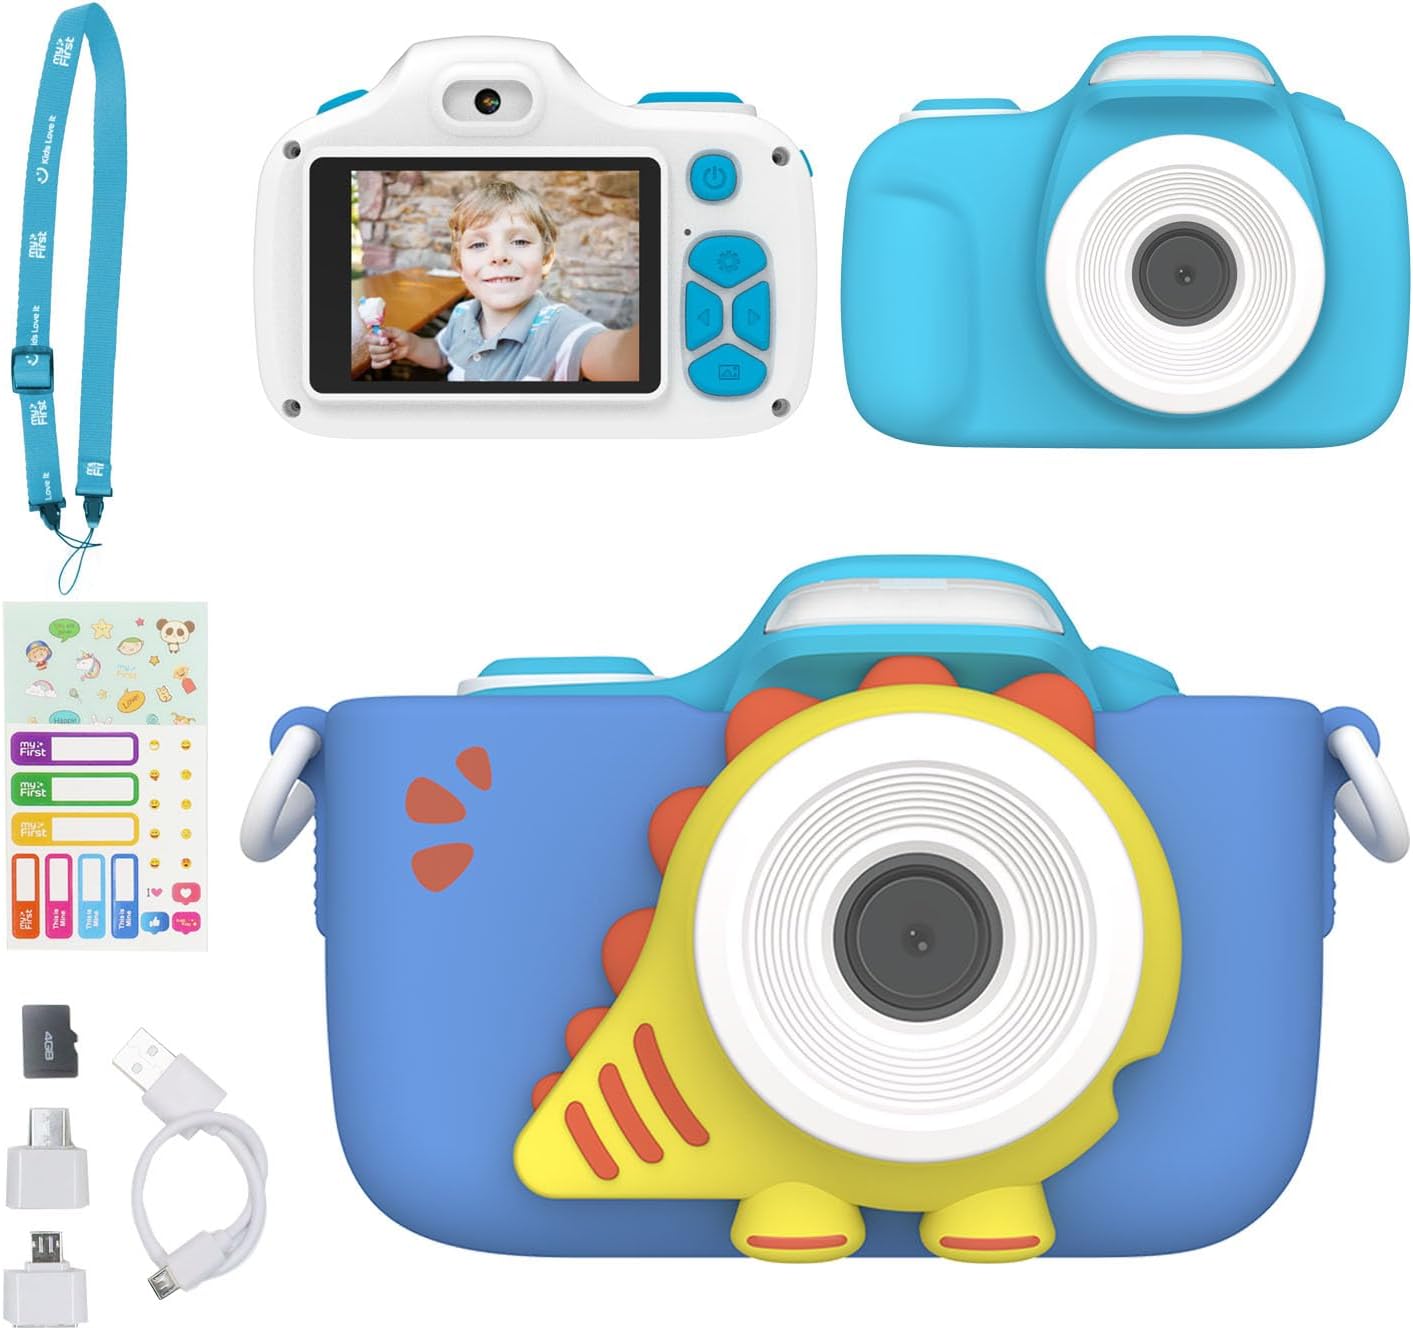
Image: The myFirst Camera 3, showcasing its protective case and lanyard.
4. Ṣiṣẹ kamẹra
4.1. Agbara Tan / Paa
Press and hold the power button (usually located on the top or back of the camera) to turn the camera on or off. The screen will light up, indicating it's ready for use.
4.2. Gbigba Awọn fọto
To take a photo, aim the camera at your subject and press the shutter button. The myFirst Camera 3 captures clear 16MP images.

Image: Demonstrating the 16MP photo and 1080P HD video capability.
4.3. Awọn fidio gbigbasilẹ
Switch to video mode (refer to the camera's on-screen icons or physical buttons) and press the shutter button to start recording. Press it again to stop. The camera records in 1080HD resolution.
4.4. Selfie & Macro Lens
The camera features both a selfie lens and a macro lens. Use the lens switcher (a dedicated button or on-screen option) to toggle between the front-facing selfie lens and the main lens. For close-up shots, activate the macro mode to capture intricate details.

Image: Exploring details with Macro Mode.

Image: Capturing stunning selfies with the built-in timer.
4.5. Using the LED Flash
The built-in LED flash helps brighten up close-up shots or photos taken in low-light conditions. Activate the flash through the camera's settings or a dedicated button.

Image: The myFirst Camera 3's built-in flashlight for brightening close-up shots.
4.6. Creative Features (Frames and Filters)
Unleash creativity with preloaded fun frames and filters. Navigate through the camera's menu to select and apply different artistic effects to your photos.

Image: Continuous shooting and creative frames and filters.
4.7. Tesiwaju ibon
The camera supports continuous shooting at 30 frames per second (fps), allowing you to capture a sequence of actions quickly.
5. Itọju
5.1. Ninu
Lo aṣọ rírọrùn tí ó gbẹ láti nu ara kámẹ́rà àti ìbòjú. Fún lẹ́ńsì náà, lo aṣọ ìfọmọ́ lẹ́ńsì pàtàkì kan. Yẹra fún lílo àwọn ohun ìfọmọ́ omi tàbí àwọn ohun èlò ìpara.
5.2. Ibi ipamọ
Store the camera in a cool, dry place away from direct sunlight and extreme temperatures. When not in use for extended periods, remove the microSD card and ensure the battery is partially charged (around 50%) to prolong its lifespan.
5.3. Itọju batiri
To maximize battery life, avoid fully discharging the battery frequently. Charge the camera regularly, even if not in constant use. If the camera will not be used for a long time, charge it every few months.
6. Laasigbotitusita
| Isoro | Owun to le Fa | Ojutu |
|---|---|---|
| Kamẹra ko ni tan. | Low battery; Camera frozen. | Charge the camera fully. If still unresponsive, try resetting by pressing the reset button (if available) or holding the power button for 10-15 seconds. |
| Batiri ko dani idiyele. | Batiri ti bajẹ; Gbigba agbara ti ko tọ. | Ensure you are using the provided charging cable and a compatible USB power source. If the issue persists after several charge cycles, the battery may need replacement. Contact customer support. |
| Ko le fi awọn fọto/fidio pamọ. | MicroSD card full or corrupted; Card not inserted correctly. | Check if the microSD card has enough free space. Reinsert the card. Try formatting the card (this will erase all data). If the problem continues, try a different compatible microSD card. |
| Aworan ti ko dara / didara fidio. | Dirty lens; Low light conditions; Incorrect settings. | Clean the camera lens. Ensure adequate lighting. Check camera settings for resolution and flash options. |
7. Awọn pato
| Ẹya ara ẹrọ | Ẹ̀kúnrẹ́rẹ́ |
|---|---|
| Brand | MyFirst |
| Orukọ awoṣe | Kamẹra myFirst 3 |
| Ipinnu sensọ Fọto | 16 MP |
| Ipinnu fidio | FHD 1080p |
| Iwon iboju | 2 inches |
| Ifihan Iru | LCD |
| Batiri Iru | Litiumu Ion (1000mAh) |
| Agbara Ibi ipamọ Iranti | Up to 32 GB (Micro SD) |
| Asopọmọra Technology | Micro USB |
| Iwọn Nkan | 80 giramu |
| Pataki Awọn ẹya ara ẹrọ | Selfie lens, Macro lens, Built-in Flashlight, Preloaded Frames/Filters, Continuous Shooting |
| Omi Resistance Ipele | Ko Omi Resistant |
8. Atilẹyin ọja ati Support
For warranty information, product support, or any inquiries, please contact myFirst customer service. You can typically find contact details on the official myFirst webojula tabi nipasẹ rẹ ra Syeed.
Visit the official myFirst store for more information: myFirst Amazon Store
Ask a question about this manual
Ask about setup, troubleshooting, compatibility, parts, safety, or missing instructions. Manuals+ will review the question and use this page’s manual context to help answer it.