1. Ifihan
Thank you for choosing the TIC-D2500 2-Input, 2-Zone, 2X300W Bridged Power Amplifier. Yi ọjọgbọn-ite amplifier is designed for reliable performance in various audio applications, featuring 8 Ohm, 4 Ohm, and 70V output capabilities, along with Crown ultra-efficient DriveCore technology. This manual provides essential information for the safe and efficient operation of your amplifier.
2. Alaye Aabo
IKILO: To reduce the risk of fire or electric shock, do not expose this equipment to rain or moisture. Do not open the casing. Tọkasi gbogbo iṣẹ si awọn oṣiṣẹ iṣẹ ti o peye.
- Ka gbogbo awọn ilana ṣaaju ṣiṣe awọn amplifier.
- Pa awọn ilana wọnyi fun itọkasi ọjọ iwaju.
- Tẹtisi gbogbo awọn ikilọ lori ọja ati ninu awọn ilana iṣẹ.
- Tẹle gbogbo awọn ilana.
- Maṣe lo ohun elo yii nitosi omi.
- Mọ pẹlu asọ gbigbẹ nikan.
- Ma ṣe dina eyikeyi awọn ṣiṣi atẹgun. Fi sori ẹrọ ni ibamu pẹlu awọn ilana ti olupese.
- Maṣe fi sori ẹrọ nitosi awọn orisun ooru gẹgẹbi awọn imooru, awọn iforukọsilẹ ooru, awọn adiro, tabi awọn ohun elo miiran (pẹlu ampliifiers) ti o gbe ooru jade.
- Ma ṣe ṣẹgun idi aabo ti polarized tabi pilogi iru ilẹ. Plọọgi polarized ni awọn abẹfẹlẹ meji pẹlu ọkan gbooro ju ekeji lọ. Plọọgi iru-ilẹ ni awọn abẹfẹlẹ meji ati prong grounding kẹta. Abẹfẹlẹ ti o gbooro tabi prong kẹta ni a pese fun aabo rẹ. Ti pulọọgi ti a pese ko ba wo inu iṣan-ọna rẹ, kan si alamọdaju kan fun rirọpo ti iṣan igba atijọ.
- Dabobo okun agbara lati ma rin lori tabi pin, ni pataki ni awọn pilogi, awọn ohun elo irọrun, ati aaye nibiti wọn ti jade kuro ninu ohun elo naa.
- Lo awọn asomọ/awọn ẹya ara ẹrọ ti olupese pato.
- Yọọ ohun elo yi nigba iji manamana tabi nigba lilo fun igba pipẹ.
- Tọkasi gbogbo iṣẹ si awọn oṣiṣẹ iṣẹ ti o peye. Iṣẹ nilo nigbati ohun elo ba ti bajẹ ni ọna eyikeyi, gẹgẹbi okun ipese agbara tabi plug ti bajẹ, omi ti ta silẹ tabi awọn nkan ti ṣubu sinu ẹrọ, ohun elo naa ti farahan si ojo tabi ọrinrin, ko ṣiṣẹ deede. , tabi ti lọ silẹ.
3. Ọja Ipariview
3.1 Igbimọ iwaju

Figure 3.1: Front Panel of the TIC-D2500 Amplifier. Shows the power switch, LCD display, control knobs for channels A and B, and navigation buttons.
- Agbara Yi pada: Yipada awọn amplifier tan tabi pa.
- CHA / CHB Level Controls: Rotary knobs to adjust the output level for Channel A and Channel B independently.
- Ifihan LCD: Shows volume in dB per channel, operating temperature, and other system information.
- Navigation Buttons (Home, Level, Type, Function, Mute): Used to navigate menus and adjust settings on the LCD display.
- TIC-D2500 Model Indicator: Displays the product model number.
3.2 ru Panel

Figure 3.2: Rear Panel of the TIC-D2500 Amplifier. Displays input/output connectors, mode switches, AC inlet, and breaker.
- Fifọ: Circuit breaker for protection.
- Wiwọle AC: Power input connector for the AC power cord.
- Speaker Outputs (CH1, CH2, BRG): Connectors for speaker cables. Supports 4Ω, 8Ω, and 70V outputs. Includes both binding posts and Speakon-style connectors.
- CH1 Input / CH2 Input (XLR): Balanced XLR input connectors for audio signals.
- CH1 Link / CH2 Link (XLR): XLR link outputs for passing the input signal to another amplifier or device.
- Mode Switches (BRG, PARALLEL, STEREO): Switches to select the amplifier's operating mode (Bridged, Parallel, or Stereo).
- HI-PASS Switches (OFF, 30Hz, 50Hz): Switches to activate high-pass filters at 30Hz or 50Hz, or disable them.
3.3 Detailed Rear Panel Connectors
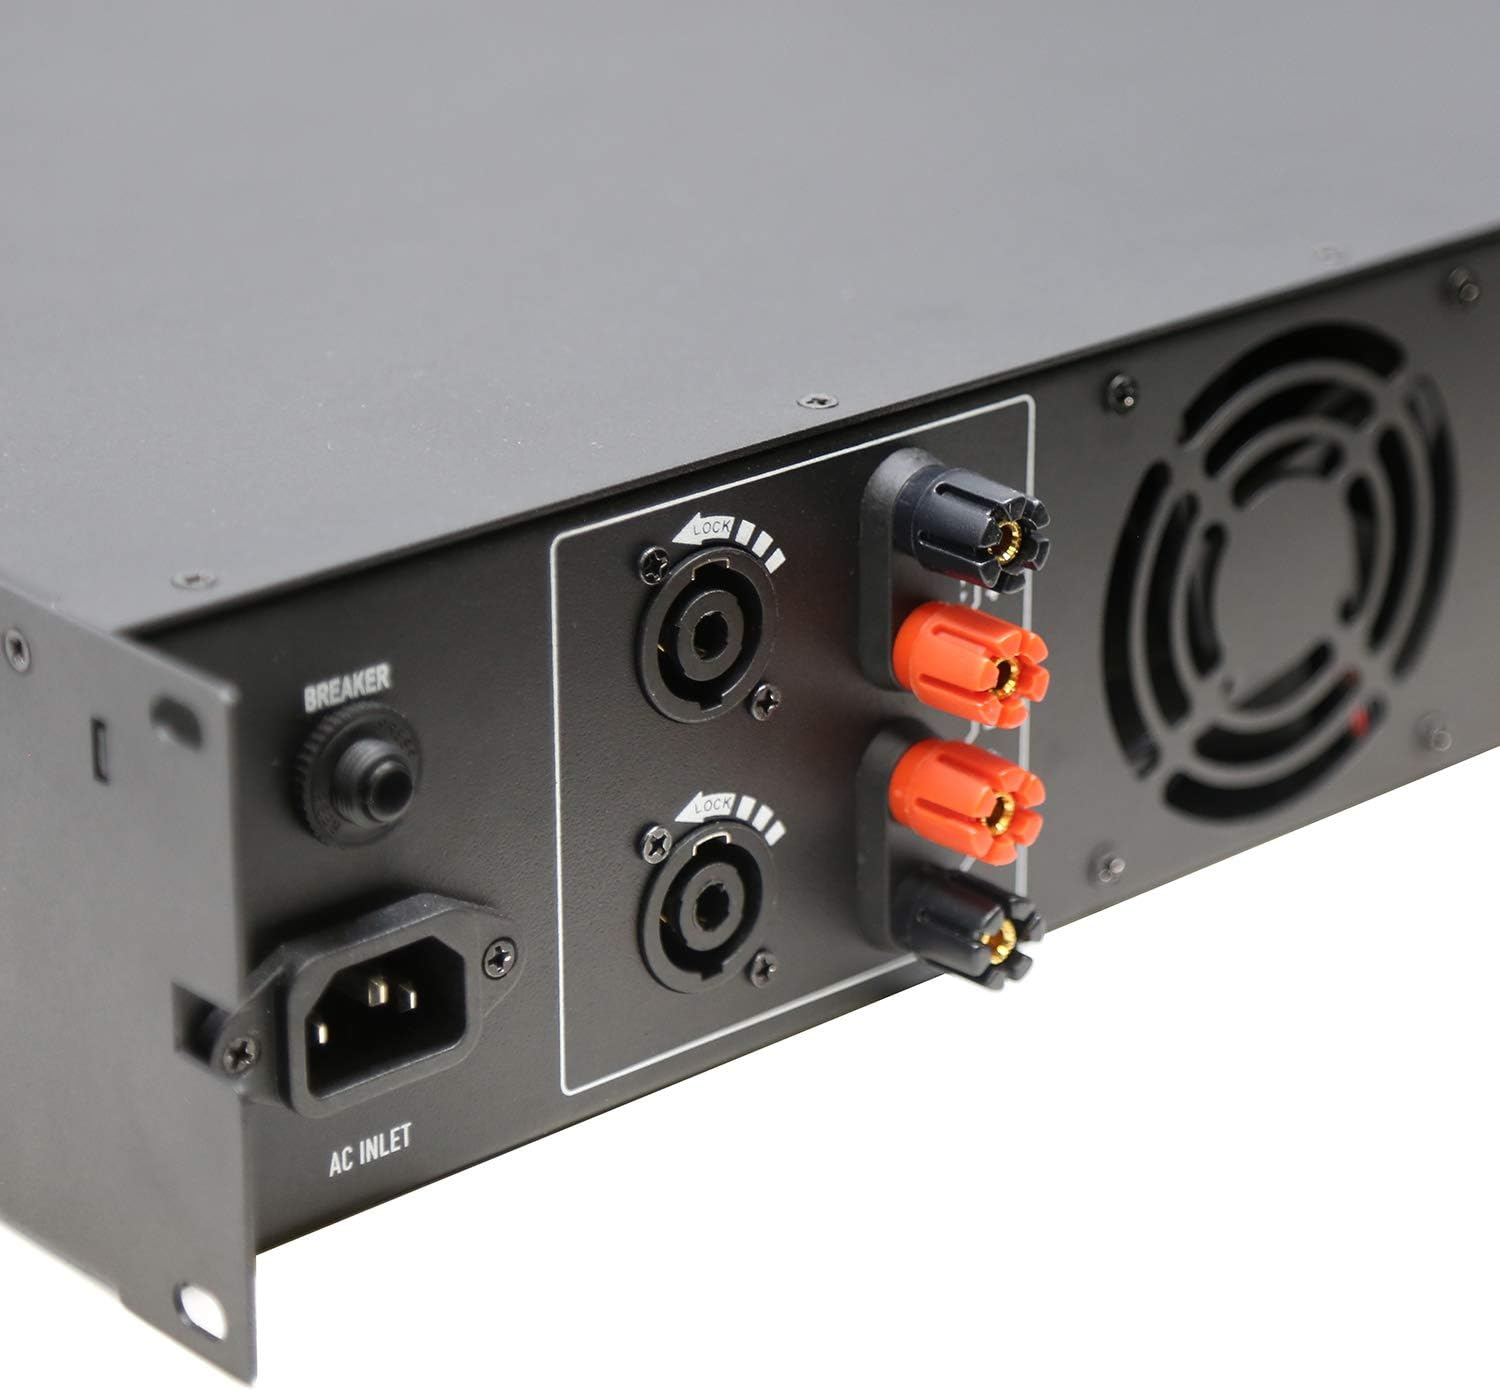
Figure 3.3: Rear Left Panel Detail. Shows the AC inlet, breaker, and speaker output terminals (binding posts and Speakon).

Figure 3.4: Rear Right Panel Detail. Shows the XLR input and link output connectors, along with the BRG/PARALLEL/STEREO and HI-PASS switches.
4. Eto
- Ibi: Rii daju pe amplifier is placed in a well-ventilated area, preferably in a standard 2U rack space. Maintain adequate clearance around the unit for airflow.
- Asopọ agbara:
- Rii daju pe ampswitch agbara lifier wa ni ipo PA.
- Connect the supplied AC power cord to the AC Inlet on the rear panel and then to a suitable grounded power outlet.
- Awọn isopọ ti nwọle:
- So orísun ohùn rẹ pọ̀ (adapọ, ṣaajuamplifier, etc.) to the CH1 INPUT and CH2 INPUT XLR connectors on the rear panel using balanced XLR cables.
- If linking to another amplifier, use the CH1 LINK and CH2 LINK XLR outputs.
- Output Connections (Speakers):
- Connect your speakers to the appropriate speaker output terminals (binding posts or Speakon) on the rear panel. Ensure correct polarity (+ to + and - to -).
- For 70V systems, ensure your speakers are compatible with 70V constant voltage systems and connect them accordingly.
- For 4Ω or 8Ω operation, ensure your speakers' impedance matches the amplifier's output capabilities for the selected mode (Stereo or Parallel).
- For Bridged mode (BRG), connect a single speaker to the designated BRG output terminals. Refer to the rear panel markings for correct connections.
- Aṣayan Ipo:
- Set the BRG/PARALLEL/STEREO switch to your desired operating mode.
- Set the HI-PASS switches according to your system requirements. "OFF" for full range, "30Hz" or "50Hz" to filter out low frequencies.
5. Awọn ilana Iṣiṣẹ
- Agbara Tan:
- Before powering on, ensure all level controls (CHA, CHB) are set to their minimum position.
- Turn on your audio source equipment first.
- Flip the Power Switch on the front panel to the ON position. The LCD display will illuminate.
- Iṣatunṣe Iwọn didun:
- Slowly increase the CHA and CHB level controls to achieve the desired output volume.
- Monitor the LCD display for volume levels (in dB) and operating temperature.
- Using the LCD Display and Navigation:
- Use the "Home", "Level", "Type", "Function", and "Mute" buttons to navigate through the amplifier's settings and monitoring options displayed on the LCD.
- Consult the on-screen menus for specific adjustments related to input sensitivity, output modes, and other advanced features.
- Agbara Pa:
- Before powering off, reduce all level controls to their minimum position.
- Pa a amplifier lilo Power Yipada.
- Turn off your audio source equipment.
6. Itọju
- Ninu: Ge asopọ na amplifier from power before cleaning. Use a soft, dry cloth to wipe down the exterior. Do not use liquid cleaners or aerosols.
- Afẹfẹ: Regularly check that ventilation openings are clear of dust and debris to ensure proper cooling.
- Awọn Isopọ USB: Periodically inspect all cable connections for secure fit and signs of wear.
- Ibi ipamọ: Ti o ba titoju awọn amplifier for an extended period, ensure it is in a cool, dry place, protected from dust and extreme temperatures.
7. Laasigbotitusita
| Isoro | Owun to le Fa | Ojutu |
|---|---|---|
| Ko si agbara | Power cord disconnected; Power switch off; Circuit breaker tripped; Power outlet issue. | Check power cord connection; Ensure power switch is ON; Reset circuit breaker; Test power outlet with another device. |
| Ko si ohun jade | Input cables disconnected; Speaker cables disconnected or incorrect polarity; Amplifier level controls at minimum; Incorrect mode selection; Audio source issue. | Check all input and output cable connections; Verify speaker polarity; Increase CHA/CHB level controls; Ensure correct BRG/PARALLEL/STEREO mode is selected; Check audio source. |
| Ohun ti o daru | Input signal too high (clipping); Amplifier overloaded; Speaker impedance mismatch; Faulty cables. | Reduce input signal level from source; Ensure speakers match amplifier impedance; Check speaker connections and cables; Reduce amplifier o wu ipele. |
| Gbigbona pupọ | Blocked ventilation; Excessive load; Prolonged high-level operation. | Rii daju dara fentilesonu ni ayika amplifier; Reduce load or operating level; Allow amplifier lati dara si isalẹ. |
If the problem persists after attempting these solutions, please contact qualified service personnel or TIC Audio support.
8. Awọn pato
| Ẹya ara ẹrọ | Ẹ̀kúnrẹ́rẹ́ |
|---|---|
| Awoṣe | D2500 |
| Agbara Ijade (8Ω) | 300 W x2 |
| Imudaniloju ijade | 4Ω / 8Ω / 70V Stable |
| Amplifier Iru | Class D with Crown DriveCore technology |
| Idahun Igbohunsafẹfẹ | 20Hz - 20KHz (+/-3dB) |
| Input Connectors | 2 x 3-pin XLR (balanced signal input) |
| Awọn asopọ ti o wu | Speaker (x2) - Binding Posts & Speakon-style |
| Agbeko Space | 2U |
| Awọn iwọn (W x D x H) | 483 x 257 x 88.8mm (19 x 10.1 x 3.5 inches approx.) |
| Iwọn Nkan | 17.27 poun (7.83 kg) |
| Orisun agbara | AC |
9. Atilẹyin ọja ati Support
For warranty information, technical support, or service inquiries, please contact TIC Audio directly. Refer to the official TIC Audio webAaye tabi iwe rira rẹ fun awọn alaye olubasọrọ tuntun ati awọn ofin atilẹyin ọja.
This product may be eligible for extended protection plans. Please refer to your retailer for details on available protection plans.
Olupese: TIC Audio