Meross MSS560
Meross Smart Dimmer Switch (MSS560) User Manual
Àwòṣe: MSS560
Ọrọ Iṣaaju
The Meross Smart Dimmer Switch (MSS560) is designed to provide intelligent control over your lighting. This single-pole dimmer switch allows you to remotely control, dim, and schedule your lights using the Meross app, Apple HomeKit, Amazon Alexa, or Google Assistant. It requires a neutral wire for installation and operates on a 2.4GHz Wi-Fi network.
Alaye Aabo
- Ti beere fun Waya Ailopin: Ensure your electrical box has a neutral wire (typically white) before installation. If unsure, consult a qualified electrician.
- Pa a ṣaaju fifi sori: Always turn off power at the circuit breaker before installing or servicing the switch to prevent electrical shock.
- Single Pole Setup Only: This switch is designed for single pole configurations only. It is not compatible with 3-way or multi-way switch setups.
- Ibamu Boolubu: Works with non-smart dimming bulbs. Maximum wattage: 400W for incandescent (INC), 150W for CFL & LED bulbs. Do not use with smart bulbs.
- Ibeere Wi-Fi: Supports 2.4GHz Wi-Fi networks only. 5GHz Wi-Fi is not supported. No hub is required.
- Ohun elo Idaduro Ina: A fi ohun èlò PC+ABS tí ó lè dènà iná ṣe ilé ìyípadà náà fún ààbò.
- Idaabobo Apọju: Certified by FCC/ETL, the device includes protection against electrical overload.
Ohun ti o wa ninu Apoti
- Meross Smart Dimmer Switch (MSS560)
- Awọn ọna fifi sori Itọsọna
- Awọn eso Waya
- Iṣagbesori skru
- Faceplate (standard size)
Ṣeto
Atokọ iṣaju fifi sori ẹrọ
- Verify your electrical box has a neutral wire (white).
- Ensure you have a 2.4GHz Wi-Fi network.
- Confirm your setup is single pole (not 3-way).
- Check bulb compatibility (non-smart dimmable LED/CFL/INC).

Image: Diagram illustrating the necessity of a neutral wire and compatible bulb types (LED, CFL, INC) with wattage limits, and incompatibility with smart bulbs.

Image: Important notes on switch compatibility, including single pole setup, 2.4GHz Wi-Fi, neutral wire, and non-smart dimming bulb support.
Hardware fifi sori
- Pa Agbara: Wa ibi tí ẹ̀rọ ìdènà rẹ wà kí o sì pa agbára sí síṣí tí o ń yí padà. Rí i dájú pé agbára ti pa nípa lílo vol kan.tage idanwo.
- Yọ Yipada atijọ kuro: Carefully remove the faceplate and unscrew the existing switch from the electrical box. Pull the switch outward without touching any wires.
- Ṣe idanimọ Awọn okun: Identify the Live (black/red), Load (brown/black), Neutral (white), and Ground (green/bare copper) wires. Label them if necessary.
- So Yipada Tuntun Sopọ: Use the provided wire nuts to connect the corresponding wires of the Meross Smart Dimmer Switch to your home's electrical wires. Ensure all connections are secure.
- Yipada Ailewu: Carefully push the wires and the new switch into the electrical box. Screw the switch to the box and attach the faceplate.
- Pada Agbara pada: Turn on the power at your circuit breaker.
Video: Official Meross guide on how to install the HomeKit smart dimmer switch, demonstrating the wiring process and safety precautions.
App Setup & Pairing
- Ṣe igbasilẹ ohun elo Meross: Download the Meross app from the App Store or Google Play.
- Fi ẹrọ kun: Open the Meross app, tap the '+' icon to add a new device, and select the Smart Dimmer Switch. Follow the in-app instructions.
- Sopọ si Wi-Fi: Connect the switch to your 2.4GHz Wi-Fi network.
- HomeKit Setup (Optional): If using Apple HomeKit, scan the HomeKit setup code located on the device or its packaging. You may need to manually enter the 8-digit code.
- Calibrate Dimming Range: Use the app to set the maximum and minimum light levels for optimal dimming performance with your specific bulbs.
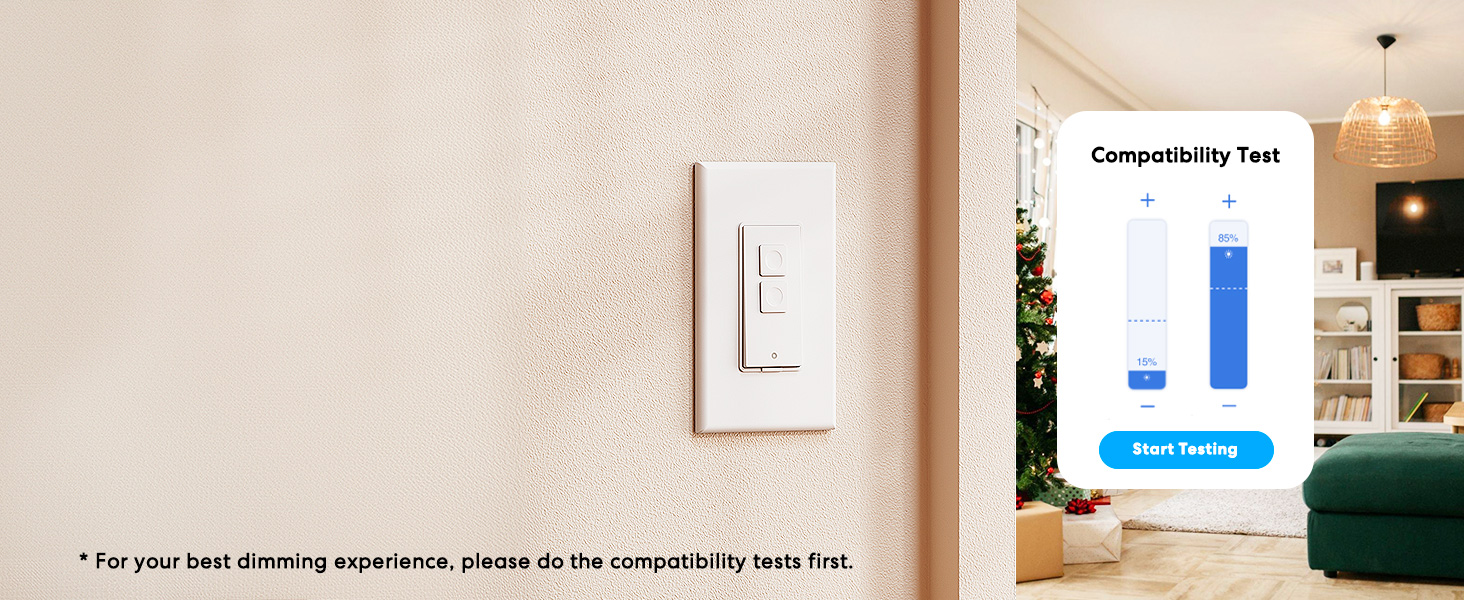
Image: Meross app interface demonstrating the dimming compatibility test to optimize light levels.
Awọn ilana Iṣiṣẹ
Iṣakoso Afowoyi
The Meross Smart Dimmer Switch features physical buttons for direct control:
- Bọtini Tan/Pa: Press the main button to turn lights on or off.
- Àwọn bọ́tìnì dídín: Use the smaller up/down buttons to adjust brightness levels.
App Iṣakoso
Control your lights from anywhere with internet access using the Meross app:
- Titan/Pa a latọna jijin: Tap the switch icon in the app to toggle lights.
- Dimming: Use the slider in the app to precisely adjust brightness from 0% to 100%.

Image: A user controlling lights remotely via the Meross app on a smartphone.
Iṣakoso ohun
The Meross Smart Dimmer Switch is compatible with leading voice assistants:
- Apple HomeKit/Siri: Say "Hey Siri, turn on the light" or "Hey Siri, dim the light to 50%".
- Amazon Alexa: Say "Alexa, turn on the light" or "Alexa, dim the light to 20%".
- Oluranlọwọ Google: Say "Hey Google, turn on the light" or "Hey Google, dim the light to 90%".

Image: Visual representation of voice commands for Siri, Alexa, and Google Assistant to control light brightness.
Scheduling & Scenes
Automate your lighting to suit your lifestyle:
- Awọn iṣeto: Set specific times for lights to turn on/off or dim automatically. Supports sunrise and sunset settings.
- Awọn iwoye: Create custom scenes for different moods or activities (e.g., "Movie Night" with dimmed lights).

Image: Meross app interface displaying options for setting scenes, timers, and schedules for automated lighting control.
Itoju
- Ninu: Wipe the switch and faceplate with a soft, dry cloth. Do not use liquid cleaners or aerosols.
- Awọn imudojuiwọn famuwia: Regularly check the Meross app for firmware updates to ensure optimal performance and security.
Laasigbotitusita
- Yipada Ko Dahun: If the switch is unresponsive or the indicator light is red, try pressing the small power reset button located at the bottom of the switch.
- Awọn ọran Isopọ Wi-Fi: Ensure your smartphone is connected to a 2.4GHz Wi-Fi network during setup. If the switch loses connection, verify your router is functioning correctly and the switch is within range.
- Awọn iṣoro Dimming: If lights flicker or do not dim correctly, re-calibrate the dimming range in the Meross app. Ensure you are using compatible non-smart dimmable bulbs.
- HomeKit Remote Control: For remote control via HomeKit, an additional networked Apple device (HomePod, Apple TV 4K/HD, or iPad) must be set up as a HomeKit bridge and remain online.
Awọn pato
| Ẹya ara ẹrọ | Sipesifikesonu |
|---|---|
| Ipo Isẹ | TAN, PAA |
| Ti isiyi Rating | 4 Amps |
| Awọn ọna Voltage | 120 Volts |
| Olubasọrọ Iru | Ṣii ni deede |
| Asopọmọra Iru | Clamp |
| Ebute | Abẹfẹlẹ |
| Awọn Iwọn Nkan (L x W x H) | 4.7 x 2.8 x 1.5 inches |
| Circuit Iru | Ọ̀nà kan (Ọ̀pá kan) |
| Actuator Iru | Titari Bọtini |
| Ohun elo olubasọrọ | Ejò |
| International Idaabobo Rating | IP00 |
| Nọmba ti Awọn ipo | 1 |
| Oke otutu Rating | Awọn iwọn Celsius 40 |
| Adarí Iru | Amazon Alexa, Apple HomeKit, Google Assistant |
| Ọna Iṣakoso | Ohun, App |
| Ilana Asopọmọra | Wi-Fi (2.4GHz nikan) |
| Àwọ̀ | Funfun |
| Wattage | 400 watts (INC), 150 watts (CFL & LED) |
| Ohun elo | Plastic (PC+ABS fire-retardant) |
Atilẹyin ọja ati Support
Atilẹyin ọja
The Meross Smart Dimmer Switch typically comes with a 1-year warranty. Please refer to your product packaging or the Meross webAaye fun pato awọn ofin ati ipo atilẹyin ọja.
Atilẹyin
If you have any questions regarding your switch type, installation, or Wi-Fi connections, please contact Meross customer support. You can usually find contact information within the Meross app or on the official Meross webojula.
Alaye ni Afikun
Fidio: Ipariview of Meross smart home products, showcasing various features and benefits of integrating smart devices into your home.
Ask a question about this manual
Ask about setup, troubleshooting, compatibility, parts, safety, or missing instructions. Manuals+ will review the question and use this page’s manual context to help answer it.