Tẹra 1100D
Tera Mini 1D 2D QR Wireless Barcode Scanner
Model: 1100D - User Manual
1. Ifihan ati Loriview
The Tera Mini 1D 2D QR Wireless Barcode Scanner is a compact, robust, and versatile device designed for efficient barcode data collection. Its IP66 waterproof and dustproof rating ensures durability in various environments. With multiple connection options and support for a wide range of barcode types, this scanner is suitable for diverse applications.

Figure 1.1: Tera Mini 1100D Barcode Scanner and accessories.
2. Package Awọn akoonu
Jọwọ rii daju pe gbogbo awọn nkan wa ninu package:
- Ayẹwo kooduopo x1
- Okun USB x1
- Dongle x1
- User Manual x1 (this document)
3. Ọja Awọn ẹya ara ẹrọ ati irinše
The Tera Mini 1100D is designed with user convenience and durability in mind. Key components and features include:
-
Silicone Button: Provides a soft and smooth scanning experience.

Figure 3.1: Scanner components including the silicone button and port plug.
- Imọlẹ Atọka: Provides visual feedback on scanner status.
-
Waterproof Anti-Dust Silicone Port Plug: Ensures better performance in various working conditions by protecting the charging port.

Figure 3.2: Detail of the waterproof silicone port plug.
-
Itaniji Gbigbọn: Provides tactile feedback when a barcode is detected, useful for quiet environments.
Figure 3.3: Vibration alert functionality.
-
Iwapọ ati Apẹrẹ iwuwo fẹẹrẹ: Easily fits into a pocket for portability.

Figure 3.4: Scanner dimensions and portability.
4. Eto
The Tera Mini 1100D offers three connection methods:
-
Asopọ Bluetooth:
To connect via Bluetooth, ensure your device's Bluetooth is enabled. Scan the Bluetooth pairing barcode (usually found in the full user manual or quick start guide) with the scanner. The scanner will then appear in your device's Bluetooth settings for pairing.
-
2.4GHz Asopọ Alailowaya:
Insert the provided 2.4G USB dongle into a USB port on your computer. The scanner will automatically connect to the dongle. This mode offers a transmission distance of up to 656ft in barrier-free environments and 98ft with obstacles.
-
Asopọ okun USB:
Connect the scanner directly to your computer using the provided USB cable. The scanner will function as a wired device and also charge simultaneously.

Figure 4.1: Three-in-one connection modes.
5. Awọn ọna ṣiṣe
The scanner supports different operating and data upload modes to suit various workflows:
-
Awọn ọna Igbesoke Data:
- Ipo Ikojọpọ lẹsẹkẹsẹ: Barcodes are uploaded directly to your connected device immediately after scanning.
- Ipo Ipamọ: Scan and store up to 10,000 barcodes internally. Data can be uploaded to a computer later when available.

Figure 5.1: Data upload modes.
-
Awọn ọna Ṣiṣayẹwo:
- Ipo okunfa bọtini: Scan a barcode by pressing the trigger button for each scan.
- Lemọlemọfún Ipo: The scanner continuously emits its scan beam, allowing for rapid scanning without repeatedly pressing the trigger.

Figure 5.2: Scanning modes.
6. Gbigba agbara
To charge the Tera Mini 1100D, use the provided USB cable. Connect it to a standard USB power source. Observe the following charging guidelines:
- Gbigba agbara niyanju lọwọlọwọ: 5V/1A.
- O pọju Ngba agbara lọwọlọwọ: 5V/1.2A.
- Pataki: Do KO use quick charge adapters or USB Power Delivery (USB PD) standard power adapters and data cables to charge this scanner. Use only the original USB cable included in the package for optimal charging and to prevent damage.
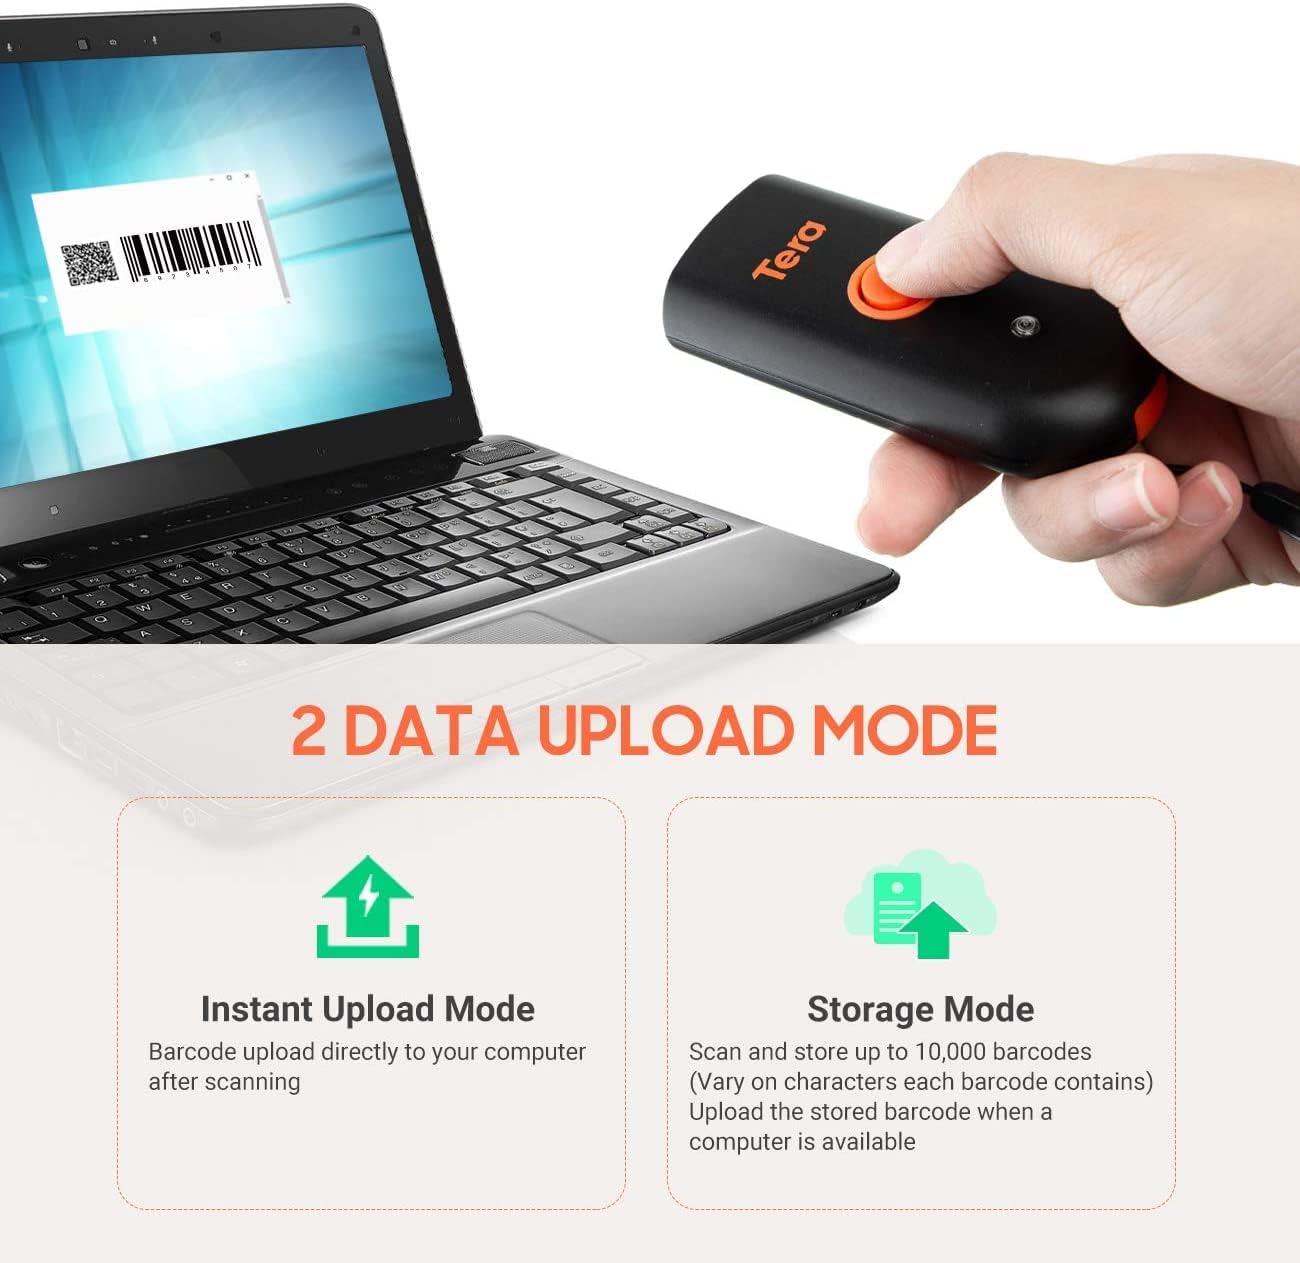
Figure 6.1: Charging specifications and warnings.
7. Ibamu
The Tera Mini 1100D barcode scanner is compatible with a wide range of devices and operating systems:
- Awọn ẹrọ ibaramu: Desktop computers, laptops, smartphones, tablets.
- Awọn ọna ṣiṣe ibaramu: Windows (11/10/8/7/XP), Mac OS, iOS, Android, Linux.
- Akiyesi: This scanner is kii ṣe compatible with Square POS systems.

Figure 7.1: Device and system compatibility.
8. Scanning Capabilities
The Tera Mini 1100D is capable of reading both digital and printed 1D, 2D, and QR barcode symbologies. It features a global shutter for fast and accurate decoding performance.
- 1D Decode Capability: Codabar, Code 11, Code93, MSI, Code 128, UCC/EAN-128, Code 39, EAN-8, EAN-13, UPC-A, ISBN, Industrial 25, Interleaved 25, Standard 25, 2/5 Matrix.
- 2D Decode Capability: QR, PDF417, Data Matrix, Aztec code, Maxi Code.
- The scanner supports reading barcodes directly from computer screens and mobile phones.
- It also supports adding time prefixes or suffixes to scanned data.

Figure 8.1: 1D, 2D, and QR code readability.
Figure 8.2: Reading barcodes from screens.
Figure 8.3: Time prefix/suffix support.
9. Awọn Eto To ti ni ilọsiwaju
The scanner can be configured for various advanced functionalities by scanning specific setup barcodes (refer to the comprehensive user manual for all configuration barcodes):
-
Adding or Hiding Digits: Customize scanned data by adding or removing specific digits from the barcode output.

Figure 9.1: Customizing barcode output.
-
Atilẹyin Ọpọ Ede: Configure the scanner to support various keyboard layouts for different languages, including English, Spanish, German, Japanese, French, and Italian.

Figure 9.2: Multi-language keyboard support.
10. Awọn pato
| Ẹya ara ẹrọ | Ẹ̀kúnrẹ́rẹ́ |
|---|---|
| Ọja Mefa | 3.43"D x 1.57"W x 0.79"H (87 x 40 x 20 mm) |
| Iwọn Nkan | 5.3 iwon (150g) |
| Asopọmọra Technology | 2.4G Alailowaya, Bluetooth, okun USB |
| Orisun agbara | Corded Electric (Internal Battery) |
| Awọn ẹrọ ibaramu | Ojú-iṣẹ, Kọǹpútà alágbèéká, Foonuiyara, Tabulẹti |
| Olupese | Tẹra |
| IP Rating | IP66 (Mabomire & Ko eruku) |

Figure 10.1: IP66 Waterproof and Dustproof design.
11. Itọju
Itọju to peye ṣe idaniloju igbesi aye gigun ati iṣẹ to dara julọ ti ọlọjẹ rẹ:
- Ninu: Use a soft, dry cloth to clean the scanner's exterior. For stubborn dirt, a slightly damp cloth can be used, but ensure no moisture enters the ports.
- Ibi ipamọ: Tọ́jú ẹ̀rọ ìwádìí náà sí ibi tí ó tutù tí ó sì gbẹ, tí kò sí ìmọ́lẹ̀ oòrùn tààrà àti igbóná tó le koko.
- Idaabobo ibudo: Always ensure the silicone port plug is securely in place when the USB cable is not connected to maintain its waterproof and dustproof integrity.
- Itọju Batiri: Avoid fully discharging the battery frequently. Charge the scanner regularly, especially if it will be stored for an extended period.
12. Laasigbotitusita
If you encounter issues with your Tera Mini 1100D scanner, please refer to the following common troubleshooting steps:
-
Scanker Kò Sopọ̀ Mọ́:
- Rii daju pe scanner ti gba agbara ni kikun.
- Verify the correct connection mode (Bluetooth, 2.4G, or USB) is selected and properly set up.
- For Bluetooth, ensure your host device's Bluetooth is on and the scanner is in pairing mode.
- Fún 2.4G alailowaya, rí i dájú pé kọ̀ǹpútà rẹ ti fi USB dongle náà sí i láìléwu àti pé ó dá a mọ̀.
- Gbiyanju lati tun bẹrẹ ẹrọ ati ẹrọ agbalejo naa.
-
A ko le ṣe ayẹwo awọn koodu barcode:
- Rí i dájú pé ẹ̀rọ ìṣiṣẹ́ náà ti wà lórí agbára àti pé ó ti so pọ̀.
- Check if the barcode is damaged or poorly printed.
- Adjust the scanning distance and angle. The scanner works best within 2 to 16 inches.
- Ensure there is sufficient lighting for the barcode to be read.
- Verify that the barcode type is supported by the scanner (refer to Section 8).
- If scanning from a screen, ensure the screen brightness is adequate and there is no glare.
-
Data Not Uploading Correctly:
- Confirm the correct data upload mode (Instant or Storage) is selected.
- If using Storage Mode, ensure you have initiated the upload process to transfer stored data.
- Check for any software or driver issues on your host device.
-
Batiri Sisan Ni kiakia:
- Rí i dájú pé ẹ̀rọ ìṣiṣẹ́ náà ti gba agbára tán kí ó tó lò ó.
- Reduce continuous scanning if not necessary, as this consumes more power.
- Check for any background processes or settings that might be keeping the scanner active.
13. Official ọja Video
Watch the official product video for a visual guide on the Tera Pro 1100D Waterproof Mini Barcode Scanner's features and capabilities.
Video 13.1: Tera Pro 1100D Waterproof Mini Barcode Scanner Overview.
14. Atilẹyin ọja ati Support
For warranty information, technical support, or further assistance, please contact Tera customer service through the official website or your point of purchase. Keep your purchase receipt as proof of purchase.
A detailed PDF user manual is also available for download: Ṣe igbasilẹ Itọsọna olumulo (PDF)
Ask a question about this manual
Ask about setup, troubleshooting, compatibility, parts, safety, or missing instructions. Manuals+ will review the question and use this page’s manual context to help answer it.