
Ọrọ Iṣaaju
This manual provides comprehensive instructions for the Vivitar Podcast and Social Media Microphone MIC918. This high-quality condenser microphone is designed for clear audio capture for various applications, including podcasting, live streaming, gaming, voice-overs, and vocal recording. It features a simple plug-and-play USB connection, integrated volume control, and a stable tripod stand for optimal positioning.
Alaye Aabo
- Má ṣe fi gbohungbohun náà sí omi tàbí ọrinrin tó pọ̀ jù.
- Yẹra fún àwọn iwọn otutu tó le koko tàbí oòrùn tààrà.
- Ma ṣe gbiyanju lati tu tabi yi gbohungbohun pada. Eyi yoo sọ atilẹyin ọja di ofo.
- Jeki gbohungbohun kuro lati awọn aaye oofa to lagbara.
- Lo asọ ti o tutu nikan fun mimọ.
Ọja Pariview
Package Awọn akoonu
- Vivitar MIC918 Microphone Unit
- Duro Tripod
- Integrated USB Connection Cable
Microphone Components
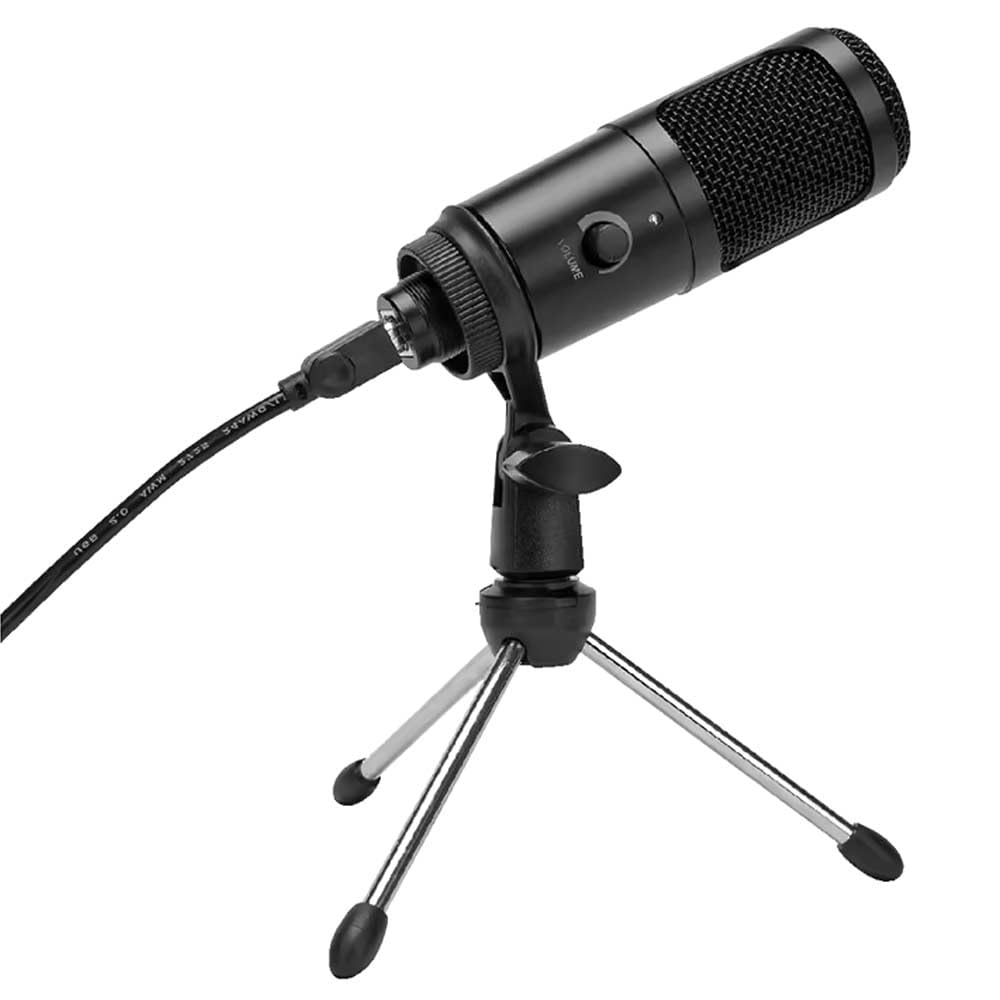
Nọmba 1: Vivitar MIC918 Microphone unit attached to its tripod stand, showing the integrated USB cable.

Nọmba 2: Apa view of the Vivitar MIC918 Microphone, highlighting the volume control knob and the Vivitar brand logo.
The microphone unit features a durable metal construction. The front side includes a volume control knob for easy audio level adjustments. The microphone is designed with a unidirectional polar pattern to focus on sound directly in front of it, reducing background noise.
Ṣeto
Nsopọ Gbohungbohun
- Ṣe apejọ Iduro naa: If not already assembled, unfold the tripod stand and ensure it is stable on a flat surface. Securely attach the microphone unit to the stand's mounting point. The rotating shaft ring allows for angle adjustment.
- Sopọ si Ẹrọ: Plug the integrated USB cable from the microphone into an available USB port on your computer, laptop, or compatible gaming console.
- Pulọọgi ati Ṣiṣẹ: The Vivitar MIC918 is a plug-and-play device. Your operating system (Windows, macOS, etc.) should automatically detect and install the necessary drivers. No additional software installation is typically required.
- Yan gẹgẹbi Ẹrọ Agbewọle: After connecting, navigate to your device's sound settings or the audio settings within your recording/streaming software. Select the "Vivitar MIC918" or similar USB audio device as your primary input (microphone) device.
Ṣiṣẹ
Siṣàtúnṣe iwọn didun
The microphone features a built-in volume control knob located on its side (refer to Figure 2). Rotate this knob clockwise to increase the microphone's input sensitivity (volume) and counter-clockwise to decrease it. Adjust this to achieve the desired recording level without distortion.
Gbigbe Gbohungbohun
For optimal audio capture, position the microphone directly in front of the sound source (e.g., your mouth for speaking or singing). The tilting tripod stand allows you to adjust the microphone's angle to best suit your needs. Due to its unidirectional polar pattern, the microphone is most sensitive to sounds coming from the front and less sensitive to sounds from the sides or rear, helping to minimize ambient noise.
Itoju
- Ninu: Use a soft, dry, lint-free cloth to wipe the microphone's exterior. Do not use liquid cleaners, aerosols, or solvents.
- Ibi ipamọ: Nigbati o ko ba si ni lilo, tọju gbohungbohun si mimọ, aaye gbigbẹ, kuro lati eruku ati awọn iwọn otutu to gaju.
- Mimu: Handle the microphone with care. Avoid dropping it or subjecting it to strong impacts.
Laasigbotitusita
| Isoro | Owun to le Fa | Ojutu |
|---|---|---|
| Kò sí ìró tí a lè gbọ́ láti inú gbohùngbohùn. | Gbohungbohun ko so pọ mọ daradara. Incorrect input device selected. Iwọn gbohungbohun kere ju. | Ensure USB cable is securely plugged into both the microphone and the device. Verify that "Vivitar MIC918" is selected as the input device in your system's sound settings or recording software. Increase the volume using the knob on the microphone and check system input levels. |
| Poor sound quality (e.g., muffled, too quiet, background noise). | Ipò gbohungbohun tí kò tọ́. High ambient noise. Input level too high or too low. | Position the microphone closer to the sound source and ensure it's facing directly towards it. Ṣe igbasilẹ ni agbegbe idakẹjẹ. Adjust the microphone's volume knob and system input levels to an optimal range, avoiding clipping or being too faint. |
| Kọ̀ǹpútà kò dá márófókì mọ̀. | Faulty USB port or cable. System driver issue. | Gbiyanju so gbohungbohun pọ mọ ibudo USB ti o yatọ lori kọnputa rẹ. Restart your computer. If the issue persists, check your operating system's device manager for any driver conflicts or updates. |
Awọn pato
| Ẹya ara ẹrọ | Sipesifikesonu |
|---|---|
| Brand | Vivitar |
| Nọmba awoṣe | MIC918 |
| Asopọmọra | USB (Plug ati Play) |
| Gbohungbohun Iru | Condenser |
| Pola Àpẹẹrẹ | Unidirectional |
| Ifihan Ibuwọlu-si-Noise | 78 dB |
| Ohun elo apade | Irin |
| Iwọn Nkan | 0.95 Poun (iwọn 0.43 kg) |
| Awọn Iwọn Nkan (L x W x H) | 8.86 x 5.36 x 2.49 inches (iwọn 22.5 x 13.6 x 6.3 cm) |
| Orisun agbara | Awọn okun ina (nipasẹ USB) |
| Awọn ẹrọ ibaramu | Computers, Laptops, Gaming Consoles |
Alaye atilẹyin ọja
The Vivitar Podcast and Social Media Microphone MIC918 comes with a 3-Year USA Warranty. For specific terms, conditions, and to register your product, please refer to the official Vivitar webaaye tabi kan si atilẹyin alabara wọn taara. Jeki ẹri rira rẹ fun awọn iṣeduro atilẹyin ọja.
Onibara Support
For further assistance, technical support, or inquiries regarding your Vivitar MIC918 microphone, please visit the official Vivitar website or contact their customer service department. Contact information can typically be found on the Vivitar webaaye naa labẹ awọn apakan 'Atilẹyin' tabi 'Kan si Wa'.