
1. Ifihan
This manual provides detailed instructions for the installation, operation, and maintenance of your XENOCAM 8-Channel 5M-N/1080N Hybrid Digital Video Recorder (DVR). This DVR supports multiple video input modes including AHD, TVI, CVI, Analog, and IP cameras, offering a versatile solution for your security surveillance needs. Please read this manual thoroughly before using the product to ensure proper setup and functionality.
2. Package Awọn akoonu
Daju pe gbogbo awọn ohun ti a ṣe akojọ rẹ si isalẹ wa ninu package rẹ. Ti awọn ohun kan ba nsọnu tabi bajẹ, jọwọ kan si alagbata rẹ.
- 1x XENOCAM 8-Channel 5M-N/1080N DVR (Hard Disk Drive NOT included)
- Ipese Agbara 1x
- 1x USB Asin
- 1x Itọsọna olumulo (iwe yii)

Nọmba 2.1: Package Contents. This image displays the XENOCAM 8-Channel DVR unit, its power adapter, a USB mouse, and the printed user manual, confirming all standard inclusions.
3. Ọja Ipariview
The XENOCAM 8-Channel Hybrid DVR is designed for comprehensive video surveillance. It features multiple video input ports, audio input/output, and various connectivity options for seamless integration into your security system.
3.1 Iwaju ati ru Panels

Nọmba 3.1: Front and Rear Panels. The top image shows the front panel with navigation buttons (ESC, MENU, OK, directional arrows) and a USB port. The bottom image displays the rear panel with 8 BNC video input ports, HD-port (HDMI), AUDIO IN/OUT (RCA), VGA, NET (RJ-45), USB, and DC 12V power input.
3.2 Awọn iwọn
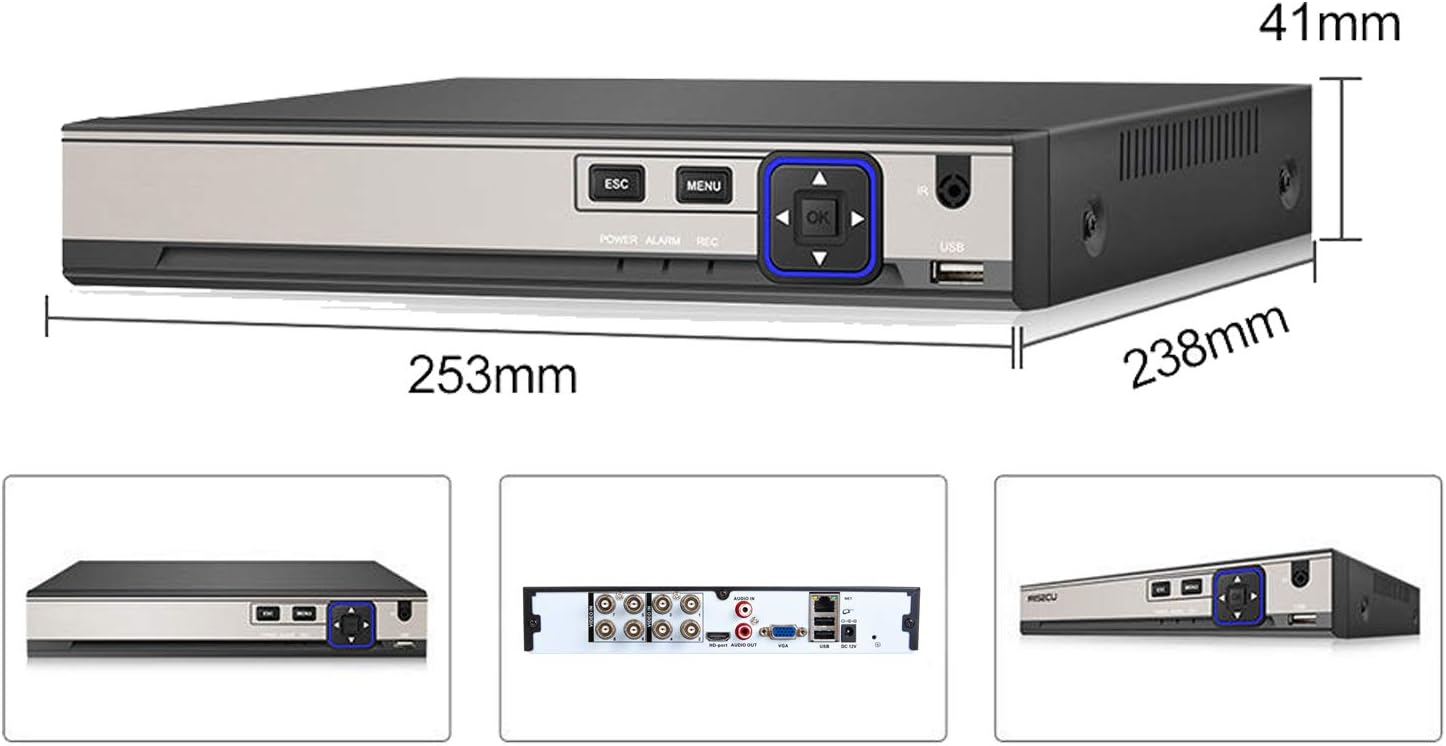
Nọmba 3.2: DVR Dimensions. The image illustrates the physical dimensions of the DVR unit: approximately 253mm in length, 238mm in width, and 41mm in height.
4. Eto
4.1 Fifi sori ẹrọ Hard Disk Drive (HDD)
This DVR does not include a pre-installed HDD. An HDD is required for recording video. The DVR supports one SATA HDD interface with a maximum capacity of 6TB.
- Yọọ kuro ki o yọ ideri oke ti DVR kuro.
- Connect the SATA data cable and power cable from the DVR to your HDD.
- Secure the HDD to the bottom of the DVR chassis using the provided screws.
- Rọpo ideri oke ki o ni aabo pẹlu awọn skru.
4.2 Connecting Cameras and Display
- Connect your AHD/TVI/CVI/Analog cameras to the BNC FIDIO INU awọn ibudo lori ru nronu.
- So a atẹle si awọn HDMI or VGA ibudo o wu.
- Connect the USB mouse to one of the USB awọn ibudo.
- So ohun ti nmu badọgba agbara pọ si DC 12V input and plug it into a power outlet.
- The DVR will power on automatically.
4.3 Iṣeto ni ibẹrẹ
Upon first boot, you will be prompted to set up basic parameters. The default login username is Abojuto. Iwọ gbọdọ set a password for the device to access the system.
- Follow the on-screen prompts to set the language, time zone, and date format.
- Set a strong password for the 'Admin' user.
- If an HDD is installed, the system may prompt you to format it. Confirm to proceed.
4.4 Eto nẹtiwọki
Connect an Ethernet cable from your router to the NET (RJ-45) port on the DVR. The DVR supports 10M/100Mbps network speeds.
- From the Main Menu, navigate to System > Network.
- Ensure DHCP is enabled for automatic IP address assignment, or configure a static IP address manually.
- Test network connectivity.
4.5 Channel Type Configuration (Hybrid Mode)
This DVR supports various camera types. If your cameras are not displaying, you may need to adjust the channel type settings.
- Ọtun-tẹ lori ifiwe view iboju lati ṣii Akojọ aṣyn akọkọ.
- Lilö kiri si System > Digital.
- In the ChannelType menu, select the appropriate mode for your cameras (e.g., 1080N for analog/AHD, or IP for network cameras). The DVR supports hybrid modes like 4ch 1080N AHD + 4ch 1080P IP.
- Tẹ OK and the DVR will reboot to apply changes.
Fidio 4.1: XENOCAM AHD DVR Operation Introduction. This video demonstrates the initial setup and menu navigation of the XENOCAM DVR, including how to access system settings, adjust display resolution, and configure channel types for different camera inputs. It also shows how to check for storage abnormalities.
5. Ṣiṣẹ
5.1 Live View
After successful setup, the DVR will display the live feed from connected cameras. You can switch between single-camera view ati olona-kamẹra akoj views (1/4/8 screen display) using the on-screen menu or mouse controls.
5.2 Awọn ọna Gbigbasilẹ
DVR ṣe atilẹyin awọn ọna gbigbasilẹ lọpọlọpọ:
- Afowoyi: Bẹrẹ/da gbigbasilẹ duro pẹlu ọwọ.
- Itaniji: Àkọsílẹ̀ nígbà tí ìṣẹ̀lẹ̀ ìkìlọ̀ bá wáyé.
- Iwari išipopada: Records when motion is detected in the camera's view.
- Àkókò: Records according to a pre-set schedule.
Configure recording settings via Main Menu > Record.
5.3 Sisisẹsẹhin
Si view foo ti o ti gbasilẹtage:
- Ọtun-tẹ lori ifiwe view iboju ki o si yan Sisisẹsẹhin.
- Select the desired date and camera channel.
- Use the timeline to navigate and play recordings.
5.4 Remote Access (P2P Monitoring)
The DVR supports P2P (Peer-to-Peer) remote monitoring via the XMeye free app for Android and iOS devices.
- Gba awọn XMeye app lati ile itaja ohun elo ẹrọ rẹ.
- Register an account if you don't have one.
- Add your DVR by scanning the unique QR code displayed on the DVR's screen (usually found in System > NetService or Info > Version).
- O le bayi view live streams and playback recordings remotely.
5.5 Motion Detection & Instant Alerts
Configure motion detection to trigger recordings and receive alerts.
- Lilö kiri si Main Menu > Alarm > Motion Detect.
- Enable motion detection for desired channels.
- Set the detection area and sensitivity.
- Configure alert actions such as email notifications or mobile app alerts.
6. Itọju
6.1 Hard Disk Drive Management
Regularly check the status of your HDD to ensure continuous recording. The DVR will overwrite old footage when the HDD is full, based on your settings.
- To check HDD information, go to Main Menu > Info > HDD Info.
- If you encounter 'No Storage' errors, ensure an HDD is properly installed and formatted.
6.2 Ninu
Keep the DVR unit clean and free from dust to prevent overheating and ensure optimal performance. Use a soft, dry cloth for cleaning. Do not use liquid cleaners.
7. Laasigbotitusita
| Isoro | Owun to le Fa | Ojutu |
|---|---|---|
| No video displayed on monitor | Loose cable connection, incorrect display resolution, incorrect channel type. | Check HDMI/VGA cable connections. Adjust display resolution via System > DISPLAY. Verify channel type settings in System > Digital. |
| "No Storage for Recording!" message | No HDD installed, HDD not formatted, HDD faulty. | Install an HDD. Format the HDD via Main Menu > Advanced > HDD Info. Replace faulty HDD if necessary. |
| Kò le wọlé sí DVR láti ọ̀nà jíjìn | Network issue, incorrect app settings, firewall blocking. | Ensure DVR is connected to the internet. Check network settings (DHCP/Static IP). Verify QR code scan in XMeye app. Check router firewall settings. |
| Gbagbe ọrọ aṣina bi | Ọrọigbaniwọle ti sọnu tabi ti gbagbe. | Contact XENOCAM support for password reset procedures. |
8. Awọn pato
| Ẹya ara ẹrọ | Sipesifikesonu |
|---|---|
| Iṣawọle fidio | 8-channel BNC input |
| Ijade fidio | HDMI/VGA (up to 1080P) |
| Ohun Input/O wu | 1CH/1CH RCA |
| Fidio funmorawon | H.265 |
| Ṣaajuview Didara | 8*5M-N@12fps (6 in 1); 8*4M-N@15fps (6 in 1); 8*1080N (6 in 1) |
| Record Resolution & Frame | 8*5M-N@8fps (6 in 1); 8*4M-N@8fps (6 in 1); 8*1080N@15fps (6 in 1) |
| Playback Quality | 4*5M-N@8fps (6 in 1); 8*4M-N@8fps (6 in 1); 8*1080N@15fps (6 in 1) |
| Awọn ipo igbasilẹ | Manual, Alarm, Motion Detection, Timing |
| Backup Modes | Network, USB portable HDD, USB DVD-RW |
| HDD Interface | 1x SATA (Max 6TB) |
| Ọlọpọọmídíà Nẹtiwọọki | 1x RJ-45 10M/100Mbps |
| USB Interface | 2x USB 2.0 |
| DVR Modes | DVR: 8*5M-N; 8*1080N Hybrid: 4ch 1080N AHD + 4ch 1080P IP NVR: 16*1080P; 8*5M |
| Ohun elo Alagbeka | XMeye (free) |
| PC Software | CMS, VMS |
| Ọja Mefa | 9.96 x 9.37 x 1.65 inches (253 x 238 x 41 mm) |
| Iwọn Nkan | 2.59 iwon |
9. Atilẹyin ọja ati Support
XENOCAM products are designed for reliability and performance. For warranty information, technical support, or service inquiries, please refer to the warranty card included with your product or visit the official XENOCAM webojula. Jọwọ ṣe idaduro ẹri rira rẹ fun awọn iṣeduro atilẹyin ọja.