1. Ifihan
This manual provides detailed instructions for the proper use and maintenance of your Tera D5100Y USB Wired 1D 2D QR Barcode Scanner. Designed for efficiency and durability, this scanner offers fast and precise scanning for a wide range of barcode symbologies. Please read this manual thoroughly before operating the device to ensure optimal performance and longevity.

Image: The Tera D5100Y USB Wired 1D 2D QR Barcode Scanner, featuring its ergonomic design and USB cable.
2. Package Awọn akoonu
Nigbati o ba ṣii package, jọwọ rii daju pe gbogbo awọn nkan ti o wa ni isalẹ wa ati ni ipo to dara:
- Tera D5100Y Barcode Scanner (x1)
- Okun USB (ṣepọ)
- Itọsọna olumulo (x1)

Image: A visual representation of the Tera D5100Y scanner, its USB cable, and the included user manual, as found in the product box.
3. Key Awọn ẹya ara ẹrọ
- Apẹrẹ Ergonomic: The scanner features a curved, extended, and thickened handle, specifically designed for comfortable grip during prolonged use. The smooth, flat trigger enhances user experience.
- Imudara Itọju: Equipped with an orange anti-shock silicone protective cover, the scanner is designed to withstand drops from up to 6.56 feet (2 meters). Its IP54 rating provides protection against dust and splashing water.
- Pulọọgi ati Mu Asopọmọra ṣiṣẹ: The Tera D5100Y is a wired 2D barcode scanner that connects via a standard USB cable. No driver or software installation is required, allowing for immediate use upon connection.
- Ibamu gbooro: Compatible with Windows, Mac OS, Linux, iOS, and Android operating systems. It works seamlessly with common software applications such as Word, Excel, and Novell.
- Atilẹyin Ọpọ Ede: Supports approximately 25 languages, including English, Spanish, German, French, Italian, and Japanese. The factory default language is English. Ensure the scanner's language setting matches your computer's keyboard language for correct output.
- Versatile Scanning Capabilities: Decodes both printed and digital 1D, 2D, and QR barcode symbologies. This includes UPC-A, EAN-13, Code 128, QR Code, Data Matrix, PDF417, Aztec code, and Maxicode.

Image: A hand comfortably holding the Tera D5100Y scanner, illustrating its ergonomic shape and trigger placement for ease of use.

Image: The Tera D5100Y scanner shown in a simulated drop scenario, emphasizing its robust, shock-resistant construction.

Image: The Tera D5100Y scanner connected to a laptop via its USB cable, demonstrating its simple plug-and-play setup.

Image: The Tera D5100Y scanner with flags of various countries, indicating its support for multiple languages.

Image: The Tera D5100Y scanner actively scanning a QR code on a laptop screen, demonstrating its capability to read both digital and printed 1D/2D/QR codes.
4. Eto
- So Scanner: Plug the USB cable of the Tera D5100Y scanner into an available USB port on your computer (Desktop or Laptop).
- Idanimọ eto: Your operating system (Windows, Mac OS, Linux, etc.) will automatically detect and install the necessary drivers. This process typically takes a few seconds.
- Ṣetan fun Lilo: Once the system recognizes the device, the scanner is ready for immediate use. No additional software installation is required.
5. Awọn ilana Iṣiṣẹ
5.1 Ṣíṣàyẹ̀wò Àkọ́kọ́
- Ensure the scanner is connected to your computer.
- Open an application where you want the scanned data to appear (e.g., Notepad, Word, Excel, a POS system).
- Tọ́ka sí fèrèsé ẹ̀rọ ìwádìí náà sí àmì ìdámọ̀ tí o fẹ́ ṣe àyẹ̀wò náà.
- Press and hold the trigger button. A red aiming line will appear.
- Align the aiming line across the entire barcode. Once successfully scanned, the scanner will emit a beep (if enabled) and the data will appear in your active application.
5.2 Ohun Eto
The scanner's beep sound can be adjusted. Refer to the full user manual (PDF) for specific configuration barcodes to turn the sound on or off.

Image: A visual guide illustrating how to enable or disable the scanner's beep sound, enhancing user control over auditory feedback.
5.3 Ede Eto
To ensure correct character output, the scanner's language setting must match your computer's keyboard language. The default language is English. Consult the full user manual (PDF) for instructions on changing the scanner's language by scanning specific configuration barcodes.

Image: A graphic depicting a globe surrounded by various national flags, symbolizing the scanner's extensive multi-language support.
5.4 Data Editing (Prefix/Suffix)
The scanner supports adding prefixes or suffixes to scanned data, and hiding certain characters. These advanced settings are configured by scanning specific barcodes found in the comprehensive user manual (PDF).
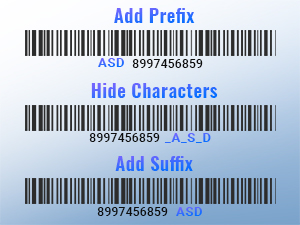
Aworan: Examples of barcodes with added prefixes, illustrating the scanner's capability to customize data output.
5.5 Upload Modes
The Tera D5100Y scanner supports two primary upload modes:
- Ipo Ikojọpọ lẹsẹkẹsẹ: Scanned data is immediately transmitted to the connected device.
- Ipo Ipamọ: Scanned data is stored internally in the scanner's memory and can be uploaded later in a batch.
Configuration barcodes for switching between these modes are available in the full user manual (PDF).
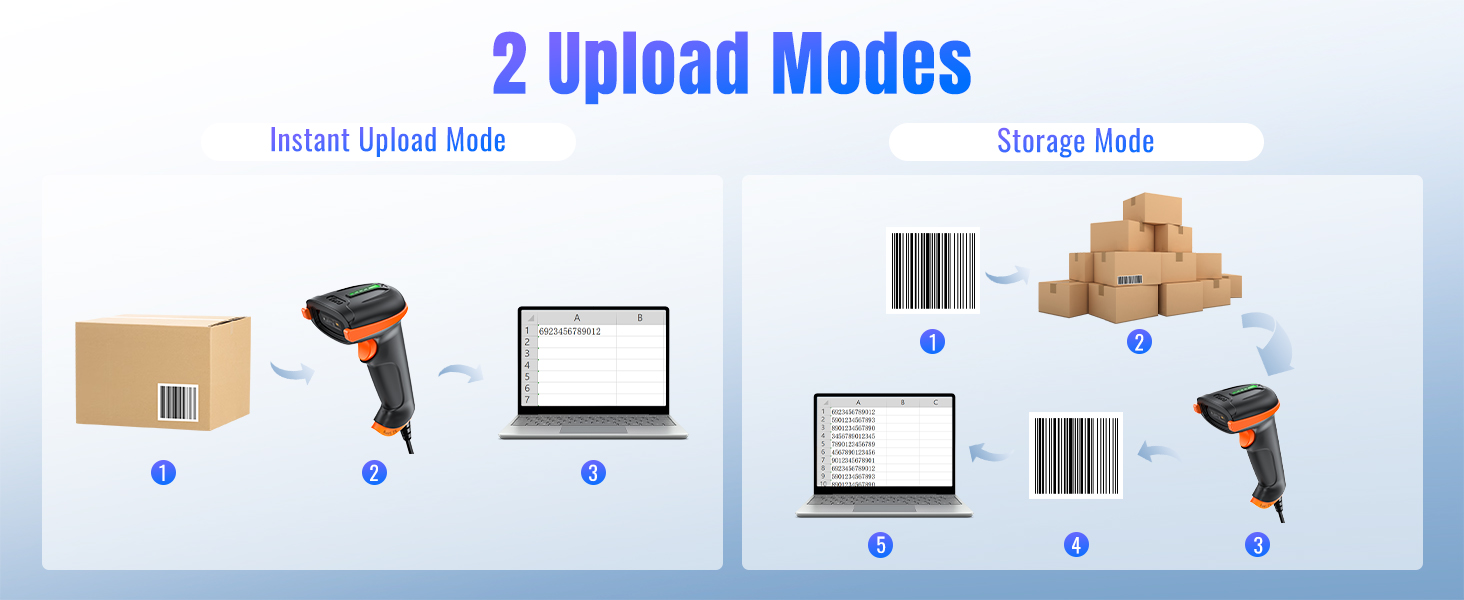
Image: A diagram illustrating the two data upload modes: Instant Upload, where data is sent immediately, and Storage Mode, where data is saved for later batch transfer.
6. Itọju
- Ninu: Lo aṣọ rirọ ati gbigbẹ lati nu ita ẹrọ ayẹwo naa. Fun ferese ayẹwo, lo aṣọ ti ko ni lint diẹ.ampYẹra fún àwọn kẹ́míkà líle tàbí àwọn ohun èlò ìfọ́mọ́ra.
- Ibi ipamọ: Tọ́jú ẹ̀rọ ìwádìí náà sí ibi tí ó tutù tí ó sì gbẹ, tí kò sí ìmọ́lẹ̀ oòrùn tààrà àti igbóná tó le koko.
- Itọju USB: Yẹra fún títẹ̀ tàbí yíyí okùn USB pọ̀ jù láti dènà ìbàjẹ́ inú.
7. Laasigbotitusita
If you encounter issues with your Tera D5100Y scanner, please refer to the following common problems and solutions:
- Scanner Kò Dáhùn:
- Rii daju pe okun USB ti sopọ ni aabo si ẹrọ ọlọjẹ ati kọnputa.
- Try plugging the scanner into a different USB port.
- Tun kọmputa rẹ bẹrẹ.
- A ko le ṣe ayẹwo awọn koodu barcode:
- Rí i dájú pé àmì ìdámọ̀ náà mọ́, kò bàjẹ́, ó sì hàn gbangba.
- Adjust the distance and angle between the scanner and the barcode.
- Verify that the scanner is configured for the correct barcode symbology (refer to the PDF manual for configuration barcodes).
- Check the scanner's decoding ability for challenging barcodes.
- Incorrect Characters or Output:
- Ensure the scanner's language setting matches your computer's keyboard language.
- Verify that the cursor is in an active input field in your application.
- If experiencing random character issues (e.g., lower case becoming upper case, numbers becoming symbols), this might indicate a firmware issue or an incorrect HID keyboard mode setting. Refer to the full PDF manual for factory reset options or alternative USB-COM mode configurations.
- Ko si Ohun Beep:
- Check the sound settings as described in Section 5.2 or the PDF manual to ensure the beep is enabled.
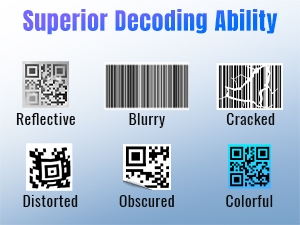
Image: A display of various barcode conditions, such as reflective, blurry, cracked, distorted, obscured, and colorful, demonstrating the scanner's advanced decoding capabilities.
For advanced troubleshooting or specific configuration settings, please refer to the comprehensive Tera D5100Y User Manual (PDF).
8. Awọn pato
| Ẹya ara ẹrọ | Sipesifikesonu |
|---|---|
| Nọmba awoṣe | D5100Y |
| Ọja Mefa | 2.5"D x 3.9"W x 6.5"H (6.35 cm D x 9.9 cm W x 16.5 cm H) |
| Iwọn Nkan | 9.1 iwon (257.98 giramu) |
| Orisun agbara | Okun USB |
| Asopọmọra Technology | Okun USB |
| Awọn ẹrọ ibaramu | Ojú-iṣẹ, Kọǹpútà alágbèéká |
| Àwọn Irú Àkójọpọ̀ (1D) | UPC-A, UPC-E, EAN-8, EAN-13, Code 128, Code 39, Code 93, Code 11, Interleaved 2 of 5, Matrix 2 of 5, Standard 2 of 5, Coda bar, MSI Plessey, GS1, China Post, Databar(RSS), Korea, NEC2 of 5, etc. |
| Àwọn Irú Àkójọpọ̀ (2D) | QR Code, Data Matrix, PDF417, Aztec code, Maxicode |
| Rating agbara | IP54 (Dustproof, Splashproof) |
| Ju Resistance | Titi de 6.56 ẹsẹ (2 mita) |
9. Atilẹyin ọja ati Support
Tera products are manufactured to high-quality standards and are backed by a manufacturer's warranty. For specific warranty details, terms, and conditions, please refer to the documentation included with your product or visit the official Tera webojula.
For further assistance, technical support, or to download the complete user manual, please visit the official Tera support resources. The full user manual contains detailed configuration barcodes and advanced settings not covered in this condensed guide.
You can access the official PDF user manual here: Tera D5100Y User Manual (PDF)
10. Alaye Aabo
- Do not expose the scanner to extreme temperatures, humidity, or corrosive substances.
- Avoid direct eye exposure to the scanner's light source.
- Do not attempt to disassemble or modify the scanner. This will void the warranty and could cause damage or injury.
- Jeki ẹrọ naa kuro ni awọn aaye oofa ti o lagbara.