
Ọrọ Iṣaaju
O ṣeun fun riraasing the VoltEdge CX40 Classic Black Controller. This manual provides essential information for setting up, operating, and maintaining your new controller. The VoltEdge CX40 is designed to provide optimal performance and full functionality, featuring built-in dual vibration for an immersive gaming experience and ergonomics tailored for long hours of gaming.
Package Awọn akoonu
Jọwọ rii daju pe gbogbo awọn nkan wa ninu package:
- VoltEdge CX40 Classic Black Controller
- Afowoyi Olumulo (iwe-ipamọ yii)

Image: The retail packaging box for the VoltEdge CX40 controller, showing the controller and key features like 2m cable, ergonomic design, and dual vibration.
Ọja Pariview
The VoltEdge CX40 controller features a classic layout with all standard buttons and analog sticks. It is designed for comfortable use during extended gaming sessions.

Aworan: Oke-isalẹ view of the VoltEdge CX40 controller, showcasing the D-pad, analog sticks, action buttons (triangle, circle, cross, square), Share, Options, and PS buttons.

Aworan: Iwaju view of the VoltEdge CX40 controller, highlighting the ergonomic grips and the central PS button.
Awọn ẹya ara ẹrọ Alakoso:
- Idahun Gbigbọn Meji
- Iṣẹ Turbo
- 2-meter Cable Length
- Apẹrẹ Ergonomic
- Ni ibamu pẹlu PS4, PS3, ati PC
Ṣeto
The VoltEdge CX40 is a wired controller, offering a simple plug-and-play setup.
Connecting to PS4/PS3/PC:
- Locate an available USB port on your PS4, PS3, or PC.
- Insert the USB connector of the VoltEdge CX40 controller into the USB port.
- Awọn eto yẹ ki o laifọwọyi ri ki o si fi awọn pataki awakọ. Eyi le gba awọn iṣẹju diẹ.
- Once detected, the controller is ready for use.
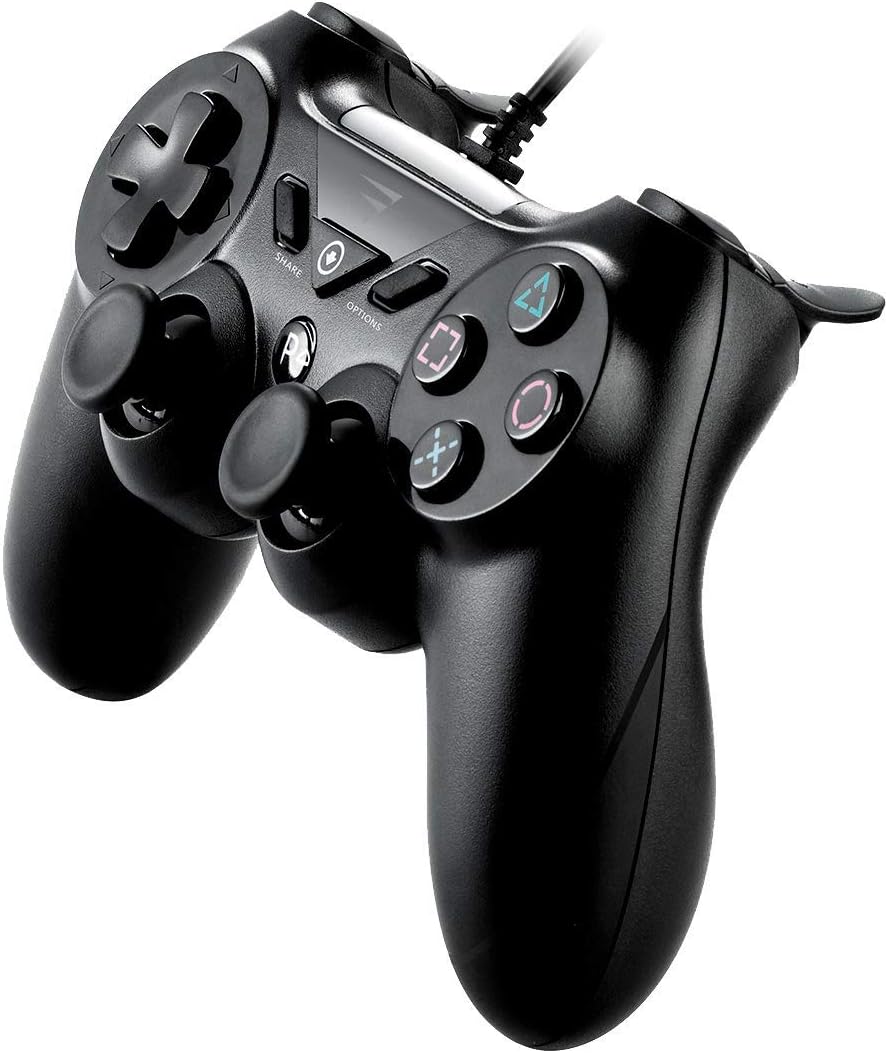
Aworan: Apa view of the VoltEdge CX40 controller, illustrating the attached USB cable extending from the top of the controller.
Awọn ilana Iṣiṣẹ
The VoltEdge CX40 controller functions similarly to standard game controllers. Familiarize yourself with the button layout for optimal gameplay.
Awọn iṣẹ bọtini:
| Button/Component | Išẹ |
|---|---|
| D-paadi | Ìtẹ̀síwájú ìtọ́sọ́nà fún ìṣíkiri tàbí ìlọ kiri àkójọ. |
| Left/Right Analog Sticks | Precise directional control, camera movement, or character movement. Press down for L3/R3 functions. |
| Awọn bọtini iṣe (Igun mẹta, Circle, Cross, Square) | Primary in-game actions (e.g., jump, attack, interact). |
| L1/R1 Buttons | Shoulder buttons, often used for secondary actions or weapon switching. |
| L2/R2 Awọn okunfa | Analog triggers, often used for aiming, shooting, or acceleration/braking. |
| Bọtini Pin | (PS4) Share gameplay moments, screenshots, or video clips. |
| Bọtini Awọn aṣayan | (PS4) Access in-game menus, pause, or settings. |
| Bọtini PS | (PS4/PS3) Access the system menu or turn on/off the console. |

Aworan: Angled view of the VoltEdge CX40 controller, showing the layout of the D-pad, left analog stick, Share, Options, PS buttons, and the right analog stick and action buttons.
Iṣẹ Turbo:
The Turbo function allows a button to be pressed repeatedly as long as it is held down. To activate/deactivate Turbo for a specific button:
- Tẹ mọlẹ Turbo button (if present, or a designated combination).
- While holding Turbo, press the desired action button (e.g., Cross, Circle).
- Tu awọn bọtini mejeeji silẹ. Iṣẹ Turbo ti ṣiṣẹ bayi fun bọtini iṣe yẹn.
- Repeat the process to deactivate Turbo for the same button.
Note: Specific Turbo button location or activation method may vary. Refer to the controller's physical markings if a dedicated Turbo button is present.
Itoju
Proper maintenance ensures the longevity and optimal performance of your VoltEdge CX40 controller.
Ninu:
- Disconnect the controller from the console/PC before cleaning.
- Use a soft, dry cloth to wipe down the surface of the controller.
- Fun idoti alagidi, die-die dampen asọ pẹlu omi tabi kan ìwọnba, ti kii-abrasive ninu ojutu. Yago fun ọrinrin pupọ.
- Do not use harsh chemicals, solvents, or abrasive cleaners, as these can damage the controller's finish.
- Use cotton swabs or compressed air to clean around buttons and analog sticks.
Ibi ipamọ:
- Tọju olutọju naa ni itura, aye gbigbẹ kuro lati orun taara ati awọn iwọn otutu to gaju.
- Avoid placing heavy objects on the controller, which could damage the analog sticks or buttons.
- Keep the cable neatly coiled to prevent tangling or damage.
Laasigbotitusita
If you encounter issues with your VoltEdge CX40 controller, refer to the following common solutions:
| Isoro | Owun to le Solusan |
|---|---|
| A kò mọ olùdarí náà nípasẹ̀ console/PC. |
|
| Awọn bọtini tabi awọn igi afọwọṣe ko dahun. |
|
| Gbigbọn kò ṣiṣẹ́. |
|
Awọn pato
| Ẹya ara ẹrọ | Ẹ̀kúnrẹ́rẹ́ |
|---|---|
| Orukọ awoṣe | VoltEdge CX40 Classic Black Controller |
| Nọmba awoṣe | 850021579128 |
| Asopọmọra | USB ti a firanṣẹ |
| USB Ipari | 2 mita |
| Gbigbọn | Gbigbọn Meji |
| Ibamu | PS4, PS3, PC |
| Awọn iwọn (L x W x H) | 17 x 6.2 x 14.5 cm |
| Iwọn | 400 g |
Atilẹyin ọja ati Support
VoltEdge products are designed for durability and performance. For warranty information and technical support, please refer to the official VoltEdge webojula tabi kan si wọn onibara iṣẹ taara.
Jeki ẹri rira rẹ fun eyikeyi awọn ibeere atilẹyin ọja.
Fun iranlọwọ siwaju sii, ṣabẹwo: www.voltedge.com