
1. Ifihan
O ṣeun fun riraasing the Soundsation MIOMIX 404FXM 6-Channel Mixer. This versatile mixer is designed for a wide range of audio applications, including home recording, live performances, and podcasting. It combines professional audio quality with portability, featuring low-noise preamplifiers, digital effects, a USB media player/recorder, and Bluetooth connectivity. This manual provides essential information for safe operation, setup, and optimal use of your MIOMIX 404FXM mixer.
2. Awọn ilana aabo
IKILO: Lati dinku eewu ina tabi mọnamọna, maṣe fi ohun elo yii han si ojo tabi ọrinrin.
- Ka awọn itọnisọna wọnyi ni pẹkipẹki ṣaaju ṣiṣe ẹrọ naa.
- Jeki iwe afọwọkọ yii fun itọkasi ọjọ iwaju.
- Tẹle gbogbo awọn ikilọ ki o tẹle gbogbo awọn ilana.
- Maṣe lo ohun elo yii nitosi omi.
- Mọ pẹlu asọ gbigbẹ nikan.
- Ma ṣe dina eyikeyi awọn ṣiṣi atẹgun. Fi sori ẹrọ ni ibamu pẹlu awọn ilana ti olupese.
- Maṣe fi sori ẹrọ nitosi awọn orisun ooru gẹgẹbi awọn imooru, awọn iforukọsilẹ ooru, awọn adiro, tabi awọn ohun elo miiran (pẹlu ampliifiers) ti o gbe ooru jade.
- Ma ṣe ṣẹgun idi aabo ti polarized tabi pilogi iru ilẹ. Plọọgi polarized ni awọn abẹfẹlẹ meji pẹlu ọkan gbooro ju ekeji lọ. Plọọgi iru-ilẹ ni awọn abẹfẹlẹ meji ati prong grounding kẹta. Abẹfẹlẹ ti o gbooro tabi prong kẹta ni a pese fun aabo rẹ. Ti pulọọgi ti a pese ko ba wo inu iṣan-ọna rẹ, kan si alamọdaju kan fun rirọpo ti iṣan igba atijọ.
- Dabobo okun agbara lati ma rin lori tabi pin, ni pataki ni awọn pilogi, awọn ohun elo irọrun, ati aaye nibiti wọn ti jade kuro ninu ohun elo naa.
- Lo awọn asomọ/awọn ẹya ara ẹrọ ti olupese pato.
- Yọọ ohun elo yi nigba iji manamana tabi nigba lilo fun igba pipẹ.
- Tọkasi gbogbo iṣẹ si awọn oṣiṣẹ iṣẹ ti o peye. Iṣẹ nilo nigbati ohun elo ba ti bajẹ ni ọna eyikeyi, gẹgẹbi okun ipese agbara tabi plug ti bajẹ, omi ti ta silẹ tabi awọn nkan ti ṣubu sinu ẹrọ, ohun elo naa ti farahan si ojo tabi ọrinrin, ko ṣiṣẹ deede. , tabi ti lọ silẹ.
3. Package Awọn akoonu
Please check that all items listed below are included in the package:
- Soundsation MIOMIX 404FXM Mixer
- Adapter agbara
- Itọsọna olumulo
4. Awọn ẹya Ọja
- 6-channel mixer with digital multi-effect processor.
- Integrated USB player/recorder supporting WAV, MP3, WMA, and FLAC formats.
- Wireless Bluetooth audio streaming.
- 4 Mic/Line channels with low-noise preamps and Combo connectors.
- Selectable Hi-Z inputs for guitars and other high-impedance instruments.
- +48V Phantom Power for condenser microphones.
- Peak indicators on input channels.
- 1 stereo line channel with 6.3mm jacks and +4/-10 dB pad adapter.
- 2-band EQ on channels 1-4.
- 24-bit/48 kHz digital effects processor with 16 presets (Reverb, Delay, Echo, Chorus, etc.) and TAP-Tempo function.
- USB player level control.
- Iṣagbejade agbekọri pẹlu iṣakoso ipele.
- XLR main outputs with volume control.
- Stereo VU Meter with 2 x 6 LED bars.
5. Awọn iṣakoso ati Awọn iṣẹ
5.1 Iwaju Panel Loriview

Image: Front panel of the Soundsation MIOMIX 404FXM mixer, showing all input channels, EQ controls, effect section, USB/Bluetooth media player, and main output controls.
Input Channels (MIC/INST 1-4)
- MIC/INST Input (Combo Jack): Connect XLR microphones or 1/4" instrument/line cables.
- + 48V Agbara Phantom: Activates phantom power for condenser microphones. Use with caution.
- Hi-Z Yipada: Engages high impedance input for direct connection of guitars or basses.
- KỌRỌ NIPA: Ṣe atunṣe ifamọ igbewọle fun gbohungbohun ti a ti sopọ tabi irinse.
- Kọ́nì Gíga: Adjusts the high-frequency equalization (treble).
- Kọ́ńdì KÌLỌ̀: Adjusts the low-frequency equalization (bass).
- Knob FX: Controls the amount of signal sent to the internal digital effects processor.
- Knob PAN: Adjusts the stereo position (left/right) of the channel.
- Bọtini VOL: Adjusts the output volume of the individual channel.
- PK (Peak) LED: Ṣe itanna nigbati ifihan agbara titẹ sii ga ju, nfihan gige gige ti o pọju.
Stereo Line Input (CH 5-6)
- L/Mono, R Inputs (1/4" Jacks): Connect stereo line-level devices (keyboards, CD players, DJ consoles, etc.). The L/Mono input can be used alone for a mono signal.
- +4/-10dB Switch: Adjusts input sensitivity for different line-level devices.
- Knob PAN: Ṣe atunṣe ipo sitẹrio ti ikanni naa.
- Bọtini VOL: Adjusts the output volume of the stereo channel.
- PK (Peak) LED: Illuminates when the input signal is too high.
USB & Bluetooth Media Player
- Ibudo USB: Connect a USB drive for playing audio files or recording.
- Iboju ifihan: Shows current mode, track information, and settings.
- Up/Rewind Button: Navigates up in menus or rewinds current track.
- Down/Forward Button: Navigates down in menus or fast-forwards current track.
- Play/Pause/Enter Button: Plays/pauses audio or confirms menu selections.
- Bọtini MENU: Accesses media player menu options (BT streaming, music player, audio recorder, selection).
- MP3 PLAYER LVL Knob: Controls the output level of the USB/Bluetooth media player.
Digital Effects Processor (24-bit/48 kHz)
- Ifihan ipa: Shows the selected effect number and parameter values.
- Bọtini Eto: Rotates to select one of the 16 built-in digital effects. Press to confirm selection.
- Fọwọ ba Bọtini TEMPO: Tap multiple times to set the tempo for time-based effects (e.g., Delay).
- Ipele koko: Adjusts the overall wet/dry mix of the effects.
Output & Monitoring Section
- PHONES Jack (1/4"): So olokun fun mimojuto.
- PHONES LVL Knob: Ṣe atunṣe iwọn didun ti iṣelọpọ agbekọri.
- MAIN OUT L/R (XLR): Balanced XLR outputs for connecting to powered speakers, ampalifiers, tabi awọn ẹrọ gbigbasilẹ.
- MAIN OUT Knob: Ṣe iṣakoso iwọn didun iṣelọpọ gbogbogbo ti apopọ akọkọ.
- VU Meter (LED): Displays the stereo output level of the main mix.
5.2 Ru Panel Pariview
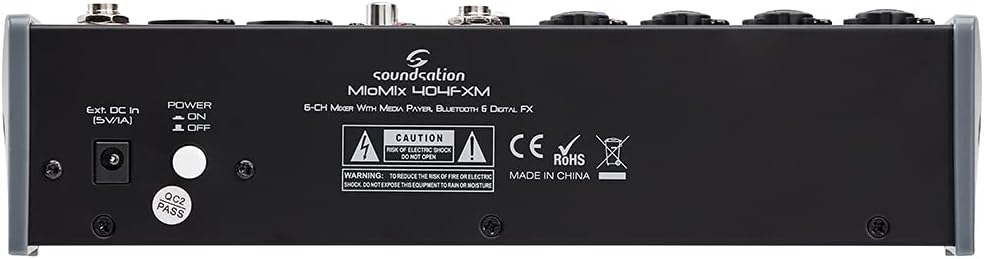
Image: Rear panel of the Soundsation MIOMIX 404FXM mixer, showing the power input, power switch, and main output connections.
- Ext. DC In (5V/1A): Power input for connecting the provided external power adapter.
- POWER ON/OFF Switch: Turns the mixer's power on or off.
- REC OUT L/R (RCA): Unbalanced RCA outputs for connecting to recording devices.
6. Eto
- Yọ alapọpọ naa kuro: Carefully remove the MIOMIX 404FXM from its packaging.
- Ibi: Place the mixer on a stable, flat surface, ensuring adequate ventilation around the unit.
- Asopọ agbara: Ensure the mixer's POWER switch is in the OFF position. Connect the provided power adapter to the "Ext. DC In (5V/1A)" port on the rear panel, then plug the adapter into a suitable power outlet.
- Agbara Ibẹrẹ Tan: Flip the POWER switch to the ON position. The mixer's indicators should light up, and the display should activate.
- Àwọn ohun tí a so pọ̀: Connect the MAIN OUT XLR outputs to your powered speakers, amplifier, or audio interface. Connect headphones to the PHONES jack for monitoring.
- Àwọn Ìsopọ̀ Àwọn Ohun Tí A Ń Wọlé: Connect your microphones, instruments, and line-level devices to the appropriate input channels.
7. Awọn ilana Iṣiṣẹ
7.1 Nsopọ Awọn orisun ohun
- Awọn gbohungbohun: Connect dynamic microphones via XLR cables to the MIC/INST Combo jacks. For condenser microphones, connect via XLR and activate the +48V Phantom Power switch for the respective channel.
- Instruments (Guitars/Basses): Connect directly using a 1/4" TS cable to the MIC/INST Combo jack and engage the Hi-Z switch for that channel.
- Line-Level Devices (Keyboards, CD Players): Connect using 1/4" TS cables to the MIC/INST Combo jacks (for mono) or to the CH 5-6 L/Mono and R inputs (for stereo). Adjust the +4/-10dB switch on CH 5-6 as needed.
7.2 Adjusting Channel Levels and EQ
- Set all GAIN, VOL, and MAIN OUT knobs to their minimum positions before starting.
- Speak into the microphone or play your instrument. Slowly increase the GAIN knob for the respective channel until the PK LED flashes only occasionally during the loudest parts.
- Adjust the HIGH and LOW EQ knobs to shape the tone of your sound.
- Use the PAN knob to position the sound in the stereo field.
- Slowly increase the channel's VOL knob to blend it into the overall mix.
7.3 Using the USB Media Player/Recorder
- Sisisẹsẹhin: Insert a USB drive containing WAV, MP3, WMA, or FLAC files into the USB port. The display will show the file list. Use the Up/Down buttons to navigate and Play/Pause/Enter to select and play. Adjust the MP3 PLAYER LVL knob to control its volume in the mix.
- Gbigbasilẹ: In the media player menu (accessed via MENU button), select the 'Audio Recorder' function. Ensure your USB drive has enough free space. Press Play/Pause/Enter to start and stop recording. The mixer records the main stereo mix.
7.4 Bluetooth Asopọmọra
- Press the MENU button on the media player and select 'BT Streaming'. The display will show 'Bluetooth' and indicate it's searching.
- On your smartphone or Bluetooth device, search for available devices and select 'MIOMIX 404FXM'.
- Once paired, you can stream audio from your device to the mixer. Control the volume using your device and the MP3 PLAYER LVL knob on the mixer.
7.5 Applying Digital Effects
- Turn the FX knob on the desired input channel to send signal to the effects processor.
- Rotate the PROGRAM knob to browse through the 16 available effects. Press the PROGRAM knob to select an effect.
- Adjust the LEVEL knob in the FX section to control the overall amount of effect applied to the mix.
- For time-based effects, use the TAP TEMPO button to synchronize the effect to your music.
7.6 Monitoring and Main Output
- Agbekọri: Connect headphones to the PHONES jack and adjust the PHONES LVL knob for comfortable monitoring.
- Ifilelẹ akọkọ: Slowly increase the MAIN OUT knob to send the mixed audio to your connected speakers or amplifier. Monitor the VU Meter to ensure levels are not clipping (avoiding red LEDs).
8. Itọju
- Ninu: Lo aṣọ rírọrùn tí ó gbẹ láti nu ojú ẹ̀rọ ìfọṣọ náà. Má ṣe lo àwọn ohun ìfọṣọ omi tàbí àwọn ohun èlò ìfọṣọ.
- Ibi ipamọ: Nigbati o ko ba wa ni lilo fun awọn akoko ti o gbooro sii, tọju alapọpo ni itura, ibi gbigbẹ, kuro lati orun taara ati awọn iwọn otutu to gaju.
- Afẹfẹ: Rii daju pe awọn šiši fentilesonu ko ni idinamọ lati ṣe idiwọ igbona.
9. Laasigbotitusita
- Ko si Ijade ohun:
- Check all power connections and ensure the mixer is turned ON.
- Verify that all channel VOL knobs, MAIN OUT knob, and PHONES LVL knob are turned up.
- Ensure your speakers/amplifier are powered on and connected correctly.
- Check input source connections and ensure GAIN knobs are set appropriately.
- Ohun Yiyi:
- Reduce the GAIN knob for the input channel.
- Check if the PK LED is constantly lit; if so, reduce the input level.
- Lower the MAIN OUT volume if the VU Meter is consistently in the red.
- Agbara Phantom Ko Ṣiṣẹ:
- Ensure the +48V switch is engaged for the specific channel.
- Verify that you are using an XLR cable, as phantom power is only supplied via XLR.
- Bluetooth Ko Sopọ:
- Ensure the mixer's media player is in 'BT Streaming' mode.
- Make sure your device's Bluetooth is enabled and it's searching for devices.
- Gbiyanju yiyo ati tun so pọ ẹrọ naa.
- USB Playback/Recording Issues:
- Ensure the USB drive is formatted correctly (FAT32 is generally recommended).
- Ṣayẹwo pe ohun naa files are in a supported format (WAV, MP3, WMA, FLAC).
- Fun gbigbasilẹ, rii daju pe awakọ USB ni aaye ọfẹ ti o to.
10. Awọn pato
| Ẹya ara ẹrọ | Sipesifikesonu |
|---|---|
| Olupese | Iro ohun |
| Nọmba awoṣe | E923E |
| Nọmba ti awọn ikanni | 6 |
| Iwọn Nkan | 1900 giramu |
| Asopọmọra Technology | USB, Bluetooth |
| Orisun agbara | Cable ina |
| O wu Asopọmọra Iru | XLR |
| Input Audio | XLR, 1/4" Jack |
| Voltage | 48 Volts (Phantom Power) |
| Awọn ipa oni-nọmba | 16 Presets, 24-bit/48 kHz |
| Supported USB Audio Formats | WAV, MP3, WMA, FLAC |
11. Atilẹyin ọja ati Support
Soundsation products are designed and manufactured to the highest quality standards. For information regarding warranty coverage, service, or technical support, please refer to the warranty card included with your product or visit the official Soundsation webojula. Tọju iwe-ẹri rira rẹ bi ẹri rira fun eyikeyi awọn ibeere atilẹyin ọja.