CREATE THERA RETRO PRO
ṢẸDA Itọsọna Olumulo Ẹrọ Espresso THERA RETRO PRO
Model: THERA RETRO PRO
1. Ifihan
Thank you for choosing the CREATE THERA RETRO PRO Semi-Automatic Espresso Machine. This machine is designed to provide you with high-quality espresso, cappuccino, and latte beverages using ground coffee. Featuring a 20-bar high-pressure pump, NTC temperature control, and an integrated milk tank, it offers convenience and excellent results. Please read this manual carefully before first use to ensure proper operation and maintenance.

Aworan 1.1: Iwaju view of the CREATE THERA RETRO PRO Espresso Machine in Cream White.
2. Awọn ilana aabo
Nigbagbogbo tẹle awọn iṣọra aabo ipilẹ nigba lilo awọn ohun elo itanna lati dinku eewu ina, mọnamọna, ati/tabi ipalara si eniyan, pẹlu atẹle naa:
- Ka gbogbo awọn ilana ṣaaju lilo ohun elo naa.
- Maṣe fi ọwọ kan awọn aaye ti o gbona. Lo awọn ọwọ tabi awọn koko.
- Lati daabobo lodi si ina, mọnamọna, ati ipalara si awọn eniyan, maṣe fi okun, plugs, tabi ohun elo bọ inu omi tabi omi miiran.
- Abojuto sunmọ jẹ pataki nigbati eyikeyi ohun elo ba lo nipasẹ tabi sunmọ awọn ọmọde.
- Yọọ kuro lati inu iṣan nigbati ko si ni lilo ati ṣaaju ṣiṣe mimọ. Gba laaye lati tutu ṣaaju fifi sii tabi mu awọn ẹya kuro, ati ṣaaju ki o to nu ohun elo naa.
- Ma ṣe ṣiṣẹ ohun elo eyikeyi pẹlu okun ti o bajẹ tabi pulọọgi tabi lẹhin aiṣe ohun elo, tabi ti bajẹ ni eyikeyi ọna.
- Lilo awọn asomọ ẹya ẹrọ ti a ko ṣeduro nipasẹ olupese ohun elo le ja si ina, mọnamọna, tabi ipalara si awọn eniyan.
- Maṣe lo ni ita.
- Ma ṣe jẹ ki okun duro lori eti tabili tabi counter, tabi fi ọwọ kan awọn aaye ti o gbona.
- Ma ṣe gbe sori tabi sunmọ gaasi ti o gbona tabi ina ina, tabi ni adiro ti o gbona.
- Nigbagbogbo so plug to ohun elo akọkọ, ki o si pulọọgi okun sinu ogiri iṣan. Lati ge asopọ, tan eyikeyi iṣakoso si “pa,” lẹhinna yọ plug kuro ni iṣan ogiri.
- Ma ṣe lo ohun elo fun miiran ju lilo ti a pinnu lọ.
3. Ọja irinše
Familiarize yourself with the parts of your CREATE THERA RETRO PRO Espresso Machine.
- Ẹgbẹ akọkọ pẹlu Igbimọ Iṣakoso
- Omi omi (agbara 1.5l)
- Wara ojò
- Portafilter
- Filter Baskets (for 1 and 2 cups)
- Ìwọ̀n Síkọ́ọ̀pù pẹ̀lú Tamper
- Adjustable Drip Tray
- Cup imorusi Atẹ

Image 3.1: Included accessories: Portafilter, two filter baskets, and a measuring scoop with integrated tamper.

Image 3.2: Detail of the control panel, showing beverage selection buttons and the temperature gauge.
4. Eto
4.1 Unpacking ati Ni ibẹrẹ Cleaning
- Fi ìṣọ́ra yọ gbogbo ohun èlò ìdìpọ̀ kúrò kí o sì gbé ẹ̀rọ náà sí orí ilẹ̀ tí ó dúró ṣinṣin, tí ó tẹ́jú, tí ó sì lè kojú ooru.
- Wash the water tank, milk tank, portafilter, filter baskets, and drip tray with warm, soapy water. Rinse thoroughly and dry.
- Mu ese ita ẹrọ naa pẹlu ipolowoamp asọ.
4.2 Kikun Omi Omi
Remove the water tank from the back of the machine. Fill it with fresh, cold water up to the MAX line. Replace the tank securely.
4.3 Preparing the Milk Tank
If making milk-based drinks, fill the milk tank with desired milk (dairy or plant-based) between the MIN and MAX lines. Ensure the milk frothing tube is properly inserted into the tank.

Image 4.1: Removing the milk tank for filling or cleaning.
4.4 First Lo / Priming Machine
Ṣaaju lilo akọkọ, tabi ti ẹrọ naa ko ba ti lo fun igba pipẹ, o nilo lati ṣe atunṣe:
- Rii daju pe ojò omi ti kun.
- Place a large container under the coffee spout and milk frothing nozzle.
- Turn on the machine. It will start heating up.
- Once heated, press the Espresso button and let water flow through until the tank is almost empty. Repeat this process with the milk frothing function (if applicable, by selecting a milk-based drink without coffee grounds) to prime the milk system.
5. Awọn ilana Iṣiṣẹ
5.1 Preparing Ground Coffee
Use freshly ground coffee for best results. We recommend using naturally roasted ground coffee. Avoid sugar-roasted mixed coffee as it can clog the filters over time.
- Select the appropriate filter basket (single or double shot) and place it into the portafilter.
- Fill the filter basket with ground coffee. Use the measuring scoop provided.
- Tamp the coffee firmly and evenly using the tamper end of the scoop.
- Mu ese eyikeyi excess kofi lati rim ti portafilter.
- Insert the portafilter into the brewing head and turn it to the right until it is securely locked.
5.2 Ṣiṣe Espresso
- Ensure the machine is heated and ready (temperature gauge indicates optimal temperature).
- Fi ago rẹ si ori atẹ omi ti a fi n mu omi kuro labẹ awọn ihò portafilter.
- Tẹ awọn Espresso button. The machine will dispense the programmed amount of espresso.
- To adjust the volume, press and hold the Espresso button until the desired volume is reached, then release. The machine will remember this setting for future use.

Image 5.1: Preparing two cups of espresso simultaneously.
5.3 Ṣíṣe Cappuccino tàbí Latte
The machine features an integrated milk tank for automatic milk frothing.
- Ensure the milk tank is filled with milk and properly attached.
- Place your cup under both the coffee spout and the milk frothing nozzle.
- For Cappuccino, press the Cappuccino button. The machine will first dispense frothed milk, then coffee.
- For Latte, press the Latte button. The machine will dispense frothed milk, then coffee, with a different milk-to-coffee ratio.
- To adjust the volume of milk foam, use the foam adjustment dial on the milk tank.
- To adjust the total volume of the drink, press and hold the respective button until the desired volume is reached, then release.
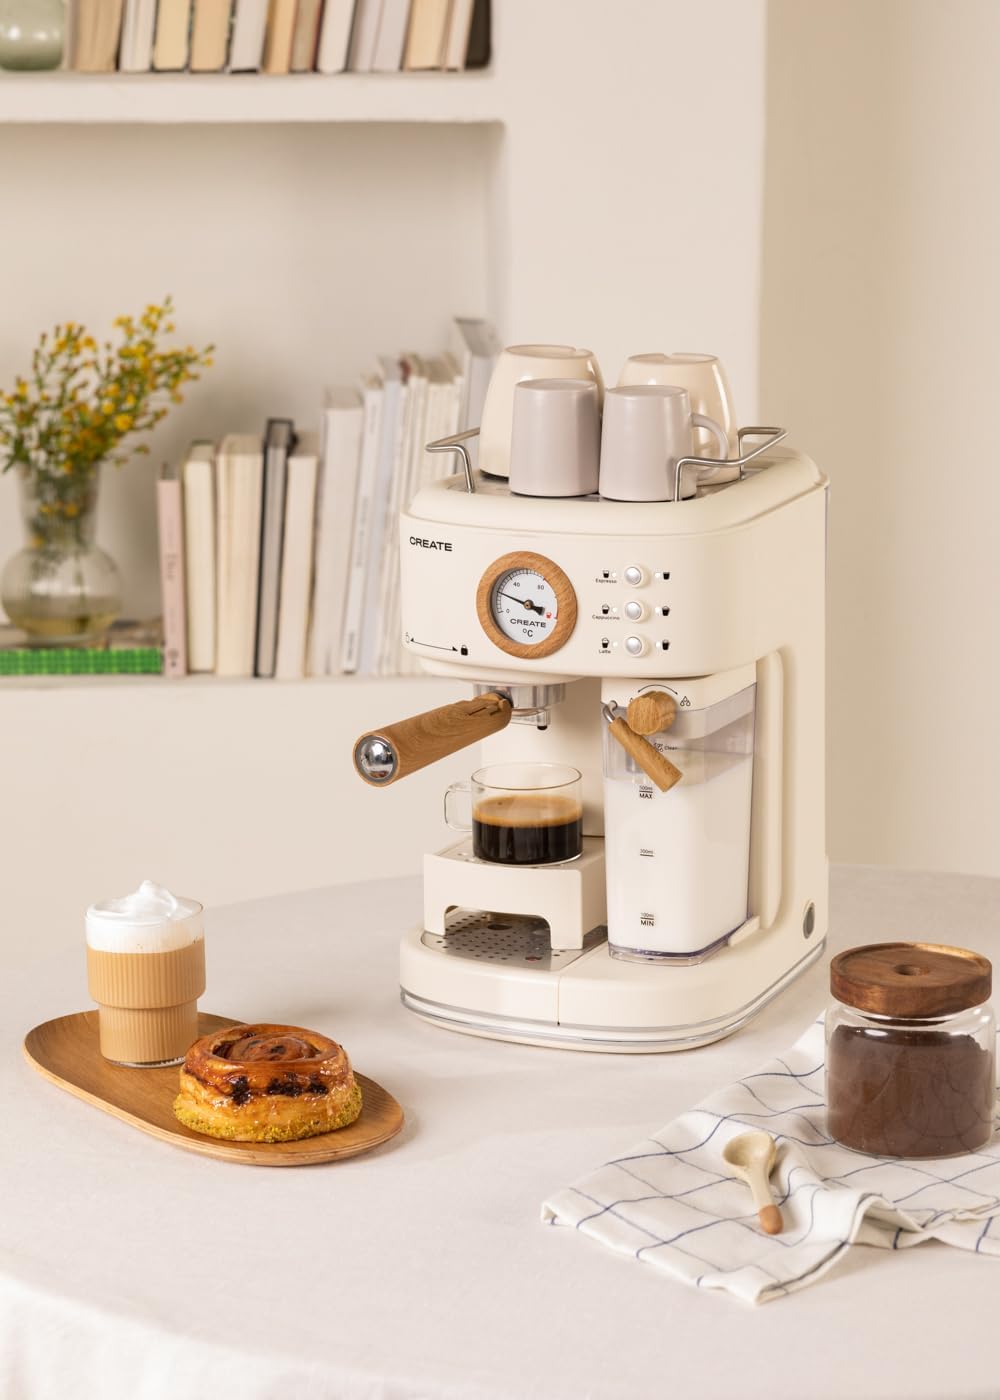
Image 5.2: User interacting with the control panel to select a beverage.
5.4 Adjustable Drip Tray
The drip tray can be adjusted to accommodate different cup sizes. Simply lift or lower the tray as needed to fit your cup comfortably and minimize splashing.

Image 5.3: The adjustable drip tray, designed to fit various cup sizes.
6. Itọju
6.1 Daily Cleaning
- Drip Atẹ: Empty and clean the drip tray daily or when the indicator shows it's full. Wash with warm, soapy water and rinse.
- Milk Tank and Frothing Nozzle: After each use, remove the milk tank and clean it thoroughly. Run the "Clean" function (if available, or dispense hot water through the nozzle) to clear any milk residue from the frothing system. This is crucial to prevent blockages and maintain hygiene.
- Portafilter ati Awọn Agbọn Ajọ: Remove spent coffee grounds. Rinse the portafilter and filter baskets under running water. Use a brush to remove any stubborn coffee residue.
- Òde: Mu ese ita ẹrọ naa pẹlu asọ, damp asọ. Ma ṣe lo awọn afọmọ abrasive tabi awọn paadi iyẹfun.
6.2 Nipasẹ
Regular descaling is essential to maintain machine performance and extend its lifespan, especially in areas with hard water. The frequency depends on water hardness and usage. Refer to the machine's indicator (if any) or descale every 2-3 months.
- Use a descaling solution specifically designed for coffee machines. Follow the instructions on the descaling solution packaging.
- Empty the water tank and fill it with the descaling solution mixed with water according to the solution's instructions.
- Place a large container under the coffee spout and milk frothing nozzle.
- Run the descaling cycle as per your machine's specific instructions (often involves pressing and holding certain buttons, or a dedicated descaling program).
- After the descaling solution has run through, rinse the water tank and fill it with fresh water. Run several cycles of plain water through the machine to thoroughly rinse out any descaling solution.
7. Laasigbotitusita
| Isoro | Owun to le Fa | Ojutu |
|---|---|---|
| Ko si kofi dispenses tabi o lọra sisan. | Water tank empty; machine not primed; coffee too finely ground or over-tamped; brewing head clogged. | Fill water tank; prime the machine; use coarser grind or less coffee; clean brewing head. |
| Milk not frothing properly or no milk dispensed. | Milk tank empty; milk frothing nozzle clogged; milk too cold/warm or type of milk. | Fill milk tank; clean frothing nozzle thoroughly; use cold milk (4-6°C); try different milk types. |
| Kofi ko gbona to. | Machine not fully preheated; cups not preheated. | Allow machine to fully preheat; preheat cups using hot water or the cup warming tray. |
| Ẹrọ n jo omi. | Omi omi ko joko daradara; drip atẹ kún; edidi oran. | Ensure water tank is correctly inserted; empty drip tray; contact support if problem persists. |
| Small coffee portions. | Programmed volume is too low. | Reprogram the desired volume by holding the button until the cup is filled to your preference. |
8. Awọn pato
| Ẹya ara ẹrọ | Ẹ̀kúnrẹ́rẹ́ |
|---|---|
| Brand | ṢẸDA |
| Awoṣe | THERA RETRO PRO |
| Àwọ̀ | Ipara funfun |
| Awọn iwọn Ọja (L x W x H) | 22.8 x 32.5 x 36 cm |
| Iwọn Nkan | 5 kilo |
| Volume (Water Tank) | 1.5 liters |
| Voltage | 240 folti |
| Titẹ | 20 igi |
| Kofi Iru | Kofi ilẹ |
| Pataki Ẹya | Integrated Milk Frother, Adjustable Drip Tray, NTC Temperature Control, Quick Heating |

Image 8.1: Product dimensions: 36cm height, 22.81cm width, 32.51cm depth.
9. Atilẹyin ọja ati Support
Your CREATE THERA RETRO PRO Espresso Machine comes with a standard manufacturer's warranty. For detailed warranty information, please refer to the warranty card included with your product or visit the official CREATE website. For technical support, spare parts, or service inquiries, please contact CREATE customer service directly. Ensure you have your model number (THERA RETRO PRO) and purchase details ready when contacting support.
For further assistance, please visit the official CREATE brand store: CREATE Brand Store
Ask a question about this manual
Ask about setup, troubleshooting, compatibility, parts, safety, or missing instructions. Manuals+ will review the question and use this page’s manual context to help answer it.