1. Ifihan
The ORBIT x Glasses tracker is designed to help you locate your eyewear using Apple's Find My network. This ultra-compact device seamlessly integrates with most eyeglass styles, providing a discreet and comfortable fit. It features a built-in speaker to assist in locating misplaced glasses and offers long-lasting battery life with convenient USB recharging.

Image: The ORBIT x Glasses tracker, a small black device, shown attached to the arm of a pair of eyeglasses, with a separate view of the tracker itself.
2. Eto
2.1. Ngba agbara ẹrọ
Before initial use, ensure your ORBIT x Glasses tracker is fully charged. Use the included USB charging cable to connect the device to a power source. The device requires at least 3 hours of charging before its first use.

Image: The ORBIT x Glasses tracker connected to its USB charging cable, illustrating the charging process.
2.2. Attaching to Eyeglasses
The ORBIT x Glasses tracker is designed for easy attachment to most eyeglass frames. It uses a 3M double-sided adhesive for secure placement. Ensure the surface of your eyeglass arm is clean and dry before applying the adhesive.
- Clean the desired attachment area on the arm of your glasses.
- Peel off the protective backing from the 3M double-sided adhesive.
- Carefully align the ORBIT x Glasses tracker with the eyeglass arm and press firmly to secure.
- Note: The height of the frames needs to be at least 4mm/0.16" to fit the device discreetly.
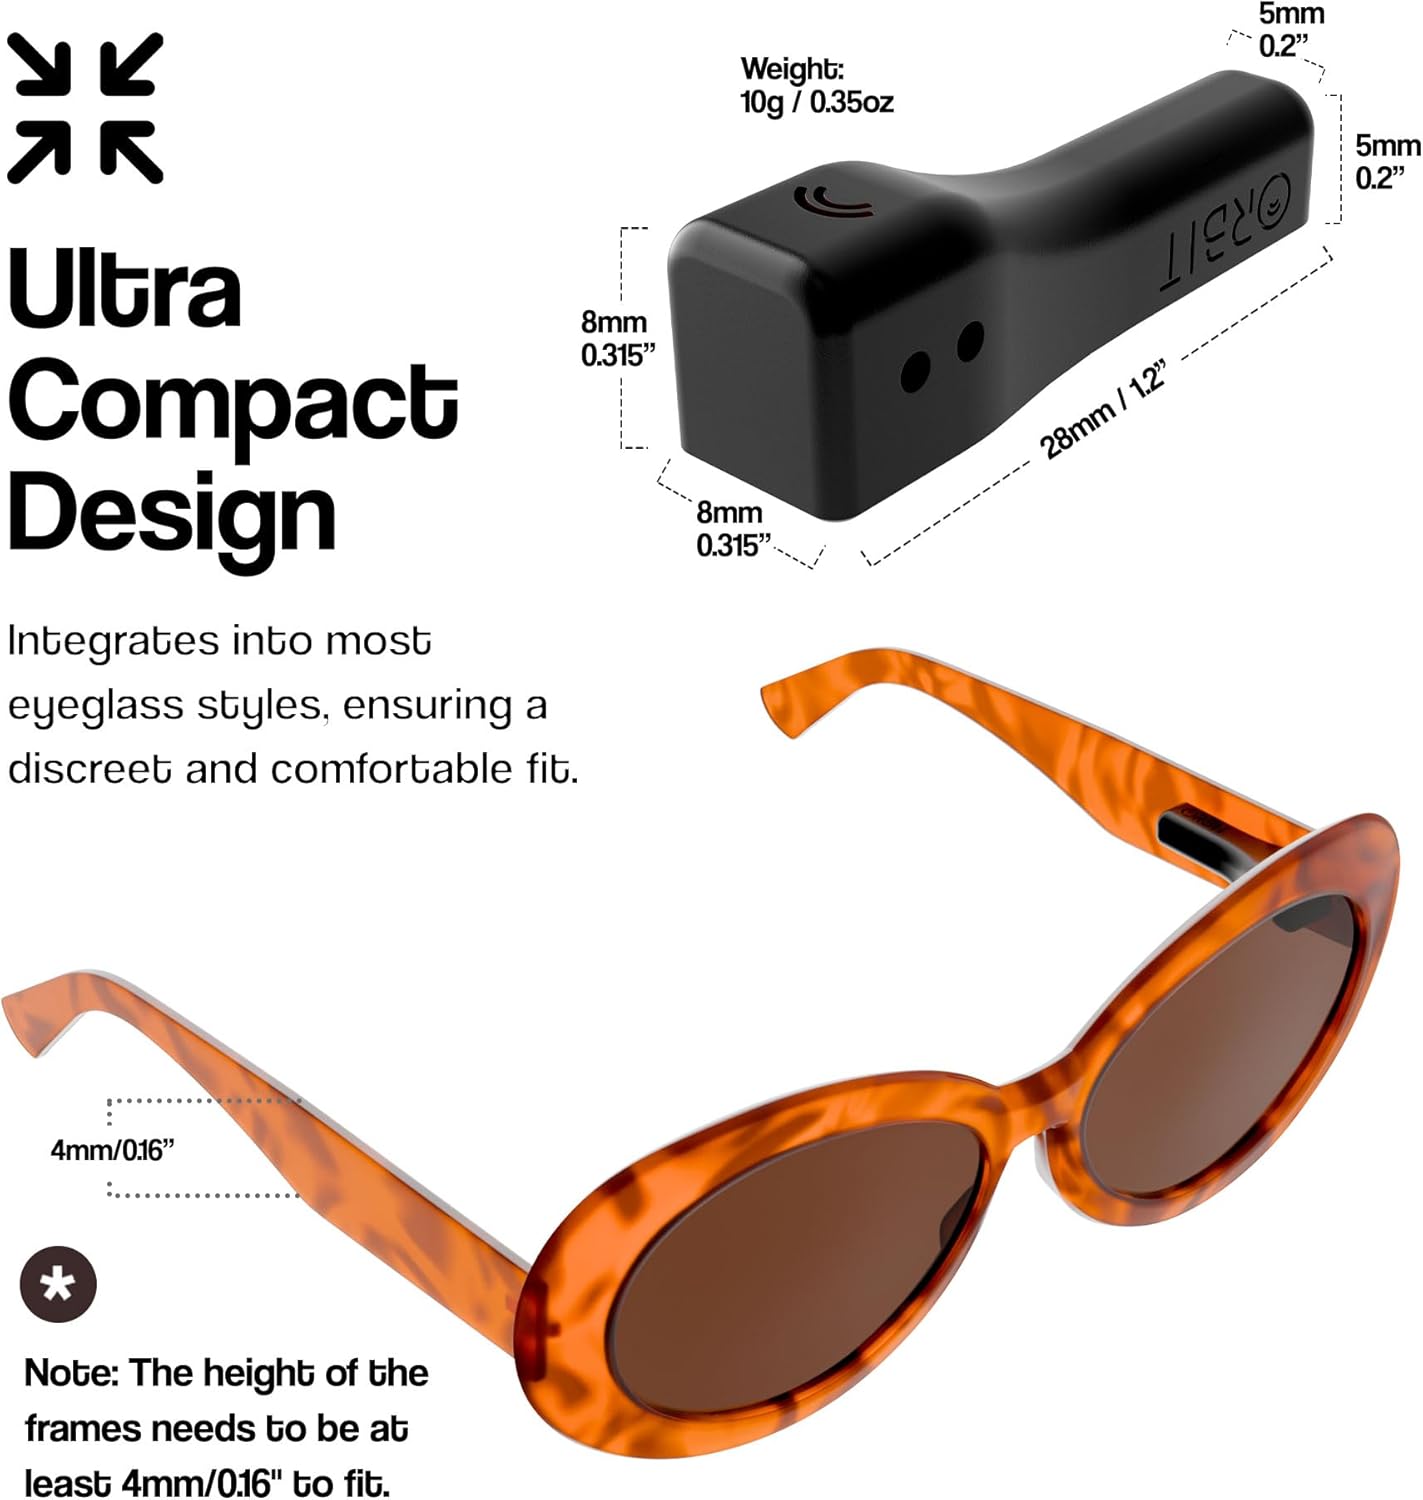
Image: A diagram illustrating the ultra-compact design and dimensions of the ORBIT x Glasses tracker, along with an example of its attachment to an eyeglass frame.
2.3. Ṣíṣepọ̀ pẹ̀lú Apple Find My
The ORBIT x Glasses tracker integrates directly with Apple's Find My app. No separate application is required for tracking.
- Ensure your iOS device (iPhone, iPad, or Mac) is running iOS 14.3 or later.
- Ṣii Apple Wa ohun elo mi lori ẹrọ rẹ.
- Follow the on-screen instructions to add a new item to your Find My network.
- The ORBIT x Glasses tracker will appear as a discoverable item. Select it to complete the pairing process.

Image: A person holding a smartphone displaying the Apple Find My app, with a glasses icon on the map, indicating successful integration.
3. Awọn ilana Iṣiṣẹ
3.1. Locating Your Glasses
Once paired, you can locate your ORBIT x Glasses using the Apple Find My app:
- Ṣii ohun elo Wa Mi lori ẹrọ iOS rẹ.
- Navigate to the 'Items' tab.
- Select your ORBIT x Glasses from the list.
- The app will display the last known location of your glasses on a map.
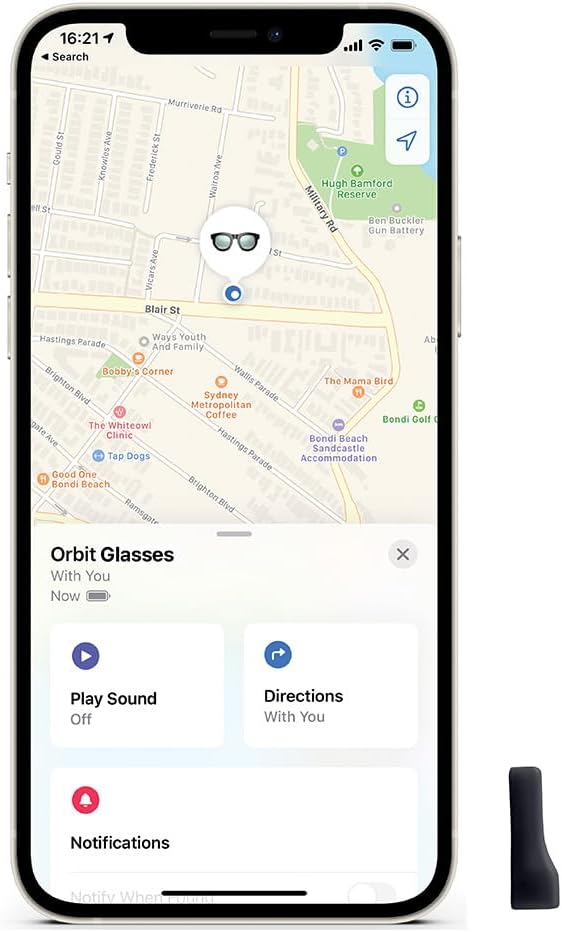
Image: A smartphone screen showing the Apple Find My app with the location of "Orbit Glasses" marked on a map.
3.2. Playing a Sound
If your glasses are nearby but out of sight, you can play a sound to help locate them:
- In the Find My app, select your ORBIT x Glasses.
- Tap the 'Play Sound' option.
- The built-in speaker on your ORBIT x Glasses will emit an audible alert.

Image: A smartphone screen displaying the 'Play Sound' feature within the Find My app, next to the ORBIT x Glasses tracker.
3.3. iCloud Syncing
Your ORBIT x Glasses location data is synchronized across all your Apple devices via iCloud, ensuring you can track them from any of your connected Apple products.

Image: A man holding a smartphone, with an overlay graphic indicating "iCloud Syncing" and the requirement for iOS 14.3 or later.
3.4. Asiri Awọn ẹya ara ẹrọ
The ORBIT x Glasses tracker is designed with privacy in mind:
- All communications within the Find My network are fully encrypted and anonymous.
- Your location data and history are never stored on the ORBIT device itself.

Image: A smartphone screen displaying the Find My map interface, with a privacy shield icon and text emphasizing privacy protection.
4. Itọju
4.1. Iye Batiri ati Gbigba agbara
The ORBIT x Glasses tracker offers up to one month of battery life on a single charge. Recharge the device using the provided USB cable when the battery indicator in the Find My app shows low power.
4.2. Ninu
To maintain the device and its adhesive, gently wipe the ORBIT x Glasses tracker with a soft, dry cloth. Avoid using harsh chemicals or abrasive materials.
5. Laasigbotitusita
5.1. Device Not Appearing in Find My App
- Ensure your iOS device is updated to iOS 14.3 or later.
- Verify the ORBIT x Glasses tracker is charged.
- Make sure Bluetooth is enabled on your iOS device.
- Try restarting your iOS device and the ORBIT x Glasses tracker (if applicable, by connecting to charger).
5.2. Low Volume from Speaker
- Ensure there are no obstructions covering the speaker on the device.
- The sound volume is designed to be audible in quiet indoor environments. In noisy settings, it may be less noticeable.
5.3. Adhesive Not Holding
- Ensure the surface of your glasses was thoroughly cleaned and dried before applying the adhesive.
- Apply firm pressure for several seconds when attaching the device.
- If the adhesive wears out, use a new piece of 3M double-sided adhesive (not included, but commonly available).
6. Awọn pato
| Ẹya ara ẹrọ | Ẹ̀kúnrẹ́rẹ́ |
|---|---|
| Nọmba awoṣe | OB03236 |
| Iwọn Nkan | 0.353 iwon |
| Ọja Mefa | 1.1 x 0.2 x 0.2 inches |
| Batiri | 1 batiri litiumu ion (pẹlu) |
| Igbesi aye batiri | Titi di oṣu 1 lori idiyele ẹyọkan |
| Pataki Awọn ẹya ara ẹrọ | Rechargeable, Built-in Speaker, Apple Find My Integration |
| Ibamu | iOS devices only (iOS 14.3 or later) |
7. Atilẹyin ọja ati Support
7.1. atilẹyin ọja Information
For specific warranty details, please refer to the product packaging or contact ORBIT customer service. Standard warranties typically cover manufacturing defects for a limited period from the date of purchase.
7.2. Onibara Support
For further assistance, technical support, or inquiries, please visit the official ORBIT website or contact their customer service department. You can often find user guides and FAQs on the manufacturer's support pages.
Atilẹyin ori ayelujara: finderbit.com/help