1. Ifihan
This manual provides detailed instructions for the setup, operation, and maintenance of your Volcora Thermal Receipt Printer, Model 500204. This high-speed 80mm POS printer features an auto cutter and offers versatile connectivity options including USB and Bluetooth, supporting various operating systems. Please read this manual thoroughly before using the printer to ensure proper functionality and longevity.
2. Alaye Aabo
- Ensure the printer is connected to a grounded power outlet.
- Do not expose the printer to water or high humidity.
- Yago fun gbigbe itẹwe si orun taara tabi sunmọ awọn orisun ooru.
- Lo adapter agbara ti a pese pẹlu ẹrọ itẹwe nikan.
- Ma ṣe gbiyanju lati tuka tabi tun ẹrọ itẹwe funrararẹ. Kan si atilẹyin alabara fun iranlọwọ.
- Keep hands clear of the auto cutter mechanism during operation.
3. Package Awọn akoonu
Daju pe gbogbo awọn nkan ti a ṣe akojọ rẹ si isalẹ wa ninu package rẹ:
- Volcora Thermal Receipt Printer - Standard
- Adapter agbara
- Roller iwe
- Okun USB
- CD (for drivers and manual)
- Afowoyi
- Sample Receipt Paper

Nọmba 3.1: Included Components - Thermal Receipt Printer, Power Adapter, USB Cable, Test Paper, and Installation CD.
4. Ọja Ipariview

Nọmba 4.1: Iwaju view of the Volcora Thermal Receipt Printer with a sample receipt.
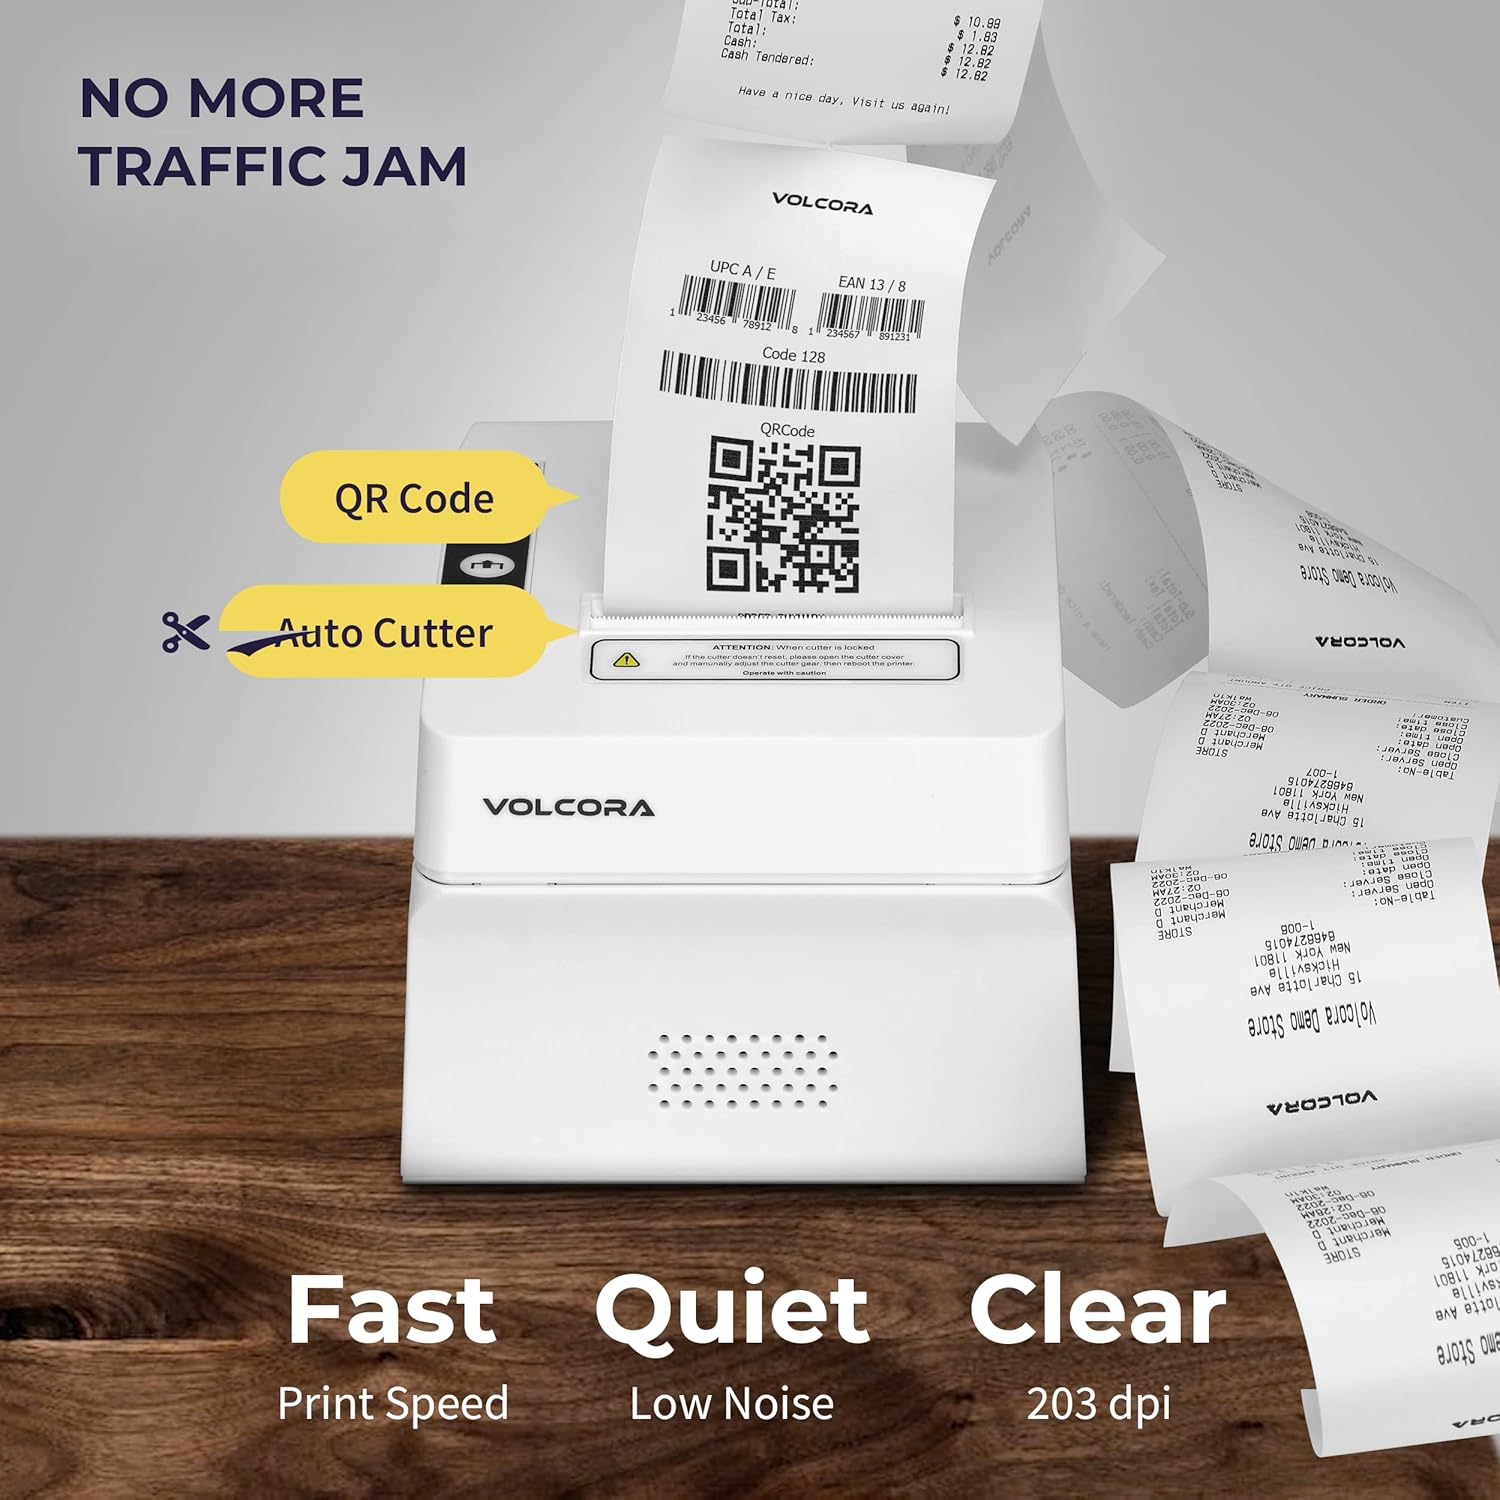
Nọmba 4.2: Key features include QR code printing, automatic cutter, fast print speed, low noise, and 203 dpi clear printing.
4.1 Àwọn Ibudo àti Bọ́tìnì

Nọmba 4.3: Rear ports include Power Supply, Cash Drawer Port (6Pin RJ11), and USB Port. Front panel features Power LED, Error LED, Paper LED, Feed Button, and Cover Open Button.
4.2 Àwọn Àṣàyàn Ìgbékalẹ̀

Nọmba 4.4: The printer supports both wall mounting (as a kitchen printer) and counter placement (as a receipt printer).
5. Eto
5.1 Initial Connection and Paper Roll Installation
- Unbox the printer and all accessories.
- Connect the power adapter to the printer and a power outlet.
- Open the paper cover by pressing the "PUSH" button.
- Insert the 80mm thermal paper roll, ensuring the paper feeds from the bottom and the leading edge extends slightly past the cutter.
- Pa ideri iwe naa duro ṣinṣin titi ti o fi tẹ sinu ibi.
- Connect the USB cable from the printer to your computer (for initial setup or USB printing).

Nọmba 5.1: Pariview of the installation process: Download drivers, Install, Connect power and USB, and Test print.
5.2 Printer Self-Test
Performing a self-test helps verify the printer's basic functionality and prints its configuration settings.
- Rii daju pe itẹwe ti wa ni pipa.
- Press and hold the "Feed" button.
- While holding the "Feed" button, power on the printer.
- Release the "Feed" button after approximately 5 seconds. The printer should print a self-test page.
For a visual guide on unboxing, connecting, and performing a self-test, please watch the video below:
Fidio 5.1: Getting Started with Volcora Thermal Receipt Printer - Unboxing, Connecting, and Self-Test.
6. Fifi sori awakọ ati Asopọmọra
The Volcora Thermal Receipt Printer supports USB and Bluetooth connectivity. Proper driver installation is crucial for seamless operation.
6.1 System ibamu
Jọwọ tunview the compatibility chart before proceeding with driver installation:

Nọmba 6.1: Ibamu ti pariview for USB and Bluetooth connections across various operating systems. Note that Mac OS and iOS are not supported.

Nọmba 6.2: List of compatible and non-compatible POS software applications.
6.2 Windows Driver Installation (USB)
For Windows users, download the latest drivers from the official Volcora support website. The installation CD also contains the necessary drivers.
- Ṣe igbasilẹ awakọ fun Windows lati volcora.com/support.
- Unzip awọn gbaa lati ayelujara file and open the driver application.
- Follow the on-screen prompts, select your printer model (500204), and complete the installation.
- After installation, the printer should be recognized in your Windows "Printers & Scanners" settings, allowing you to print a test page.
Refer to Video 5.1 for initial connection steps. The video also demonstrates driver installation and testing tools for Windows.
6.3 Bluetooth Connection with Windows PC
This section outlines two methods for connecting your printer via Bluetooth to a Windows PC.
Method 1: Driver Pre-installed with USB Connection
- Ensure the printer driver has been installed using a USB cable connection (refer to Section 6.2).
- Go to Windows Settings > Bluetooth & devices > Add device > Bluetooth.
- Select the printer (e.g., "500203" or "Volcora Thermal Printer") from the list of available devices and pair it. Enter the default PIN (usually "0000" or "1234").
- After pairing, check the printer's properties in "Devices and Printers" to identify the assigned COM port (e.g., COM4).
- Use the Setting Tool (available from volcora.com/support) to select the correct COM port and perform a test print.
Method 2: Driver Installation After Bluetooth Connection
- Start by pairing the printer via Bluetooth directly (Windows Settings > Bluetooth & devices > Add device > Bluetooth). Enter the default PIN.
- Open Device Manager (search in Windows) and expand "Ports (COM & LPT)" to find the COM port used by the Bluetooth printer (e.g., COM3 or COM4).
- Install the printer driver (from volcora.com/support or CD), selecting the identified COM port during the installation process. If the first COM port doesn't work, try the other one listed.
- Once the driver is installed, the printer should appear in "Printers & Scanners" and be ready for use.
Fidio 6.3: How to connect your Volcora Thermal Receipt Printer via Bluetooth to a Windows PC.
6.4 Bluetooth Connection with Android Tablets
To connect your printer to an Android tablet, follow these steps:
- Go to your Android tablet's Settings and enable Bluetooth.
- Wa fun new devices and select your printer (e.g., "500203"). Pair the device using the default PIN (usually "0000" or "1234").
- Download the "PrintDemo Tool" from volcora.com/support.
- Open the PrintDemo Tool, go to "Setting", select "Bluetooth" as the interface, and search for your paired printer.
- Perform a "print test" to confirm connectivity.
- For POS applications like Loyverse POS or W&O POS, navigate to their printer settings, select "Bluetooth" as the interface, and choose your Volcora printer to perform a test print.
Fidio 6.4: How to connect your Volcora Thermal Receipt Printer via Bluetooth to an Android Tablet.
7. Awọn ilana Iṣiṣẹ
Once the printer is successfully connected and drivers are installed, it will function as a standard printer for your compatible system or POS application. Ensure your application is configured to use the Volcora Thermal Printer for receipt printing.
- Titẹ sita: Send print commands from your software. The printer will automatically feed and cut the receipt.
- Ifunni Iwe: Press the "Feed" button on the front panel to manually advance the paper.
- Atọka aṣiṣe: The "Error" LED will illuminate if there is a paper jam, paper out, or other issues. Refer to the troubleshooting section.
8. Itọju
Itọju deedee n ṣe idaniloju iṣẹ ṣiṣe to dara julọ ati gigun igbesi aye ẹrọ itẹwe rẹ.
- Ninu ori Titẹjade: Lo asọ rirọ, ti ko ni lint dampened with isopropyl alcohol to gently wipe the thermal print head. Ensure the printer is off and cooled down before cleaning.
- Fífọ ohun èlò ìyípo àwo: Rotate the platen roller and wipe it with an alcohol-dampened cloth to remove paper dust or adhesive residue.
- Ode Ninu: Wipe the exterior of the printer with a soft, dry cloth. Avoid abrasive cleaners.
9. Awọn pato
Detailed technical specifications for the Volcora Thermal Receipt Printer Model 500204:

Nọmba 9.1: Visual representation of printer dimensions and key specifications.
| Ẹya ara ẹrọ | Ẹ̀kúnrẹ́rẹ́ |
|---|---|
| Ọja Mefa | 4"D x 8"W x 8"H |
| Iyara titẹ sita | 220mm/s |
| Iwọn Iwe | 80 mm (79.5 millimeters) |
| Iwọn titẹ sita | 72 mm |
| Dot iwuwo | 8 dot/mm, 576 dot/line |
| Titẹ Ipinnu | 203 dpi (203 x 203 DPI) |
| Òfin itẹwe | ESC/POS |
| kooduopo Orisi | UPC-A/ UPC-E/ EAN13/ EAN8/ CODE39/ ITF25/ CODABAR/ CODE93/ CODE128/ QRCODE/ PDF417/ Data matrix |
| Agbara titẹ sii | AC 110V / 240V, 50-60Hz |
| Agbara Ijade | DC 24V/2A |
| Auto Cutter Life | 1.5 million gige |
| Asopọmọra Technology | Bluetooth, USB |
| Imọ-ẹrọ titẹ sita | Gbona |
| Awọn ẹrọ ibaramu | Laptops, PC, Tablets |
| Agbara Ibi ipamọ Iranti | 64 KB |
| Iwọn Nkan | 3.76 iwon (1.71 kilo) |
| Nọmba awoṣe | 500204 |
| UPC | 810041565044 |
10. Laasigbotitusita
If you encounter issues with your Volcora Thermal Receipt Printer, consider the following common solutions:
- Itẹwe Ko Dahun:
- Ṣayẹwo awọn asopọ agbara ati rii daju pe itẹwe ti wa ni titan.
- Verify USB or Bluetooth connection status.
- Perform a printer self-test (Section 5.2) to confirm internal functionality.
- Reinstall drivers if necessary.
- Didara Titẹjade Ko dara:
- Ensure you are using high-quality thermal paper.
- Clean the thermal print head (Section 8).
- Check printer settings for print density or speed adjustments.
- Awọn Jams Iwe:
- Turn off the printer and carefully open the paper cover.
- Remove any jammed paper or debris.
- Ensure the paper roll is correctly installed and not too tight.
- Awọn oran Asopọ Bluetooth:
- Ensure Bluetooth is enabled on both the printer and your device.
- Unpair and re-pair the printer.
- Verify the correct COM port is selected in your driver or application settings.
For further assistance, please refer to the support information in Section 11.
11. Atilẹyin ọja ati Support
All Volcora products are backed by a limited lifetime warranty. Our US-based customer support team is available to assist with any issues regarding setup, connection, compatibility, or other product-related concerns.
- Visit Help Portal: https://help.volcora.com
- Download Support Center: https://volcora.com/support
- Olubasọrọ Support Onibara: support@volcora.com

Nọmba 11.1: Volcora offers US-based customer support for product assistance.