
1. Ifihan
The EVTSCAN Peakmeter PM8213C is a portable digital multimeter designed for various electrical measurements. This instrument offers stable performance, high precision, and low power consumption, making it a reliable tool for both professional and DIY users. Its compact appearance and comprehensive features ensure accurate readings for voltage, current, resistance, continuity, non-contact voltage (NCV), frequency, and duty cycle.
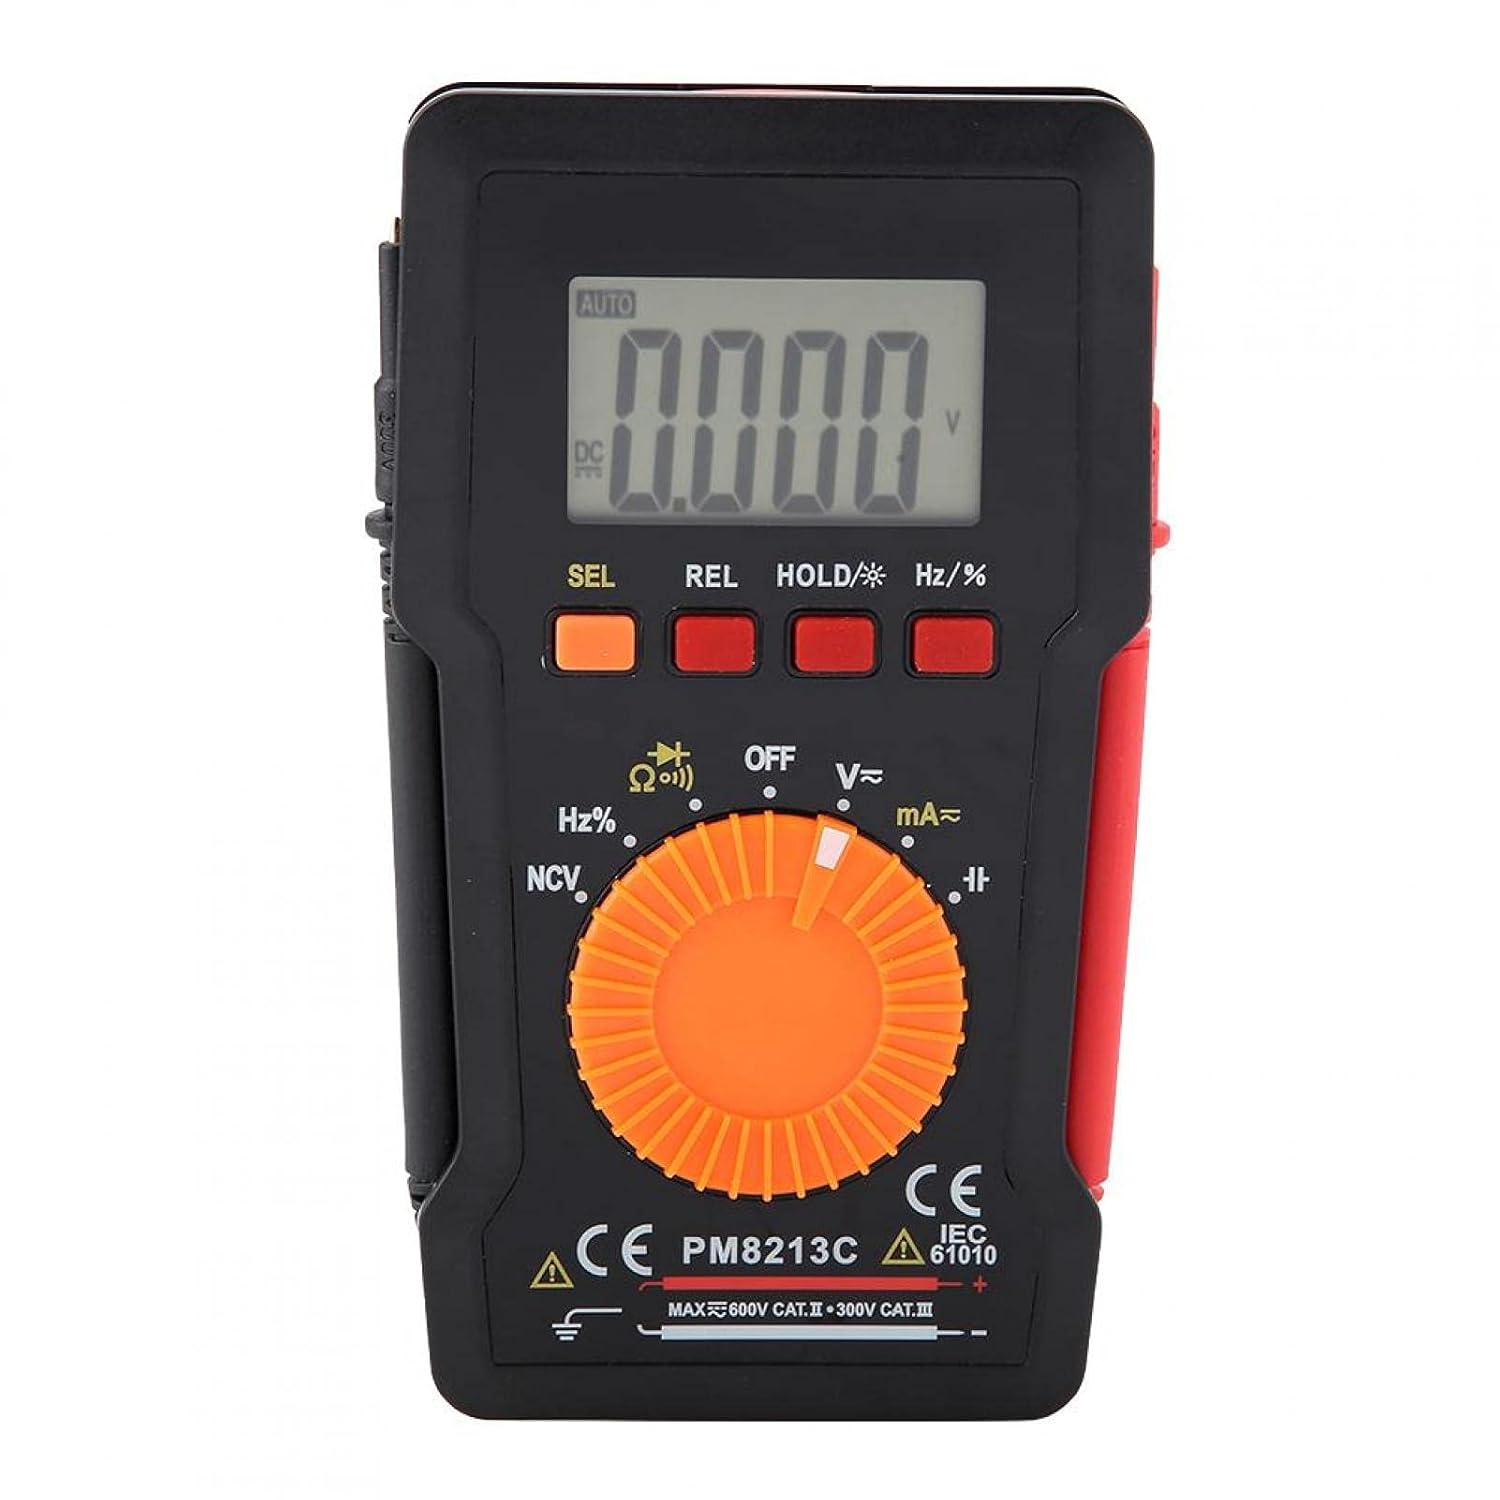
olusin 1: Iwaju view of the EVTSCAN Peakmeter PM8213C Digital Multimeter.
2. Alaye Aabo
To ensure safe operation and service of the meter, please read this manual carefully before use. Failure to observe safety warnings can result in serious injury or death. Always adhere to local and national safety codes.
- Maṣe kọja awọn ifilelẹ titẹ sii ti o pọju fun iṣẹ eyikeyi.
- Lo iṣọra nigbati o ba n ṣiṣẹ pẹlu voltages loke 30V AC RMS, 42V tente oke, tabi 60V DC. Awọn wọnyi ni voltages duro a mọnamọna ewu.
- Before measuring current, ensure the meter's test leads are connected to the correct input jacks and the function switch is set to the appropriate current range.
- Always disconnect the test leads from the circuit before changing the function switch position.
- Rọpo batiri naa lẹsẹkẹsẹ nigbati ifihan batiri kekere ba han lati rii daju pe o peye.
- Do not operate the meter if it appears damaged or if the protective casing ti yọ kuro.
- Pa awọn ọwọ ati ika ọwọ mọ lẹhin awọn idena wiwa lakoko awọn wiwọn.
3. Ọja Ipariview
3.1. Awọn irinše
The PM8213C multimeter consists of the following main components:
- Ifihan LCD: Ṣe afihan awọn kika wiwọn, awọn ẹya, ati awọn afihan iṣẹ.
- Awọn bọtini iṣẹ: SEL (Select), REL (Relative), HOLD (Data Hold), Hz/% (Frequency/Duty Cycle).
- Yiyi pada: Used to select the desired measurement function (e.g., V~, V-, Ω, Continuity, NCV, Hz%, mA~, A~).
- Awọn Jacks ti nwọle: Terminals for connecting test leads (COM, VΩHz, mA, A).
- Awọn itọsọna Idanwo: Red and black leads for connecting to the circuit under test.
- Ọran Idaabobo: Provides protection for the meter.

Figure 2: Key features of the PM8213C Multimeter, including LCD screen and compact design.
3.2. Awọn aami Ifihan
Familiarize yourself with the symbols that may appear on the LCD display:
- LATIO: Auto-ranging mode is active.
- DC/AC: Direct Current / Alternating Current.
- V: Volts (Iwọntagati).
- Ω: Ohms (Agbára ìdènà).
- Hz: Hertz (Ìgbàgbogbo).
- %: Ojuse Cycle.
- NCV: Non-Olubasọrọ Voltage erin.
- MU: Data Hold function is active.
- REL: Ipo wiwọn ibatan.
- Àmì Bátírì: Tọkasi agbara batiri kekere.
- OOL: Over-range indication.
4. Eto
4.1. Fifi sori batiri
The PM8213C requires one CR2032 (3V) button cell battery for operation. The battery is typically not included in the package.
- Rii daju pe multimeter ti wa ni pipa.
- Wa yara batiri ni ẹhin mita naa.
- Use a suitable tool (e.g., a small screwdriver) to open the battery compartment cover.
- Insert the CR2032 battery, observing the correct polarity (+ and - markings).
- Rọpo ideri iyẹwu batiri ki o ni aabo.
4.2. Ìsopọ̀ ìtọ́sọ́nà ìdánwò
Connect the test leads to the appropriate input jacks before taking any measurements.
- Sopọ awọn dudu test lead to the COM (wọpọ) Jack input.
- Fún ọ̀pọ̀lọpọ̀ ìwọ̀n (ìwọ̀n)tage, resistance, frequency, duty cycle, continuity), connect the pupa test lead to the VΩHz Jack input.
- For current measurements (mA), connect the pupa test lead to the mA Jack input.
- For higher current measurements (A), connect the pupa test lead to the A input jack (if available and distinct from mA). Note: The PM8213C typically uses a single current input for mA/A, check the dial for specific ranges.
5. Awọn ilana Iṣiṣẹ
5.1. Agbara Tan / Paa
To turn the multimeter ON, rotate the function switch from the OFF position to any desired measurement function. To turn the multimeter OFF, rotate the function switch to the OFF position. The meter features an automatic power-off function after approximately 30 minutes of inactivity to conserve battery life.
5.2. Aṣayan iṣẹ
Use the rotary switch to select the primary measurement function. For functions with multiple modes (e.g., AC/DC voltage, continuity/diode), press the SEL button to toggle between modes.
5.3. Wiwọn DC Voltage (V-)
- Connect the red test lead to the VΩHz jack and the black test lead to the COM jack.
- Set the rotary switch to the V- position.
- Connect the test leads in parallel to the DC voltage source or component you wish to measure.
- Ka voltage iye lori ifihan LCD.
5.4. Wiwọn AC Voltage (V~)
- Connect the red test lead to the VΩHz jack and the black test lead to the COM jack.
- Set the rotary switch to the V~ position.
- Connect the test leads in parallel to the AC voltage source or component.
- Ka voltage iye lori ifihan LCD.
5.5. Ìwọ̀n Àìdádúró (Ω)
- Rii daju pe iyika naa ti ni agbara ṣaaju idiwọn resistance.
- Connect the red test lead to the VΩHz jack and the black test lead to the COM jack.
- Set the rotary switch to the Ω position.
- So àwọn ìtọ́sọ́nà ìdánwò pọ̀ mọ́ ara ẹ̀rọ tí o fẹ́ wọ̀n resistance rẹ̀.
- Ka iye resistance lori ifihan LCD.
5.6. Idanwo Itẹsiwaju (Ω))))
- Rí i dájú pé ẹ̀rọ náà kò ní agbára púpọ̀.
- Connect the red test lead to the VΩHz jack and the black test lead to the COM jack.
- Set the rotary switch to the Continuity position (often shared with Resistance or Diode). Press SEL if needed to select continuity.
- Connect the test leads across the component or wire.
- Tí ìtẹ̀síwájú bá wà (ìdènà díẹ̀), mita náà yóò mú ìró ohùn tí a lè gbọ́ jáde.
5.7. Non-olubasọrọ Voltage (NCV) erin
- Ṣeto iyipada iyipo si ipo NCV.
- Move the top edge of the multimeter close to the conductor suspected of having AC voltage.
- Mita naa yoo tọka si wiwa AC voltage through an audible beep and/or visual indicator (e.g., LED).
5.8. Measuring Frequency (Hz) and Duty Cycle (%)
- Connect the red test lead to the VΩHz jack and the black test lead to the COM jack.
- Set the rotary switch to the Hz/% position.
- So awọn itọsọna idanwo pọ ni afiwe si orisun ifihan agbara.
- Tẹ awọn Hz /% button to toggle between frequency and duty cycle measurements.
- Ka iye lori ifihan LCD.
5.9. Measuring Current (mA~, A~)
- IKILO: Never connect the meter in parallel to a voltage source when measuring current. This will blow the fuse and can damage the meter.
- Rí i dájú pé ẹ̀rọ náà kò ní agbára púpọ̀.
- So dudu igbeyewo asiwaju si COM Jack.
- Fun milliampere (mA) measurements, connect the red test lead to the mA jack. For ampere (A) measurements, connect the red test lead to the A jack (if separate).
- Set the rotary switch to the appropriate mA~ or A~ position.
- Open the circuit where you want to measure current and connect the meter in series with the load.
- Re-energize the circuit and read the current value on the LCD display.
6. Itọju
6.1. Ninu
Fi ìpolówó nu àpótí mita naaamp Aṣọ àti ọṣẹ ìfọṣọ díẹ̀. Má ṣe lo àwọn ohun ìfọṣọ tàbí àwọn ohun olómi. Jẹ́ kí àwọn ibi tí a fi ń wọlé wà láìsí ìdọ̀tí àti ọ̀rinrin.
6.2. Batiri Rirọpo
When the low battery indicator appears on the display, replace the CR2032 battery promptly to ensure accurate measurements.
- Turn the multimeter OFF and disconnect all test leads.
- Ṣii ideri iyẹwu batiri ni ẹhin mita naa.
- Yọ batiri CR2032 atijọ kuro.
- Insert a new CR2032 (3V) button cell battery, ensuring correct polarity.
- Ni aabo pa ideri kompaktimenti batiri ni aabo.
6.3. Rirọpo fiusi
If the current measurement function stops working, the fuse may need replacement. The fuse specification is F 400mA/250V.
- Turn the multimeter OFF and disconnect all test leads.
- Open the meter's casing (refer to the battery replacement section for access, or consult the full service manual if necessary).
- Locate the blown fuse.
- Carefully remove the old fuse and replace it with a new fuse of the exact same type and rating (F 400mA/250V).
- Reassemble the meter's casing ni aabo.
7. Laasigbotitusita
If the meter does not function correctly, check the following points before seeking service:
- Ko si ifihan tabi ifihan ti ko lagbara: Ṣayẹwo fifi sori batiri ki o rọpo ti o ba jẹ dandan.
- Awọn kika ti ko tọ: Ensure test leads are correctly connected to the appropriate input jacks and the rotary switch is set to the correct function and range. Check battery level.
- Wiwọn lọwọlọwọ ko ṣiṣẹ: Check and replace the fuse if blown. Ensure test leads are connected in series with the circuit.
- "OOL" displayed: Iye ti a wọn ju iwọn ti a yan lọ. Yipada si iwọn ti o ga julọ tabi rii daju pe titẹ sii wa laarin agbara mita naa.
8. Awọn pato
| Giga | O kere ju 2000 m |
| Awọn iwọn otutu ti nṣiṣẹ | 0 ~ 40 °C |
| Ọriniinitutu ti nṣiṣẹ | <80% RH (not considered at <10 °C) |
| Ibi ipamọ otutu | -10 ~ 60 °C |
| Ọriniinitutu ipamọ | <70% RH (remove batteries) |
| Olusodipupo iwọn otutu | 0.1 precision/°C |
| Max Allowable Voltage (Input to Ground) | 600V DC tabi AC rms |
| Idaabobo fiusi | F 400mA/250V |
| SampOṣuwọn ling | Approximately 3 times/second |
| Agbara Aifọwọyi Paa | O fẹrẹ to iṣẹju 30 |
| Ifihan | Maximum 3999 counts |
| Ifihan ti o ga ju iwọn lọ | "OOL" |
| Ibi ti ina elekitiriki ti nwa | CR2032 (3V) button cell battery |
| Iwọn | Approximately 120 - 142 g |
| Awọn iwọn (L x W x H) | 127 x 70 x 12.5 mm (tó tó 12.8 x 7.5 x 1.3 cm) |
8.1. DC Voltage (PM8213C)
| Ibiti o | Ipinnu | Yiye |
|---|---|---|
| 4 V | 0.001 V | ± (0.1% + 3 awọn nọmba) |
| 40 V | 0.01 V | ± (0.1% + 3 awọn nọmba) |
| 400 V | 0.1 V | ± (0.1% + 3 awọn nọmba) |
| 600 V | 1 V | ± (0.1% + 3 awọn nọmba) |
8.2. Package Awọn akoonu
- 1 x Digital Multimeter (PM8213C)
- 2 x Awọn itọsọna Idanwo
- 1 x Ọran Idaabobo
9. Atilẹyin ọja ati Support
Fun alaye atilẹyin ọja tabi atilẹyin imọ ẹrọ, jọwọ kan si ataja tabi olupese taara. Tọju iwe-ẹri rira rẹ bi ẹri rira.