
1. Ifihan
This manual provides essential instructions for the safe and effective operation of your CRAFTSMAN CMXCESM258 12A Car Battery Charger and Maintainer. This device is a 4-in-1 solution designed to charge, maintain, test, and recondition 6V and 12V batteries. It is compatible with various battery types including standard, AGM, lithium (LiFePO4), and deep-cycle batteries found in power sport vehicles, automobiles, and marine applications.

Aworan 1.1: Iwaju view of the CRAFTSMAN CMXCESM258 battery charger.
2. Awọn Ilana Aabo pataki
IKILO: Read all instructions carefully before using this product. Failure to follow these instructions may result in electric shock, fire, or serious injury. Save these instructions for future reference.
2.1 Gbogbogbo Aabo Awọn iṣọra
- Nigbagbogbo wọ aabo oju ati aṣọ aabo nigbati o ba n ṣiṣẹ pẹlu awọn batiri.
- Ensure adequate ventilation when charging batteries to prevent accumulation of explosive gases.
- Ma ṣe mu siga tabi gba awọn ina tabi ina ni agbegbe batiri tabi ṣaja.
- Maṣe gba agbara si batiri tio tutunini.
- Jẹ́ kí ẹ̀rọ amúlétutù náà jìnnà sí omi, òjò tàbí ọ̀rinrin tó pọ̀ jù.
- Má ṣe lo ẹ̀rọ amúṣẹ́ náà bí ó bá ti lù ú, tí ó ti jábọ́, tàbí tí ó ti bàjẹ́.
- Ọja yii ni awọn kemikali ti a mọ si Ipinle California lati fa akàn ati awọn abawọn ibimọ tabi ipalara ibisi miiran.
2.2 Itanna Abo
- Ensure the AC power cord is in good condition and not damaged.
- Connect the charger to a properly grounded outlet.
- Ge asopọ agbara AC ṣaaju ṣiṣe tabi fifọ awọn asopọ si batiri naa.
3. Package Awọn akoonu
Jẹrisi pe gbogbo awọn ohun kan wa ninu package:
- (1) CRAFTSMAN CMXCESM258 Fully Automatic Battery Charger and Maintainer
- (1) Ilana olumulo
4. Awọn ẹya Ọja
The CRAFTSMAN CMXCESM258 offers a range of features for comprehensive battery care:
- 4-in-1 Ẹrọ: Charges, maintains, tests, and reconditions batteries.
- Immediate Charging Power: Delivers 12-amp 12V charging, 3-amp 12V charging and maintaining, and 2-amp 6V charging and maintaining.
- Smart Trickle Charge: Maintains 6V and 12V batteries safely over time without overcharging.
- Ibamu gbooro: Works with gas and diesel vehicles, 6V and 12V batteries, including standard, AGM, lithium (LiFePO4), and deep-cycle battery types.
- Battery Reconditioning: Helps extend battery life and improve performance with an advanced desulfation mode.
- Built-In Battery Tester: Quickly checks battery health for easy diagnostics.
- Idaabobo Polarity yiyipada: Prevents damage to your battery and vehicle if clamps are accidentally reversed.
- Agbara AC: This unit, with a 6-foot power cord and booster cables, must be plugged in during use.
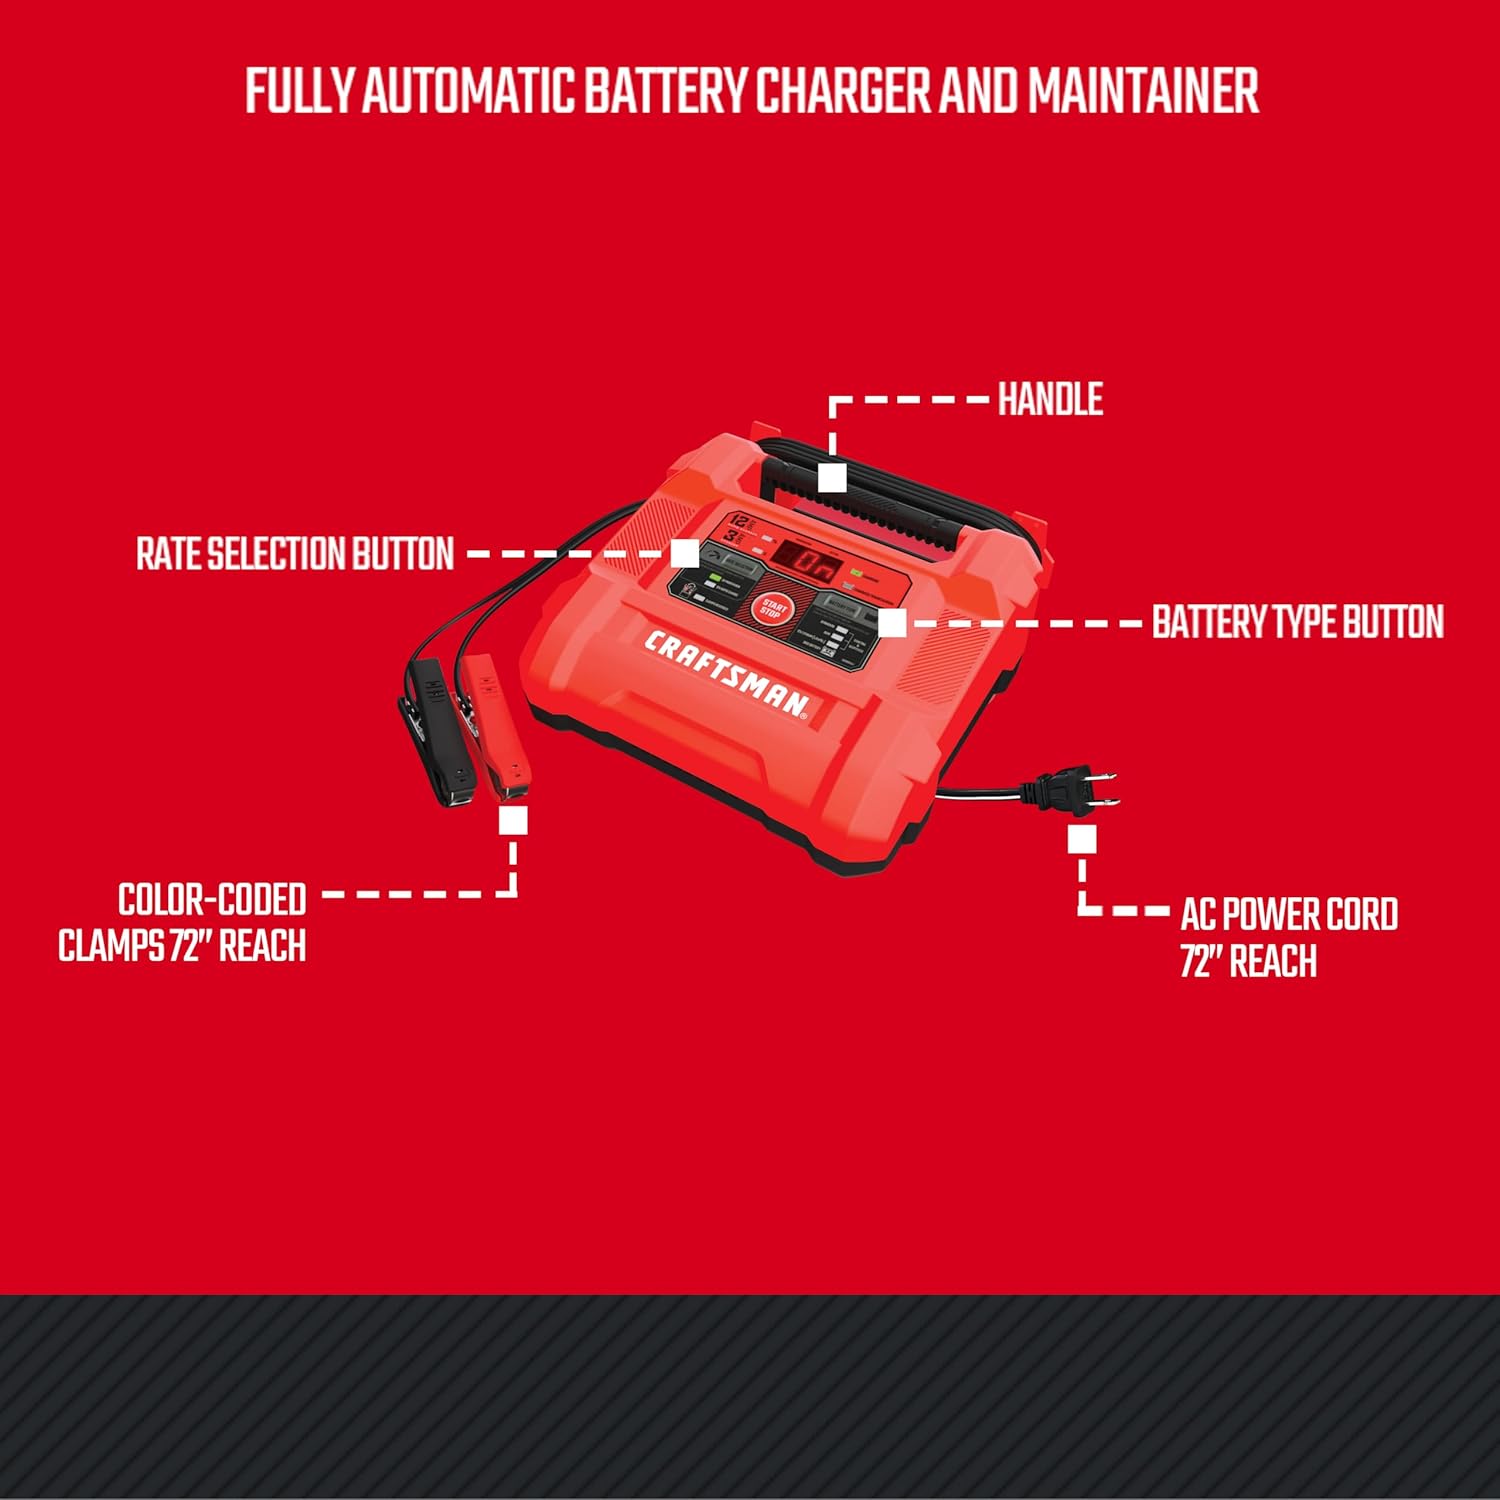
Image 4.1: Key components of the CRAFTSMAN CMXCESM258 battery charger.

Image 4.2: The charger features reverse polarity protection to prevent damage from incorrect connections.
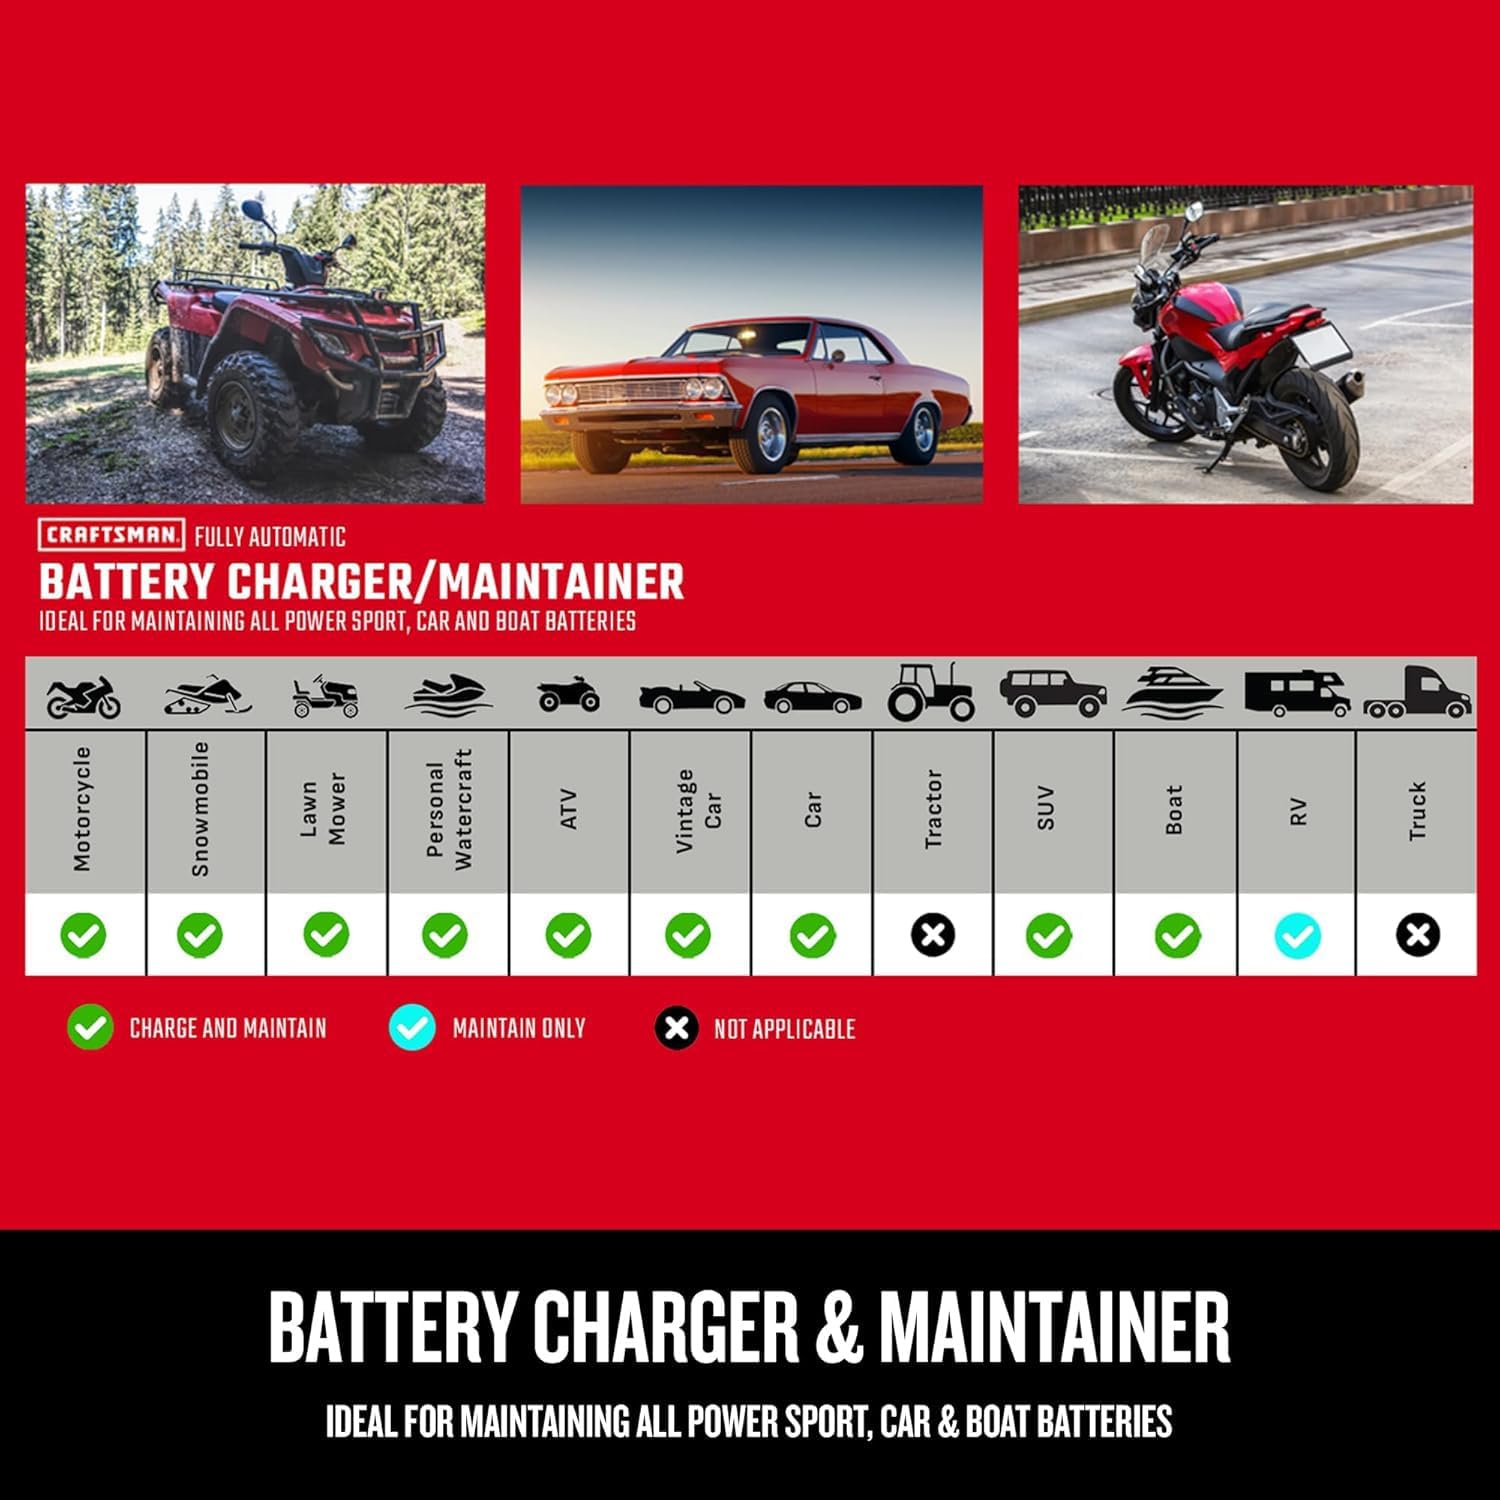
Image 4.3: Compatibility chart detailing supported vehicle types and battery functions.
5. Eto
Before connecting the charger, ensure the vehicle is turned off and in a well-ventilated area. Follow these steps for initial setup:
- Identify the battery terminals (positive and negative).
- Rí i dájú pé okùn agbára AC ti charger náà ti yọ kúrò nínú ihò iná mànàmáná náà.
- So pupa (rere) clamp si awọn rere (+) batiri ebute.
- So dudu (odi) clamp to the negative (-) battery terminal. For vehicles, connect the negative clamp to a non-painted metal part of the vehicle chassis away from the battery and fuel line.
- So okùn agbara AC ti ṣaja naa sinu ibudo ina AC 120V boṣewa kan.
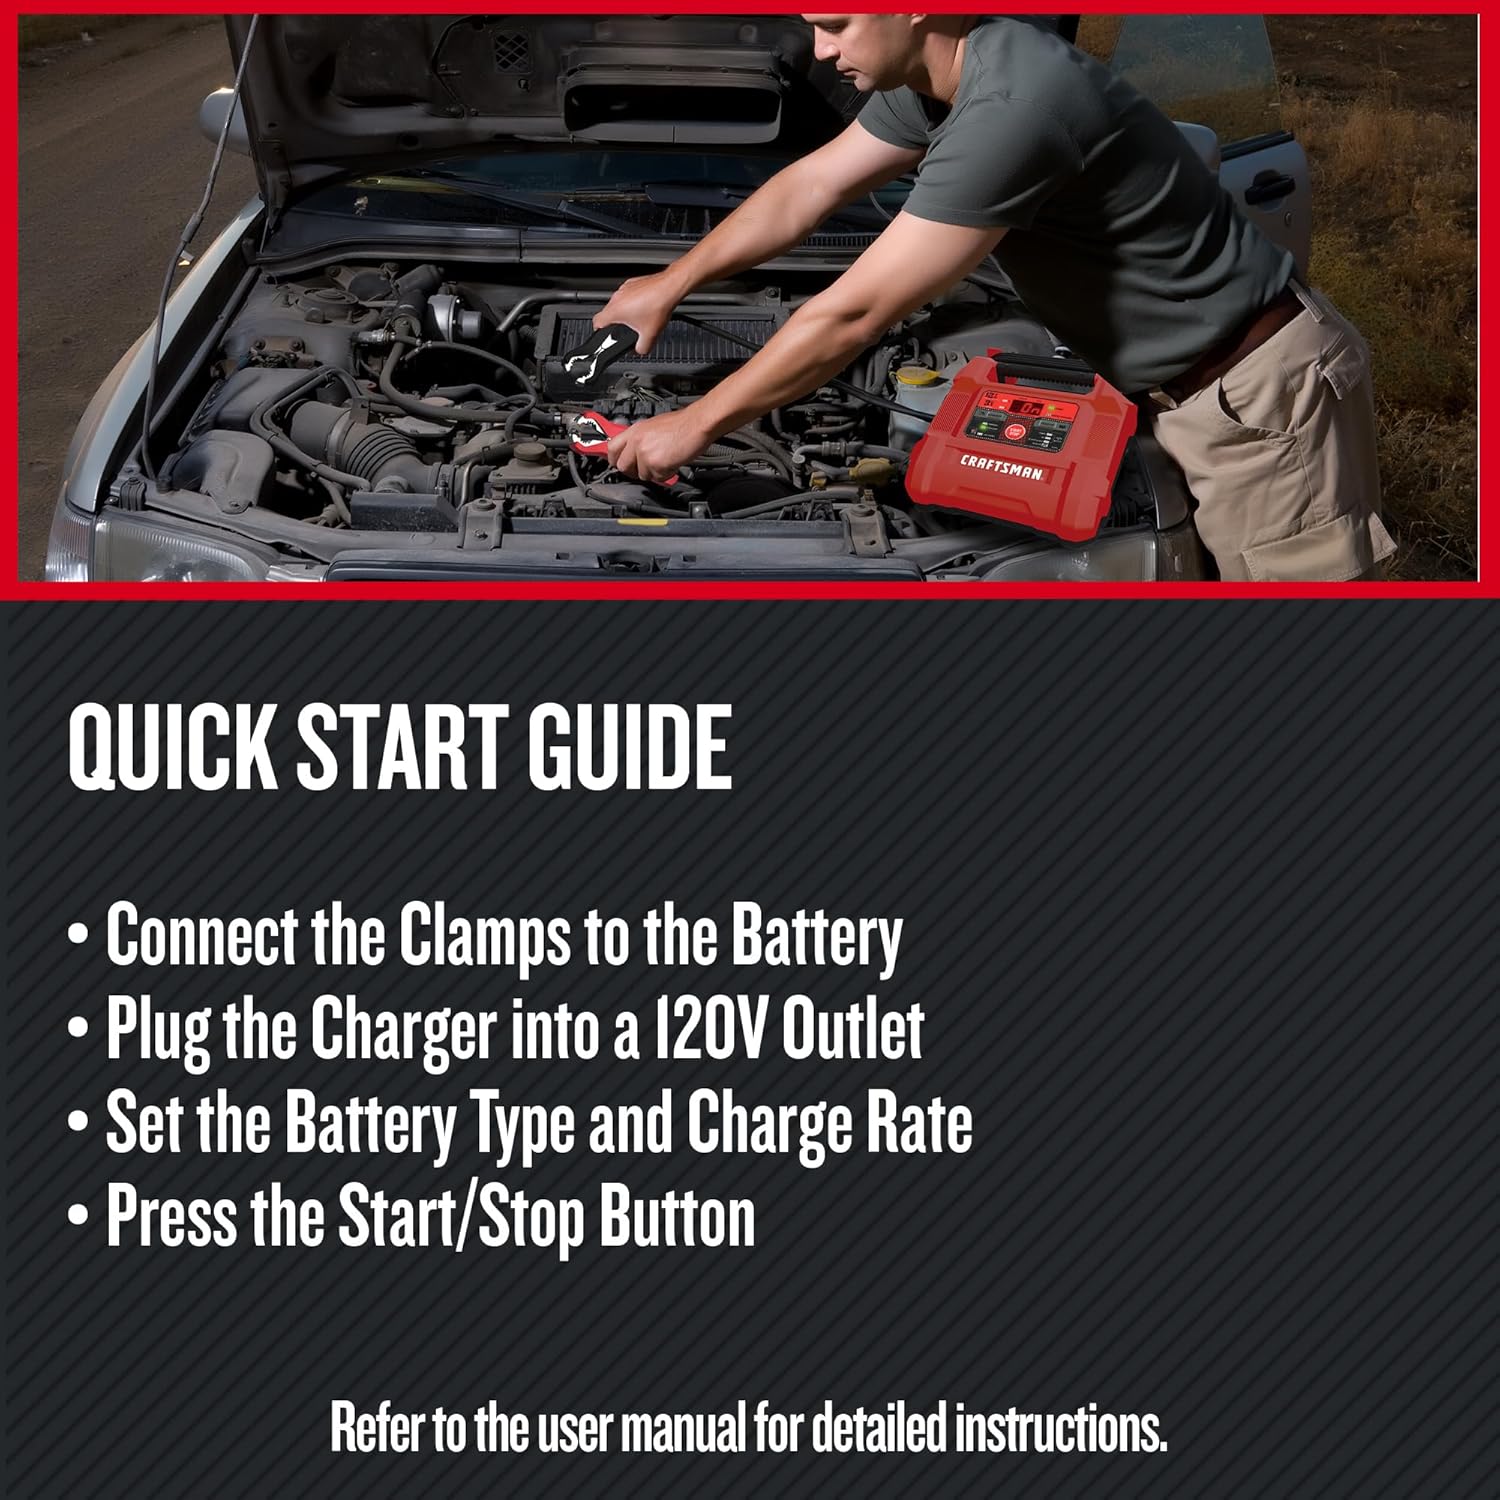
Image 5.1: Quick start guide for connecting and operating the charger.

Image 5.2: The charger requires a standard AC power connection for operation.
6. Awọn ilana Iṣiṣẹ
Once connected and powered, the charger will automatically detect the battery voltage. Follow these steps to begin charging:
- Yan Iru Batiri: Use the 'Battery Type' button on the charger's control panel to select the appropriate battery chemistry (Standard, AGM, Lithium, Deep Cycle).
- Select Charge Rate: Use the 'Rate Selection' button to choose the desired charging amperage (e.g., 12A for fast charge, 3A for maintenance, 2A for 6V).
- Bẹrẹ gbigba agbara: Press the 'Start/Stop' button to initiate the charging process. The display will show charging status and battery voltage.
- Bojuto Ilọsiwaju: The charger's display and LED indicators will show the charging progress.
- Pari gbigba agbara: Once charging is complete, the charger will automatically switch to maintenance mode or indicate full charge.
- Ge asopọ: First, press the 'Start/Stop' button to stop charging. Then, unplug the AC power cord from the outlet. Finally, disconnect the negative (black) clamp, lẹ́yìn náà ni cl rere (pupa) tẹ̀lé eamp lati batiri.

Image 6.1: The charger in use within an engine bay, demonstrating practical application.
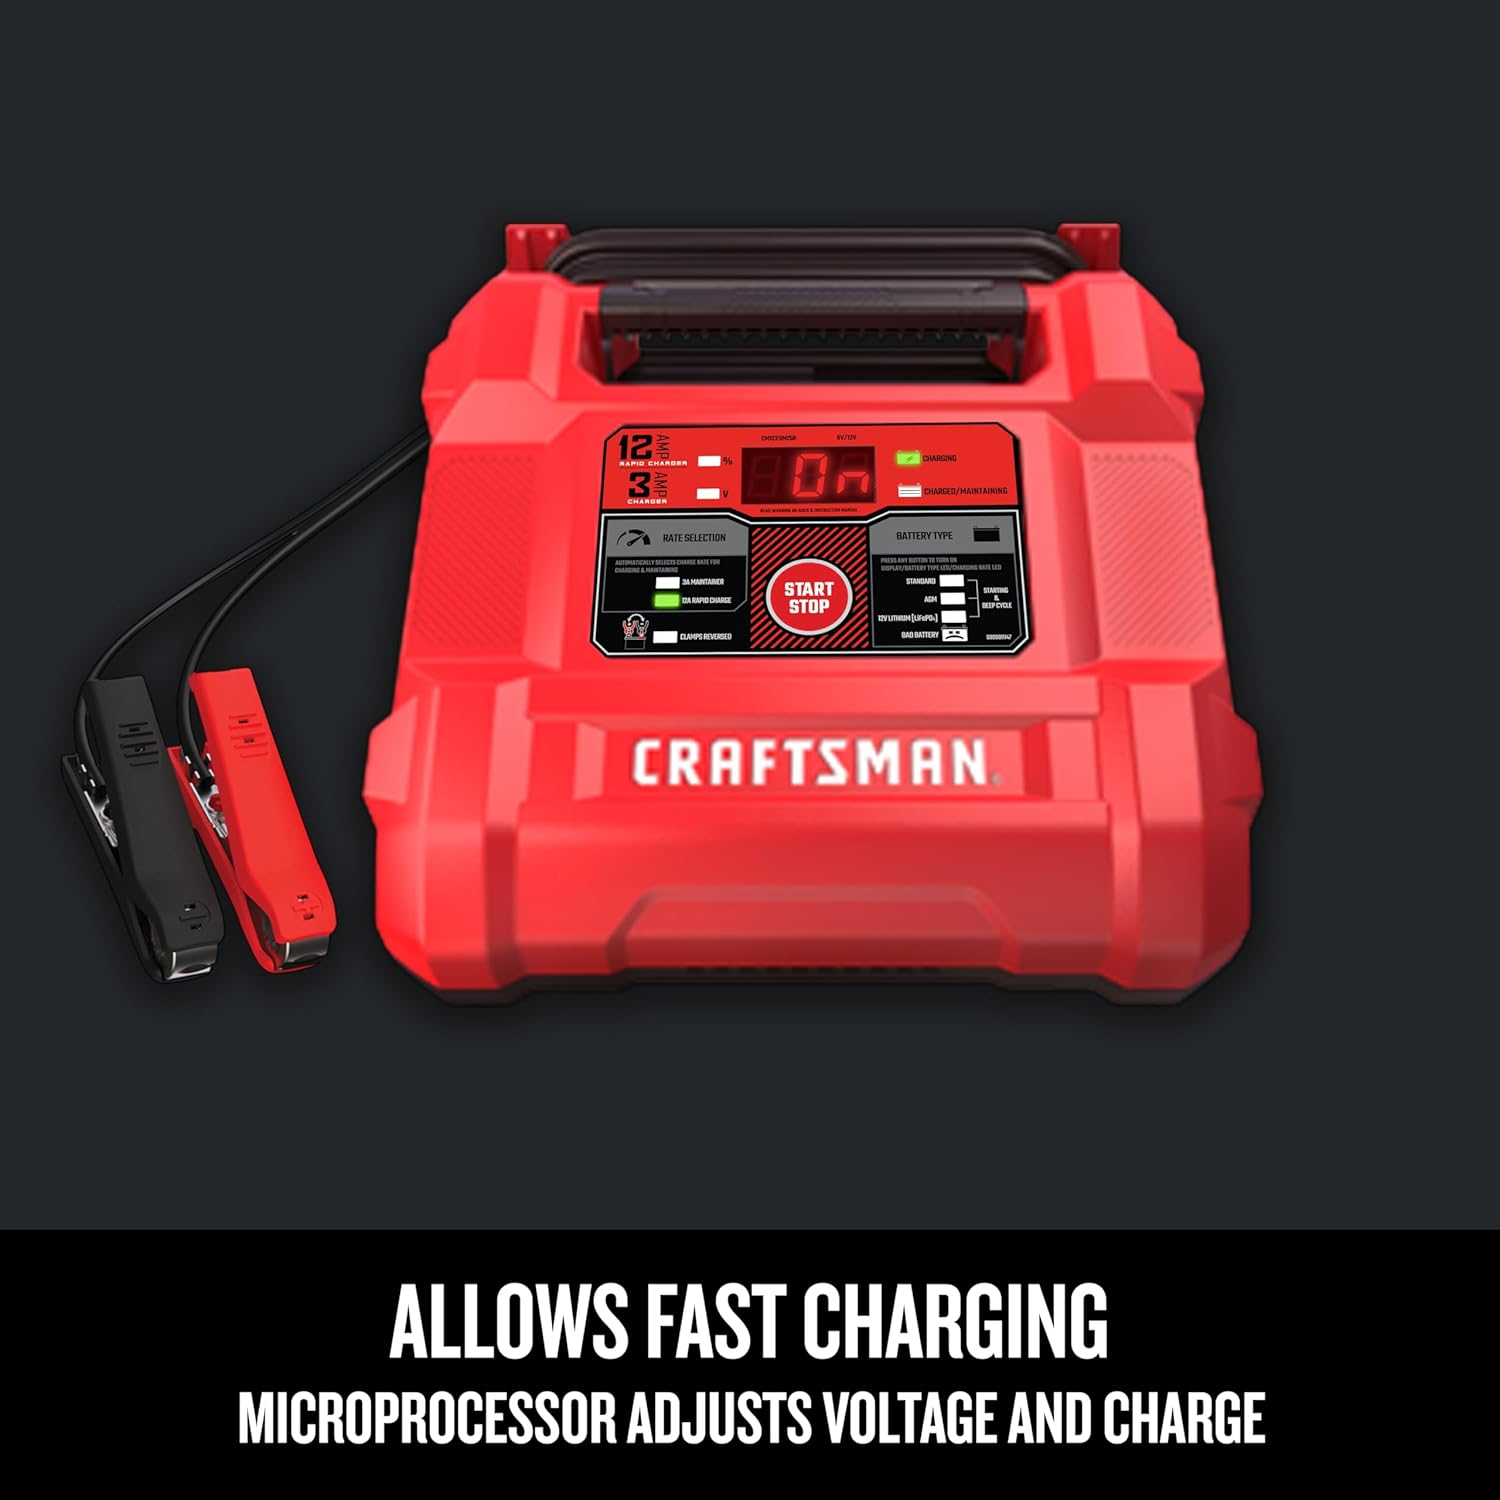
Image 6.2: The charger with its color-coded clamps connected, illustrating proper setup.
7. Itọju
Regular maintenance ensures the longevity and optimal performance of your battery charger:
- Ninu: Wipe the charger casing with a soft, dry cloth. Do not use solvents or abrasive cleaners.
- USB ati Clamp Ayewo: Periodically inspect the AC power cord, battery cables, and clamps fun eyikeyi ami ti ibaje, fraying, tabi ipata. Rọpo ti o ba wulo.
- Ibi ipamọ: Store the charger in a clean, dry, and cool place when not in use. Ensure cables are neatly coiled and not kinked.
8. Laasigbotitusita
If you encounter issues with your CRAFTSMAN CMXCESM258, refer to the following common problems and solutions:
| Isoro | Owun to le Fa | Ojutu |
|---|---|---|
| Ṣaja ko ni tan | No AC power; Faulty outlet; Damaged cord | Check AC outlet; Inspect power cord; Try a different outlet. |
| Ṣaja ko gba agbara batiri | Incorrect battery connection; Battery is severely discharged or faulty; Incorrect mode selected | Ensure correct polarity; Test battery health; Select appropriate battery type and charge rate. |
| Ifiranṣẹ aṣiṣe lori ifihan | Reverse polarity; Short circuit; Internal fault | Ṣayẹwo clamp connections; Disconnect and reconnect; If error persists, contact customer support. |
| Ṣaja naa gbona nigba ti o ba n ṣiṣẹ | Normal operation; Overload | Slight warmth is normal. Ensure adequate ventilation. If excessively hot, disconnect and allow to cool. |
If troubleshooting steps do not resolve the issue, contact CRAFTSMAN customer support.
9. Awọn pato
Detailed technical specifications for the CRAFTSMAN CMXCESM258:
- Brand:
- oníṣẹ́ ọnà
- Nọmba awoṣe:
- CMXCESM258
- Awọn iwọn ọja:
- 12"D x 16"W x 5"H
- Ìwọ̀n Nkan:
- 3.4 iwon
- O wujade Voltage:
- 12 Volts
- Iṣagbewọle Voltage:
- 12 Volts
- Idiyele lọwọlọwọ (Ampigba):
- 12 Amps
- Awọn ẹrọ ibaramu:
- Standard, AGM, Lithium (LiFePO4), Deep Cycle batteries for Gas and Diesel Vehicles
- Orisi Asopọmọra:
- Clamp
- Awọn iwe-ẹri:
- UL, FCC
- Olupese:
- Schumacher Electric
- UPC:
- 026666302586

Image 9.1: Physical dimensions and weight of the CRAFTSMAN CMXCESM258.
10. Atilẹyin ọja ati Support
The CRAFTSMAN CMXCESM258 Battery Charger and Maintainer is backed by a 1-year limited warranty. This warranty covers defects in material and workmanship. Proof of purchase is required for warranty claims. The warranty is not transferable. For detailed warranty information, please refer to the official CRAFTSMAN webojula.
For technical assistance, troubleshooting, or warranty claims, please contact CRAFTSMAN customer support through their official channels.

Image 10.1: Information regarding the 1-year limited warranty.